Creating Hyperlinks in Adobe Acrobat
While I was at the ABA Techshow, an attorney showed me a hyperlinked set of documents and exhibits his firm used in mediation.
This well-organized PDF apparently scared the pants off the large insurance company at the table. The result? A million dollar payday for the client!
One benefit of creating a nicely bookmarked and hyperlinked document is that the process itself captures your thinking about the best way to present the case.
In this article, I’ll cover the basics of hyperlinking in Acrobat.
However, to set the table, I’ll also cover how to combine several documents together. From there, we’ll use both bookmarks and links to achieve the objective of creating a well organized document.
Getting Ready
Here’s what we’ll learn:
- How to combine several documents together into a single PDF called a PDF Binder
- Ensure that the Bookmarks panel opens by default
- Create hyperlinks from text to various destinations
Combining the Files
Acrobat can combine various file types (Word, Excel, PowerPoint, PDF, TIFF) into a PDF Binder. A PDF Binder is a single, multiple page PDF document.
- Choose File> Create PDF> Merge files into a single PDF…
- Click the **Add Files **button at the top of the window and choose Add Files to add a file(s) to the binder
-

- Next, arrange your files in the correct order:
A)Click the Move Up or Move Down buttons to re-order files
B)Click the Remove button to take a file out of the binder
C) Click the Choose Pages button to select a range of pages from a file, instead of the entire file -
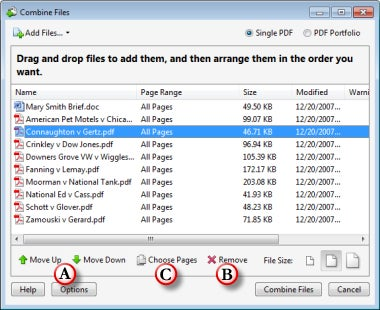
Change the Bookmark Name Acrobat creates bookmarks from the file names in the window. Right-click a file in the list and choose Edit Bookmark for File to enter a different bookmark name.
- Click the** Combine Files** button and Acrobat will combine all of the files into a single PDF.
– Acrobat will ask you to name the resulting file.
-Save it to a location of your choice. - The combined PDF will open in Acrobat.
Bookmarks and Open Options
The Bookmark panel is Acrobat offers a TOC-like interface to working with a document.
To show the Bookmarks panel:
Choose View> Navigation Panels> Bookmarks
Since Bookmarks are a primary navigation element in a binder, it is a good idea to set the PDF to open up the Bookmarks Panel automatically.
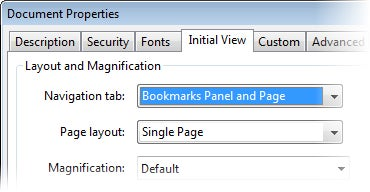
- Choose File> Properties and choose the Initial View tab.
- Set Navigation tab to Bookmarks Panel and Page
– Thissets the Bookmarks Panel to open automatically when the file is opened. - Set Page Layout to Single Page
-Better viewing experience for documents which have pages of different sizes. - Click OK and Save the document.
-
Creating Links
Follow these steps to create a link on text:
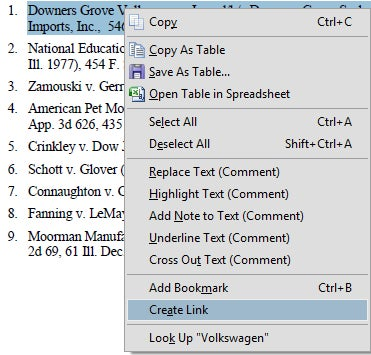
- Select the text where you want the link to appear with the cursor tool
-


- Right-Click and choose Create Link
-
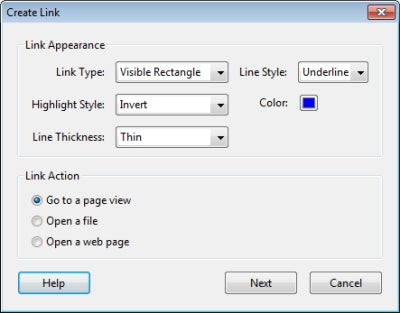
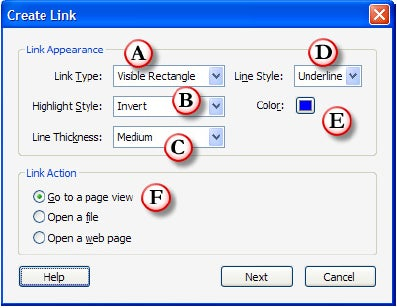
- Set the appearance of the link.
- Note:
- These settings are “sticky” so you’ll only need to do this for the first link.
- A) Link Type: Visible Rectangle
B) Highlight Style: Invert
C) Line Thickness: Medium
D) Line Style: Underline
E) Color: Set to Blue
F) Link Action: Go to a page view -
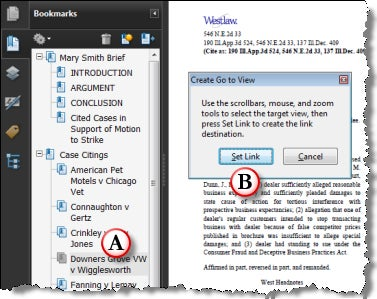
- The Create Go to View window appears.
- a. Click the Bookmark which is the destination for the link.
(Acrobat will take you to the destination page)
B. Click the Set Link button
( Acrobat returns you to the initial Page) -
Repeat as needed for additional links.
What if I don’t have a bookmark? Just use the page navigation tools to go to the page you want to link to, then click the Set Link button.
Further Thoughts about Links
Link Survivability within a single PDF=Good
In our example above, all of the links created were to a place within the same document. If you add or delete pages, Acrobat does the math and updates the links for you.
For example, if you create a link to an exhibit on page 58, then later delete page 1, the link will be updated to point to page 57.
If you delete the destination page for a link, the link will still be present, but will no longer resolve. When you click on it, nothing will happen.
You can even replace a page or range of pages (Document> Replace Pages) and the links will stay intact.
Linking between Separate Documents: Be Careful
It is possible to create links that refer to other PDF documents. In the Go to View step above, simply switch windows and then go to the page or bookmark in the destination document.
If your document set will change, link survivability is going to be a problem if you link between documents. PDF Document 1 doesn’t know if PDF Document 2 has changed.
Instead of linking to pages within a document, Acrobat can link to named destinations. Named destinations remain valid even if pages are inserted or deleted.
If this sounds like your scenario, check out Donna Baker’s excellent article on AcrobatUsers.com.
Industrial-strength Link Management
Some large law firms create massively linked sets of documents which can get difficult to manage in Acrobat alone.
Fortunately, there are two excellent third-party plug-ins that can automate many linking and bookmarking functions:
For example, these plug-ins can convert regular links to named destinations, audit links to ensure they are valid, redirect links to new locations and lots more.