How do I prevent someone from forwarding a PDF?
Attorneys are ethically bound to rigorously defend the confidentiality of clients.
For that reason, legal professionals often want to limit the distribution of documents. Accordingly, I received the following email from at attorney this week:
Is there any way I can prevent someone from forwarding a PDF I send to them?
While it is impossible to prevent someone from forwarding a file, you can prevent the next person from opening it.
How?
Can’t I use passwords?
It is easy to password protect a PDF document. (See Password Security using Adobe Acrobat 8 or 9 ).
Anyone who enters the correct password can open the document. However, that does not prevent the recipient from giving the password to another party who could, in turn, open the document.
Public Key Cryptography
Public Key security is a great way to limit who can open PDF documents. Acrobat uses a mathematical algorithm to create a related pair of keys— a secret private key and a public key.
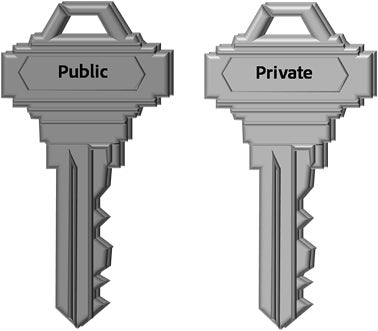
Public Key security may also be called PKI (Public Key Infrastructure) or Certificate Security.
Here’s how it works in practice:
- The parties exchange public keys using Acrobat or Adobe Reader
- You encrypt a PDF using the public key of the recipient(s)
- The PDF can only be decrypted with the corresponding private key of your intended recipient
Read on to learn how to exchange PDF documents and prevent forwarding.
Coordinating Certificate Security
In order to prevent the recipient from forwarding the document, you will need to exchange Digital IDs (your public key) with them.
Acrobat offers Wizard-based processes that will allow you to do the following:
- Create your own digital ID
- Exchange Digital IDs with the recipient(s)
- Encrypt a document so that only your recipient(s) can open it
Step 1: Create a Digital ID
You’ll only need to create your Digital ID once. Here are the steps to create it.
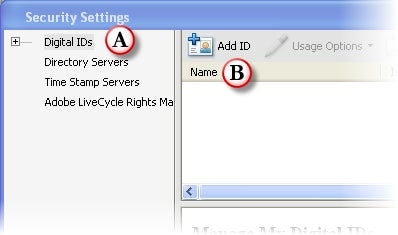
- Choose Advanced > Security Settings
A) Select Digital IDs on the left
B) Click the Add ID button -
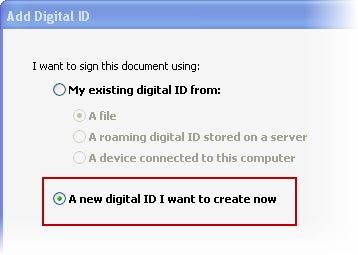
- Select “A new digital ID I want to create now” and click the Next button.
-
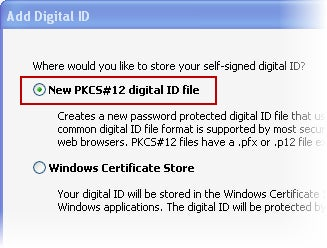
- Choose “New PKCS#12 digital ID file” and click the Next button.
-
- Enter your contact information and click the Next button.
-

- Type a password for your digital ID. You will need to re-enter the password for confirmation. Click Finish.
-
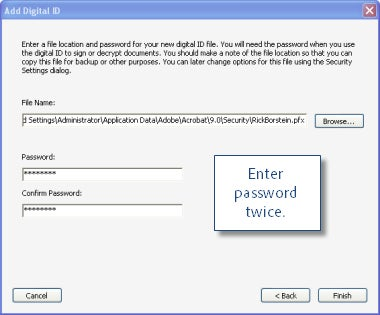
#### A note about your password …Use a good password that you will remember. Passwords are case-sensitive and must contain at least six characters. The following characters are not allowed in a password: "" : ! @ # $ % ^ & * , | \ ; < > _ .
Step 2: Exchange Digital IDs
Now that you have created a Digital ID, you’ll need to exchange your public key with your intended recipient(s).
Starting the Exchange
Follow these steps to send your digital ID and request one in return:
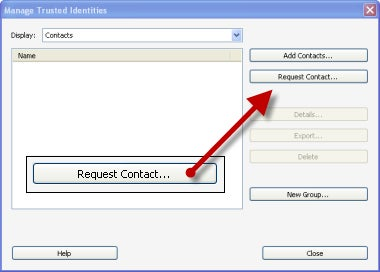
- Choose Advanced > Manage Trusted Identities and click the Request Contact button.
-
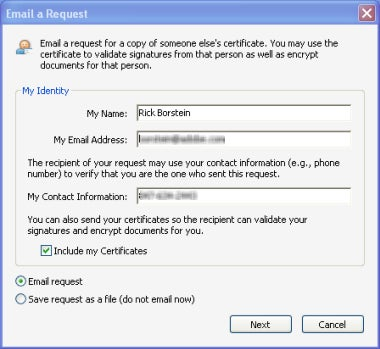
- Type your name, email address, and contact information.
– Ensure that “Include Certificates” is checked
– Click the Next button -
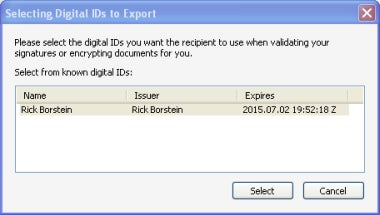
- Choose your Digital ID and click the Select button
-
- A window opens which allows you to compose an email to the recipient. You may wish to customize the message with something more personal.
– Click the Email button to send your Digital ID by email. -
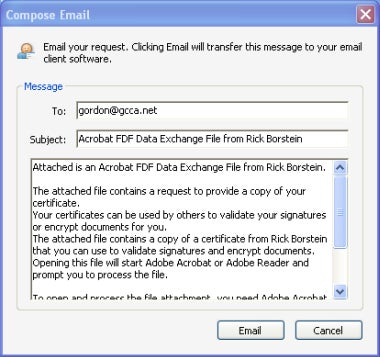
#### Tip for Better CommunicationTalk to your intended recipient ahead of time about why you need to exchange Digital IDs. Most folks do not have experience with encryption, so you may need to explain the process.Acrobat will send an email with an FDF file which contains your Digital ID’s public key.
Adding the Recipient’s Digital ID
When your recipient receives your Digital ID, Acrobat will follow the same process below. If your recipient doesn’t already have a digital ID, they will be prompted to create one.
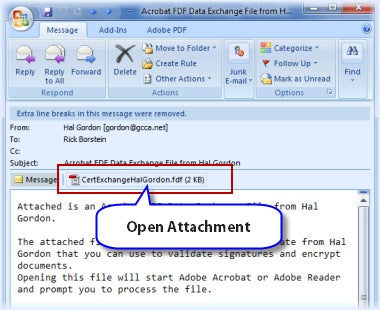
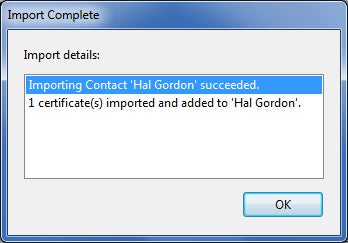
The end-result is that you will receive an email just like the one you sent from Acrobat with your recipient’s digital ID.
- Check your email. You should receive an email similar to the one below.
- Open the attachment (an FDF file) contained in the message.
-
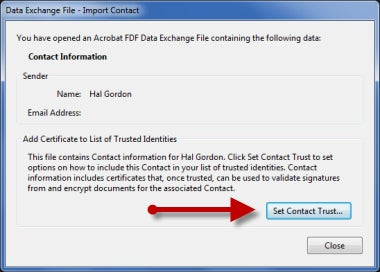
- Switch to Acrobat. The following window will appear. Click the **Set Contact Trust **button.
-
- Enable the check box, “Use this certificate as a trusted root” and click the OK button.
-
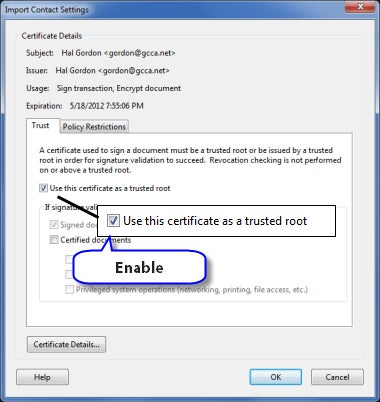
- The certificates will be added to your Acrobat trust list.
-
Step 3: Encrypting a PDF that will only open for your intended Recipient
Now that you have exchanged certificates, you can encrypt a file so that only your recipient can open it.
#### Encrypt and Send a CopyYou may wish to encrypt a copy of the original file instead of your original one. See Backup Your Security Settings below for why . . .
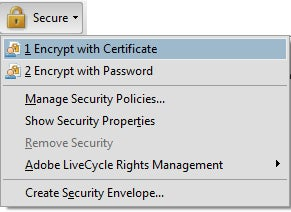
- Open Acrobat and the PDF you wish to encrypt with a digital ID
- Click the Secure button in the main toolbar and choose “Encrypt with Certificate”
-
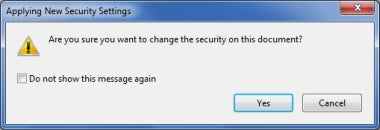
- Click Yes on the next screen . . .
-
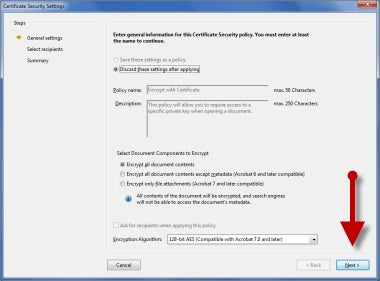
- Click the Next button
-
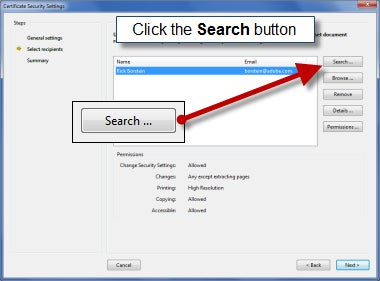
- Click the Search button. This will allow you to add recipients.
-
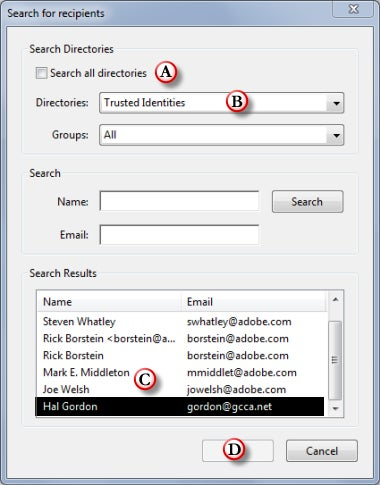
- The Search window opens. Here’s what to do:
A) Deselect “Search all directories”
B) Set Directories to “Trusted Identities”
C) Locate your recipient(s) from the list
D) Click OK -
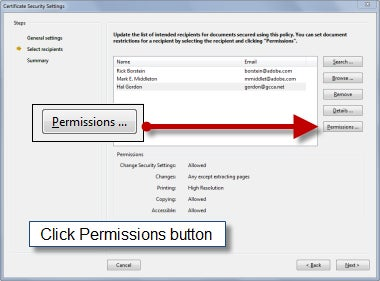
- If you want to limit what your recipients can do with the PDF (e.g. no printing, etc.), choose a recipient, then click the Permissions button
-
-
Select the permissions each recipient may have on the document such as printing, commenting, etc. Each recipient may have a different set of permissions.
– Click OK in the Permissions Settings window
– Click Next when complete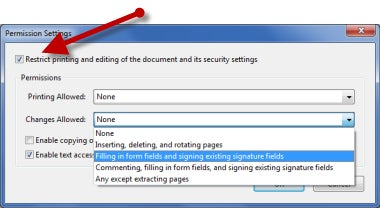
- Click the Finish button then click OK.
Your document may now be distributed to your intended recipients!
Backup your Security Settings!
The Digital ID you create is unique to you.
If you buy a new computer, or have to rebuild your existing one, you will need to re-install your Digital ID.
It is very important that you backup your certificates. Take note of this scary extract from the Acrobat 9 Help file:
If a self-signed digital ID is deleted, all PDFsthat were encrypted using the certificate from that ID are foreverinaccessible.
Here’s how to backup your Digital ID:
- Choose Advanced > Security > ExportSecurity Settings.
- Click OK to export all of your settings
- Click the Export button in the upper right of the window.
- Select Password Security and click OK.
-
Enter a password you will remember and click OK.
You will need to confirm the password.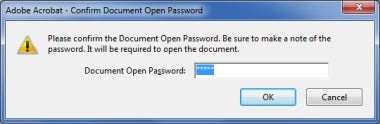
- Enter the password for your Digital ID to certify the file.
- Click Sign.
- Give the file a name and save in the location of your choice.
- Move the BACKUPNAME.acrobatsecuritysettings.pdf file to a thumbdrive or other safe place.
