Troubleshooting FrameMaker Content Conversion in RoboHelp – Part 2: Images
I hope my first post of the series was useful. In the second post of the series, I am going to discuss the quality of images generated by RoboHelp when FrameMaker content is brought (import/link) in RoboHelp. I will address the common misconceptions that occurred in this area by recommending proper workflows. I will also explain what’s going on behind the scenes for those having geeky brains.
**Why are my images still dull after improvements in TCS 3?
**Adobe Technical Communication Suite 3 boasts about improved image conversion from FrameMaker to RoboHelp. However, many users are still not able to find any improvement and their images still appear to be of degraded quality.
The fact is, the image conversion process has been greatly enhanced in TCS 3 to achieve much better quality of images as compared to previous versions of TCS. Let’s see how it works.
TCS 3 now provides a new route for image conversion where an anchored frame inside a FrameMaker document is converted to an image through Distiller. In order to turn on this route, RoboHelp provides a special checkbox under image settings.
In order to turn on/off this setting:
- Go to File->Project Settings
- Go to Import tab
- Click Edit button for FrameMaker conversion settings to open Conversion Settings dialog
- Go to Image settings
- Check/Uncheck the check box for Use Distiller to Generate Image
To use the new conversion route, turn on the setting. The check box is checked by default in a newly created RoboHelp project. Please verify the setting in an upgraded project.
The image quality obtained should be of high quality. However, one may still argue that if the distiller route is used why is the image quality not same as PDF generated through Acrobat Distiller from FrameMaker and may it still find it of degraded quality.
Here is the reason why? And how can it be made to match the PDF quality?
For those who may not be interested in exploring the answer to “Why?”, here are the quick tricks that may be applied.
- Prepare images as per the media(web or print). For example, if you wish to have good quality images on web and are not concerned about the print quality on paper when printed from FrameMaker, import images at 96DPI (or your screen DPI) inside FrameMaker.
- Set distiller PDF Job options setting to “High Quality” inside FrameMaker.
- Place a marker in the anchored frame.
__________________________________
———————————————————–
For Geeks:
Here is the explanation for those who are interested to know things going on behind the scenes. Further reading may be skipped by those who are looking for a quick solution which is described above.
Every display device (e.g. computer screen) has a DPI (Dots per inch or Pixel per inch) setting. This DPI setting is determined from the Screen physical dimension and the display resolution. For example, if the screen size is 17” (diagonal 17”, W X H = 13.27” X 10.62”), and the resolution is 1280X1024, then the DPI can be roughly calculated as 1280/13.27 = 96 DPI (approx)
Now an image is defined in terms of pixel dimensions. It has no DPI setting. DPI setting of an image is a meaningless notion. Each image can be viewed at different DPI settings. There could be a recommend DPI for an image at which it should be displayed on a particular medium or device. Different medium or display devices have different requirements for DPI settings for displaying images.
For example, image resolutions requirements for printing on paper is quite high(or the order of 200-300 dpi) as compared to requirements for Web (normally 96 dpi). Even on web image requirements could be different for mobile devices and desktop.
When an image is imported in FrameMaker, FrameMaker asks for DPI setting which defines the resolution at which the image should be displayed when published. In other words, it asks the user to provide the setting to render each pixel of the image on the computer screen. If the screen resolution is 96DPI and the image scaling setting is also 96DPI, one pixel of the image is mapped to one pixel on the screen. If the image scaling setting is set to 192dpi on the same screen, 2 pixels of the image is mapped to one pixel on the screen thus scaling down the image. When this image is converted to PDF through Acrobat Distiller, the entire image is scaled down to display it at a smaller size. However, there is no loss of pixel information. The entire pixel information is preserved so that when the PDF document is zoomed in, the pixel information is used to scale up the image thus maintaining the quality of the image. A high DPI value (say 200DPI or 300DPI) is recommended for good print quality on paper.
However, a similar functionality is not available in the online(web) world when the HTML is viewed in a browser. Browsers do not do a very good job of scaling images. RoboHelp understands this limitation of browsers and recreates the image at the resolution mentioned for the image in FrameMaker while importing the image. The recreated image does not contain extra pixel values as that present in the original image. Thus, when the image at normal size in a browser is compared to the scaled up in an image in a PDF, it looks degraded in quality though they more or less look same when viewed at the same zoom value.
This can be explained through the following image snapshots. The images look more or less same in the three cases.
https://blog.adobe.com/media_bfd9b5adbcab23964a03a675794bf4627841b008.gif
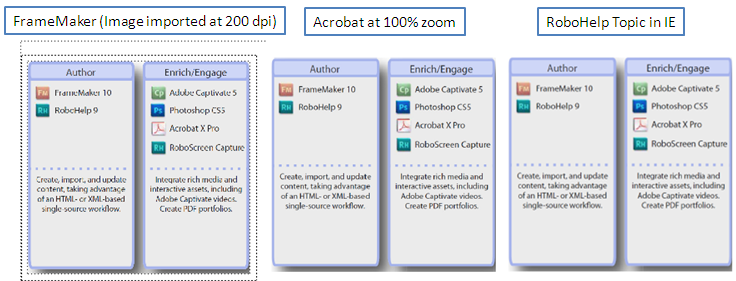
https://blog.adobe.com/media_6fab2560eb1a6048aec2c2293c5869151a939fcb.gif
The difference appears when the image is zoomed.
https://blog.adobe.com/media_8f42a78958bdb432c04c3e4eeaf9f57d0e3ce465.gif
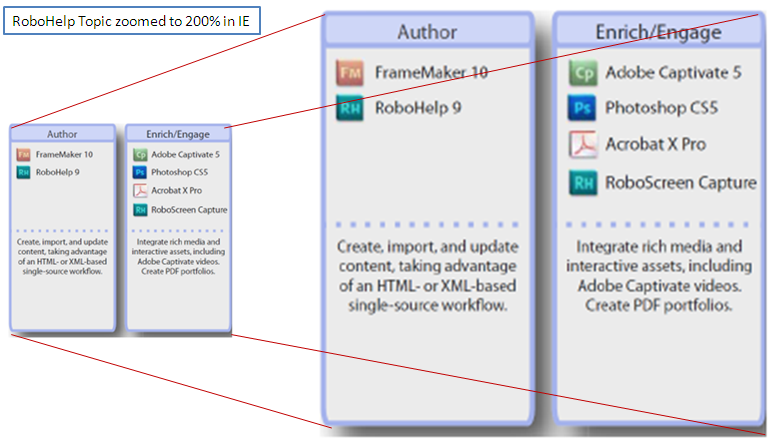
The solution to this problem is to avoid scaling of an image on a particular medium and prepare image as per the medium. This can be ensured if the DPI mentioned during the import of images in FrameMaker is same as the screen DPI at that moment. Normally, today’s screens display at 96 DPI. Hence, this should be the preferred DPI setting to be specified while importing images in FrameMaker. Following this guideline, should greatly improve the image quality.
https://blog.adobe.com/media_221f6528878557110022f68f15c4ade95002996c.gif
NOTE: However, there is precaution to be followed. As explained above there is a difference in the print and web paradigm. Where print needs images placed at a very high DPI value, web needs images to be inserted at screen DPI value. So, if your images in FrameMaker are going to be printed on paper, do on apply the rule of 96 DPI. Otherwise, the images in print may get distorted.
Another trick that can be applied is to set the distiller PDF Job options setting to “High Quality” inside FrameMaker. This sets the distiller to generate a high-quality image which is used by RoboHelp during image conversion.
Lastly, a marker can be placed in a text box inside the anchored frame so as to ensure that RoboHelp follows the distiller route and does not try to intelligently recreate the image without distiller.
All these tricks should help achieve a high-quality image with acceptable results. I hope this explains the image conversion route followed by RoboHelp and you find it useful to resolve the image conversion difficulties faced by you.
Mayank Agrawal, RoboHelp Engineering Team
This blog post is part of a 3-part Series: