Creating a “Near to PDF/A” PDF Setting
Since the Federal Courts have announced their intent to require PDF/A for court submissions, I’ve received a number of inquiries along these lines:
Would it be a good idea to always create PDF/A documents?
I do not advise law firms to use PDF/A all of the time. PDF/A view mode in Acrobat will not allow you to do many of the day to day edits you need. For example, if you want insert pages in a PDF/A document, PDF/A View mode will prevent the change.
Instead, I advise creating PDF documents using a PDF Setting which is easy to conform later to PDF/A.
Creating an “Near PDF/A” Setting
Using the steps below, you will modify the existing PDF/A setting provided by Acrobat to create a new one.
- In Acrobat, choose Edit> Preferences.
- Click on the Convert To PDF category item in the list at left
- Select Microsoft Word from the middle list
-
Click the Edit Settings button

- In the Adobe PDF Settings window, make sure that PDF/A-1b:2005 is selected, then click the Edit button:
-

-
Choose the Standards section in the Edit Settings window:

-
At the top right, under Standard Reporting and Compliance, set the Compliance Standard to None.

-
Click the **Save As . . . **button:
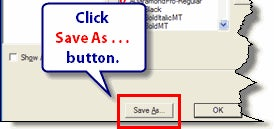
- Name the file. I named mine_ Near PDFa.joboptions_
-
The PDF Setting file will be saved in the users default Acrobat PDF Settings folder:

- Click Save, then OK twice.

https://acrobat.com/#d=kbXyB*WhF4d4MJm-Q--R6w
Download the Near PDFa Setting File I’ve already created the Near PDFa setting. You can download the setting and save it in the location below instead of making your own.Near PDFa Job Setting
**Where do copy the settings file to? **WinXP C:\Documents and Settings\USERNAME\Application Data\Adobe\Adobe PDF\Settings Win7 C:\Users\USERNAME\AppData\Roaming\Adobe\Adobe PDF\Settings
Multiple Ways to Create PDF
Acrobat offers a multitude of methods for creating PDFs from Office documents:
- Via the AdobePDF Print driver
- Via the PDFmaker buttons installed into popular office applications
- By combining native documents using the Combine function in Acrobat
Each approach will require some set-up to ensure that all documents created have fonts embedded.
Setting the Near PDF/A Setting for the Adobe PDF Print Driver
Follow these steps to set the Adobe PDF Print Driver to always use the “Near PDFa” setting:
-
From any application, choose File> Print
A) Select the Adobe PDF from the Name list.
B) Click the Properties button
**Your Print Window might look Different . . . **: The print window may look quite a bit different depending on the application you use and whether you are on XP or Windows 7. Look for a button or link labeled Properties, Print Options, Print Properties or Printer Properties
-
A) Choose the Near PDFa setting from the Default Settings list
B) Click OK.
Setting Embed All for the PDFmaker Buttons installed in Office Applications
Acrobat Standard installs 1-button PDF conversion buttons into popular Office applications such as Word, Excel, PowerPoint, and Outlook. Acrobat Pro additionally offers support for Visio, Project, Access, Publisher and Internet Explorer.
Follow these steps to set an Office PDFmaker button to always use the Near PDFa setting. The example below is from Microsoft Word.
- Launch the application of your choice, but do not open a document.
- For Office 2007 and 2010 apps such as Word, Excel or PowerPoint, choose the Acrobat ribbon then click Preferences
-

- For Office 2003 apps such as Word, Excel or PowerPoint, Choose AdobePDF> Change Conversion Settings
- Choose Near PDFa from the Conversion Settings list
-

- Click OK
Setting Embed All for Combine or Create from Desktop in Acrobat
Acrobat allows users to convert several different kinds of native files using the Combine function or via the desktop.
When conversion takes place using these direct methods, you need to specify the desired conversion setting in Acrobat Preferences for each application supported.
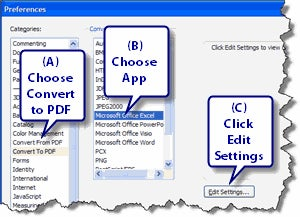
- In Acrobat, choose Edit> Preferences
A) Click on the Convert to PDF category from the list at left
B) Choose an application such as Microsoft Word, Excel, or PowerPoint from the list
C) Click the Edit Settings button -
- In the Edit Settings window, change the Conversion Setting to “Near PDFa”
-

- Click OK
- Repeat for all applications
Related Font Embedding Issues
The main reason to use this setting is that it embeds all fonts and sets the color space correctly for PDF/A conformance later on.
Occasionally, you may run into issues where certain fonts cannot be embedded.
Corrupt Fonts
Fonts can be complex beasts and occasionally become corrupted. Try replacing the fonts on your system with known, good versions of fonts.
Non-Embeddable Fonts
Some fonts contain a “Do Not Embed” flag placed in the font by the font manufacturer as a license restriction.
OpenType fonts from Adobe do not have embedding restrictions, but some other manufacturers may not allow their fonts to be embedded. The only workaround is to replace the typeface with one without any restrictions.
On Windows 7, you can see if a TrueType font may be embedded by following these steps:
- Click the Start button and open the Control Panel
- Double-click the Fonts category
- Right-click on a font and choose Properties
- Click the Details tab. If Editable is listed, then the font may be embedded:
-
