Publish your DITA content in FrameMaker 11 with the DITA OTK
Hello Framers,
Hope you are well. Today, I am happy to announce the availability of a plug-in that enables you to take your DITA content in FrameMaker and publish it via the DITA Open Toolkit (OTK). As many of you would know, DITA OTK is a set of software tools, originally developed by IBM®, for publishing DITA to a variety of formats, including HTML, Microsoft HTML Help (.CHM) and Java™ Help. If your content conforms to the DITA structure, you can use the DITA Open Toolkit to generate a wide variety of outputs.
Below you will find more information on how to use DITA OTK with FrameMaker 11. The integration has been certified with version DITA-OT1.6.3
Working with the Open Toolkit plug-in for FrameMaker
The Open Toolkit plug-in for FrameMaker lets you manage publishing through the FrameMaker user interface. The plug-in provides a DITA menu for publishing multiple outputs through the DITA Open Toolkit, using the default options or your customized builds. Before starting with this, please make sure all dependent installation and environment variable settings has been done successfully. For details, please refer to end user documentation.
Installing the DITA OTK
- Download the plug-in from the FrameMaker devnet page here . Unzip the contents
- Extract the openToolkit.dll in fminit folder in your FMHOME directory.
- Mention the following line in [ApliClients] section of maker.ini “ditaOpenToolkit=Standard, DITA Open Toolkit, FMHOME\fminit\openToolkit.dll, structured”
- Place PROJECT.xml in FMHOME\fminit\ditafm folder.
for more information, see Appndix 1 of the end user documentation
Generating output from DITA map
- Open a ditamap file.
- If prompted, select the structured application DITA-Map (1.1 and 1.2 have different structured applications), and click Continue.
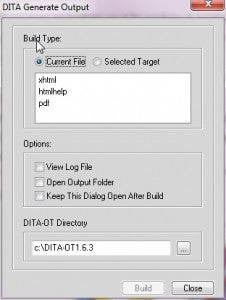
- Select ditamap in FrameMaker and click Dita->Generate Output. Dita Generate Output dialog will appear.(See the screenshot below)
https://blogsimages.adobe.com/techcomm/files/2012/12/11.jpg
There are two options, Current File and Selected Target in the DITA Generate Output dialog box:
- Current File uses a pre-configured Ant script: This script generates output from a topic that is currently open or from the map file to a sub-folder of the folder containing the topic. On a completely configured system, you can generate output without having to modify the Ant script.
- Selected Target lets you specify an Ant script you’ve created. You must set up your own Ant script and reference the script in the ditafm.ini file. The list of selected targets does not appear until you define them in the Ant script and reference them in the ditafm.ini file.
- Select the Current File option.
- Select the output you want to generate e.g. xhtml.
- Select the path where the DITA Open Toolkit is installed.
- Click Build.
Viewing the output
To view the output, go to the output folder, which is in the same folder where your ditamap is. Furthermore, you can also have the output folder open automatically when the build is complete, through a setting in the DITA OTK dialog. Now, you can browse to the published output file and view it. For example, for xhtml output, double-click the index.html file, which is located in the output folder.
The integration with DITA OTK provides one more path to our FrameMaker users for publishing their DITA content to multiple outputs. We hope that you will find this integration useful. Please let us know your feedback through the comment section below.
Regards,
Kapil Verma
Sr. Product Manager – Adobe Technical Communication Products