HTML5 Publishing Series Post #2: Creating multiscreen HTML5 output using RoboHelp 10
Hello Everyone,
Hope all of you are doing well. This is the 2nd post of the HTML5 Publishing Series. Here is the link for those of you who missed the first one.
In this post, I will show you how, in just four steps, you can create visually stunning help systems for a variety of devices using RoboHelp 10.
Step 1: Create/Open a project
It goes without saying that the first step is to choose the content for which you want to create multiscreen HTML5 output. For the purpose of this post, I am using the “Global Site Consult” project, which is shipped as one of the samples along with RoboHelp 10. You can either open the project from the “Starter” window, or you can open the project from
My Documents\My RoboHelp Projects\Adobe RoboHelp 10\Samples\Global Site Consult
RoboHelp 10 provides separate SSLs for each device enabling you to create different outputs for a variety of devices.
Step 2: Set-up screen profiles
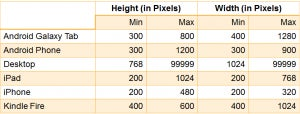
Screen profiles in RoboHelp are used to specify the screen resolution (in pixels) and the browsers of the device for which you want to create the output. By default, RoboHelp ships 6 screen profiles which are as follows:
https://blogsimages.adobe.com/techcomm/files/2013/02/Table-1.png
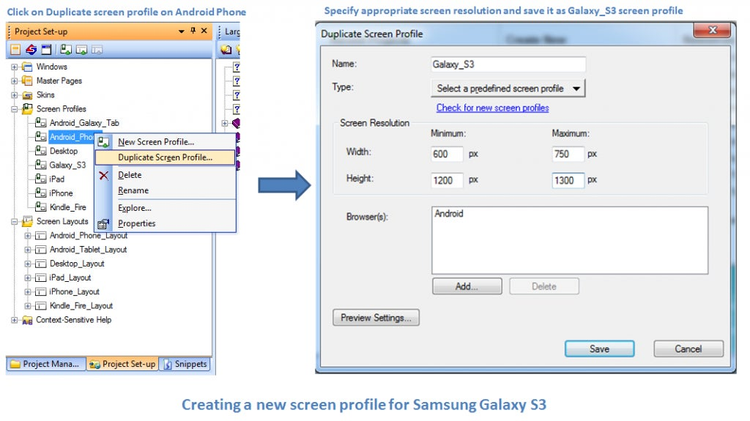
RoboHelp 10 also allows you to create your own screen profile. This feature is very useful since every now and then a new device comes with a different screen resolution which might not map to any of the screen profiles. For example, Samsung Galaxy S3 has resolution of 1280×720 pixels. Clearly it does not map to any of the predefined screen resolutions provided in RoboHelp 10. For such devices, it is advisable to either create a new screen profile or modify existing one.
Please note that Desktop is the default profile, which means that an end-user will see the desktop layout, if they are browsing the help system on a device whose resolution does not match any of the predefined screen profiles.
https://blogsimages.adobe.com/techcomm/files/2013/02/Screen-Profile.png
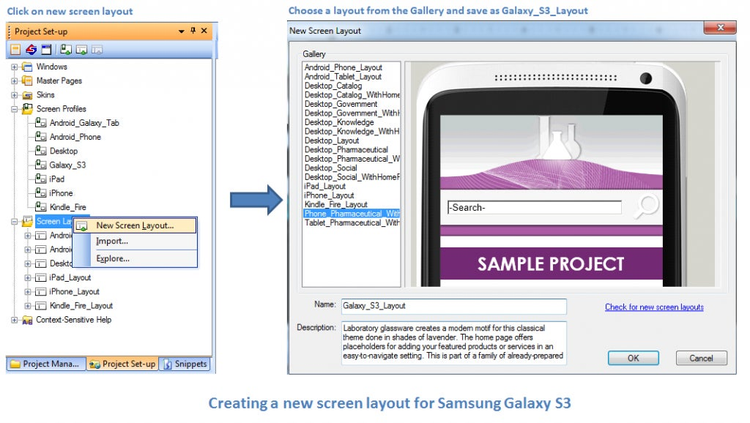
Step 3: Set-up screen layouts
Screen layouts define the look and feel of your content as it would appear on the devices. Each screen profile should be mapped to one of the screen layouts. RoboHelp 10 ships a number of screen layouts from which you can choose your preferred one. If you wish you can also import a custom screen layout.
https://blogsimages.adobe.com/techcomm/files/2013/02/Screen-Layout.png
Step 4: Generate HTML5 output
This is the final step to generate the HTML5 output. Click generate on multiscreen HTML5 SSL in the single source layout pod. In the dialog box that appears, map various screen profiles with screen layouts that you set-up in step 2 and step 3. In the mapping dialog box, you can also change the default profile from Dektop to any profile of your choice. Depending on your need, you may omit some of the outputs and retain only those which you need. For each screen profile, you can also specify content optimization settings such as enabling zoom, or converting absolute image and table size to relative size etc.
https://blog.adobe.com/media_348c80b50d29d05dfb9cd0685c80e6eace64778d.gif
Once you click on “Save and Generate”, the Galaxy_S3 output would be generated.
As you can see it is very easy to take your existing help projects and create customized HTML5 outputs to suit a variety of devices, even for those which might be launched in future.
Have you tried creating multiscreen HTML5 output yet? If not, give it a try and do let me know your feedback.
Stay tuned for my next post on Multiscreen HTML5 Publishing.
Other posts in this series
HTML5 Publishing Series Post #2: Creating multiscreen HTML5 output using RoboHelp 10
HTML5 Publishing Series Post #3: Creating Android Apps
Vikram Verma
Product Manager – RoboHelp & TCS