Customizing the Acrobat XI Interface
Our research at Adobe tells us that legal professionals use many Acrobat tools, but probably not all of them.
In the interest of simplification, you may wish to hide the tools you don’t use and and provide direct access to the tools you use the most.
I suspect that the majority of Acrobat users never change the default user interface.If you want Acrobat to work better for you, it behooves you to learn how.
For the record, I don’t use the term behoove lightly!
What is that thingy called?
Before jumping into this, let’s take a look at the Acrobat application window.
The following two screen captures represent the official terminology that we use at Adobe for various parts of the Acrobat user interface:
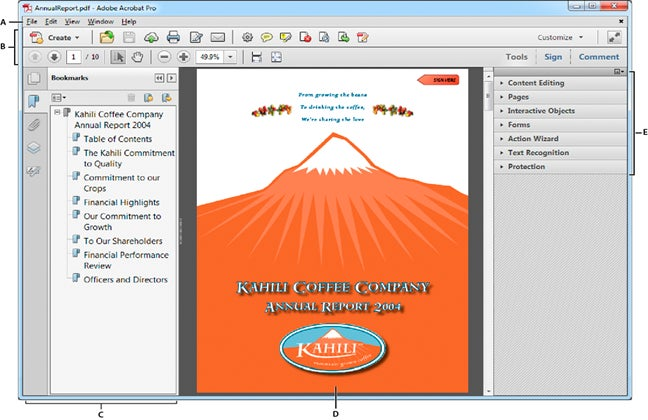
A. Menu bar
B. Toolbars
C. Navigation pane (Bookmarks panel displayed)
D. Document pane
E. Task panes
The top toolbar may also be customized and I will refer to it by section below:
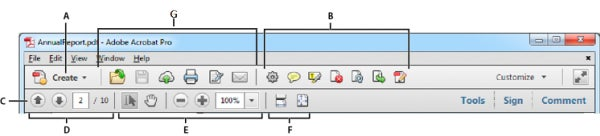
A. Create button
B. Quick Tools toolbar
C. Common Tools toolbar
D. Page Navigation commands
E. Select & Zoom commands
F. Page Display commands
G. File Tools
What can be customized in Acrobat?
In the rest of this post, I’ll discuss how to customize the Acrobat user interface in the following areas:
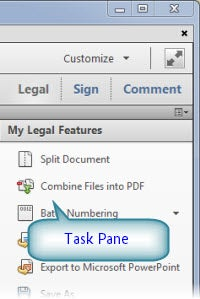
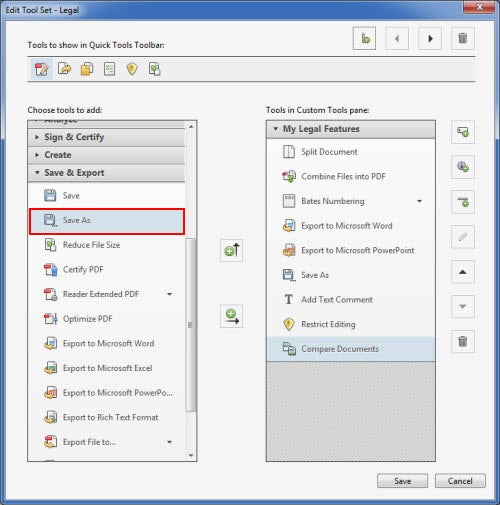
#### Task PaneAcrobat XI allows you to create a custom Task Pane which allows you to include only the tools you need.This is a new feature in Acrobat XI and not available in previous versions of Acrobat X or in Adobe Reader.The custom panel can contain just about any tool available in Acrobat with a few exceptions such as Actions.At right, I’ve created a new Task Pane called Legal which in turn contains a section called My Legal Features.
#### Quick ToolsQuick Tools are tools that you park in the top toolbar for quick access to frequently used functions. Quick Tools are handy because they allow you to get to a tool without having to open a panel.
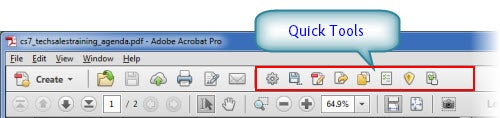
The number of Quick Tools you can show will depend on 1) your screen resolution and 2) whether you have disabled any of the tools to the File Tools (See below) to the left of the Quick Tools area.
#### Common ToolsThe Common Tools toolbar offers various tools for navigating, zooming, changing view, etc. My experience has been that users sometimes struggle figuring out how to configure the Common Tools, so I’ve included detailed instructions on how to do so below.

Tool Sets – or – Two out of Three Ain’t Bad
In Acrobat XI, you can create a new Tool Set to capture settings for Task Panes and Quick Tools. Settings files may be exported and imported making them easy to share with colleagues.
This omission of the Common Tools from saved Tool Sets makes sense (kind of) since generally users do not make too many changes to the navigation tools. On the other hand, since configuring the Common Tools isn’t that obvious, it would be great to share them. I’ve shared this feedback with our engineers.
You can create multiple Tool Sets and switch between them. If you occasionally use a specific set of tools, you can create a set that makes this easy. This certainly saves a lot of time hunting down a specific feature.
Creating a Toolset
This process is actually pretty simple . . . simpler than I have made it sound below, so please experiment!
As I mentioned above, a Tool Set captures both Quick Tools and Task Panes. Here’s how to create a new, custom Tool Set:
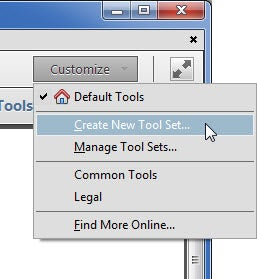
- Click the Customize button at the upper right of the window and choose Create New Tool Set. . .
From this same menu you can manage all of your tool sets. -
- The Customize Tool Set window opens.
Choose a tool and add it to either the Quick Tools Toolbar, a Custom Tools pane, or both.
For detailed instructions on how to use this window, click here. -
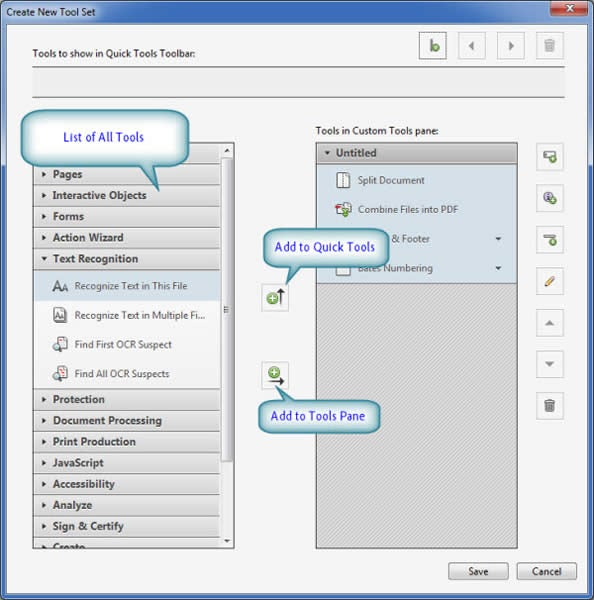
- Some options in this window:
– Create more than one panel for your toolset
– Add dividers between commands to make them easier to find
– Include instructions with commands
– Reorder or delete items
You can’t break anything in this window. Acrobat won’t let you change the default tools, so you can always revert to the full set of tools.
Switching between Tool Sets
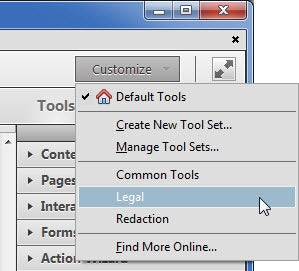
It’s easy to switch between toolsets. I have a set of tools I use for redaction and another set for everyday use. To switch between tool sets:
- Click the Customize button in the upper right corner of the window
- Choose a tool set from the list:
-
Customizing the Common Tools
The Common Toolbar is customized using a menu.
The easiest way to access the menu is to hover over the Common Toolbar, and right-click (Command-Click on the Mac):
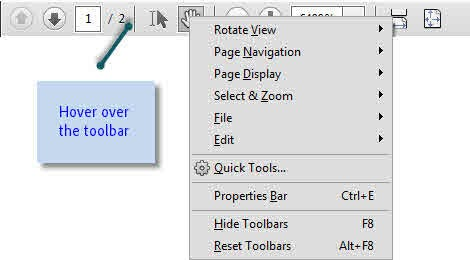
Each of the top menus (Rotate View, Page Navigation, Page Display, Select & Zoom, File, Edit) control which icons will appear on the toolbar..
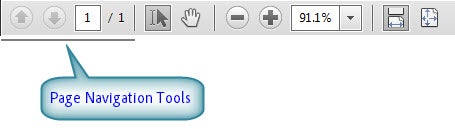
Page Navigation Tools
By default, the Page Navigation toolbar includes a Previous Page and Next Page tool:
Hidden in this section are several other very useful tools which I always enable:
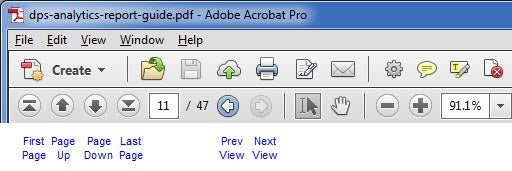
These extra tools such as the First Page, Last Page and Previous and Next View buttons allow you to more quickly move between pages and views.
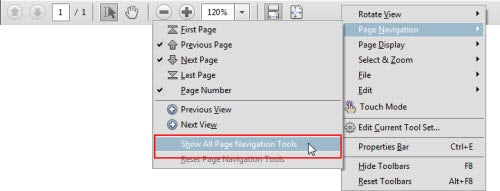
To enable all of these tools, right-click on the Common Tools bar and follow the illustration below:
Page Display Tools
I rarely change the defaults here, but I will describe Acrobat’s default behavior which, I think, is interesting.

In most cases, Acrobat behaves perfectly. For example, when you are looking at a letter-size page full width, scrolling is continuous as in your word processing program. However, when you are looking at an entire page, Acrobat snaps scrolling from page to page.
Of course, you have options . . . if you want scroll documents in Fit Page mode, you certainly can. Want to try some of these different options?
- Right-click on the Common Toolbar
- Choose Page Display
- Choose Show all Page Display Tools
You can always choose the Reset option for the Page Display toolbar if you don’t like the results.
Select and Zoom Tools
Zoom in, Zoom out . . . these are operations you may do frequently in Acrobat, so it makes sense to put tools up front where you can find them.
I like to enable the Marquee Zoom tool, also known as the Magnifying Glass tool.
The Marquee Zoom tool allows you to draw a rectangle surrounding the area in which you are interested, then have the screen zoom in to just the area selected.
You can also click once on the Marquee Zoom tool on the page and Acrobat will zoom in via 25% increments. Hold down CTRL and click to zoom out in 25% increments.
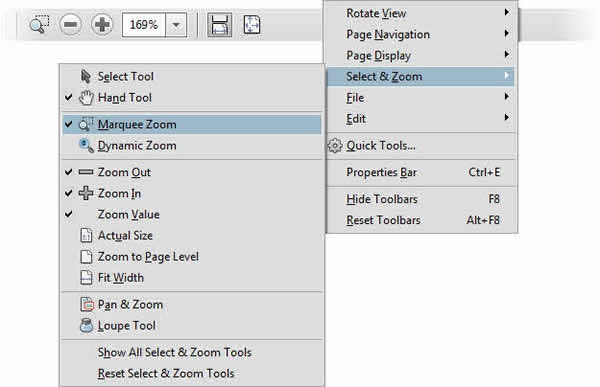
To add in the Marquee Zoom tool:
- Right-click on the Common Toolbar
- Choose Select and Zoom
- Enable the Marquee Zoom tool
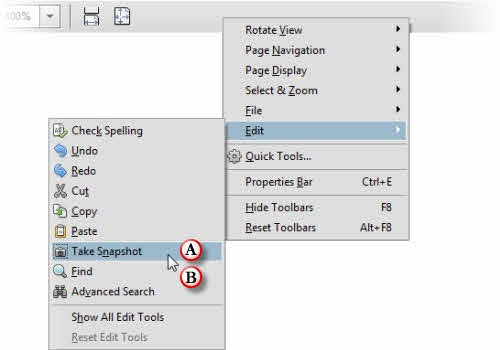
Edit Menu Tools
The Edit section of the Common Toolbar offers quick access to three tools which are not on by default, but that you may find very helpful.
- Take Snapshot
The Snapshot Tool captures to the clipboard either:
– The visible portion of a PDF page
– Part of a PDF page - I’ve written about the Snapshot Tool previously in my article Adding a Thumbnail of a PDF Page to a PowerPoint presentation.
- Find (CTRL-F)
Search for single instances of a word in a PDF - Advanced Search (CTRL-Shift-F)
Find and display all of instances of a word in PDF. Very useful for case analysis.
Of these three, I only turn on the Snapshot tool by default since it doesn’t have a keyboard equivalent.
Still, I’ve heard from many legal pros that simply – must – have – Find – on – the – toolbar.
I hear you!
Here’s how to add the Find tool to the Acrobat toolbar:
- Right-click on the Common Toolbar
- Choose Edit
- Enable the Find tool
In the screen shot below, I’ve marked Take Snapshot (A) and Find (B):
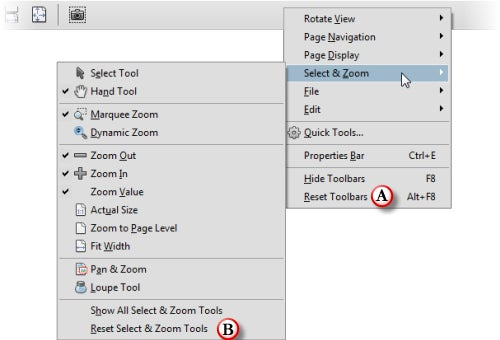
Oops! How do I set it all back to the defaults?
Acrobat allows you to quickly and easily reset:
- An Individual toolbar
- All of the Common tools
Right-click on the Common toolbar, then choose any of the toolbar sections.
For example, to reset all of your Common tools, Select (A).
To resent only the Select and Zoom tools, Select (B).
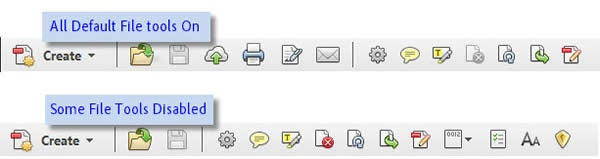
The File Section: It’s Odd
Oddly, the File section of the Common Toolbar isn’t even on the same toolbar as the rest of the Common tools, but it is controlled the same way.
By default, all of the File Menu tools are on in Acrobat and you probably won’t want to change them. These tools are:
- Open
- Save
- Save Files to Acrobat.com
- Sign
- Send by Email
One thing to note about the File tools is that they are on the same line as the Quick Tools.
If you turn off some of the File tools, you will have more room for your Quick Tools:
Here’s how to edit the File tools:
- Right-click on the Common Toolbar
- Choose File
- Deselect any tools you do not wish to have
A few miscellaneous nuggets . . .
- Acrobat XI allows you to add many more tools as Quick Tools than Acrobat X.
I recommend you go through all of the panels in the Edit Tool Set window to find the items you might need. - There is now a Save As button you can add to the toolbar (big user request!)
-
- You can add an Action to the Quick Tools Bar, but not though the Edit Quick Tools window (above). Just right-click on an Action and choose Add to Quick Tools bar.
Share a Quick Tools Set
Acrobat stores the tool set files as tiny XML files with the .AAUI suffix. They are easy to export and import:
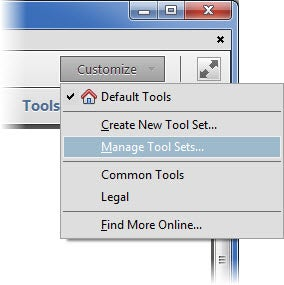
- Click the Customize button and choose Manage Tool Sets . . .
-
- Select a toolset and click the Export button:
-
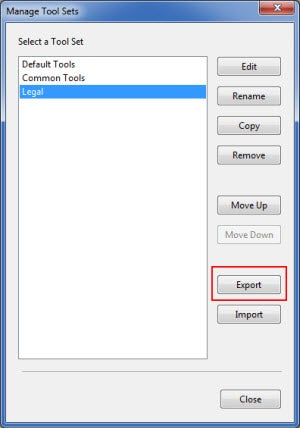
The files are tiny and easy to email. To import a Tool Set file, you can double-click on it or use the Import button in the Manage Tool Set window.
Oh, that Dang Properties Bar!
For regular blog readers, you probably already know that one issue some Acrobat users don’t like is how the Properties Bar is handled. The Properties Bar cannot be docked, so it sort of floats around, forever looking for home.
Believe me, I have given this feedback to our engineers!
For those of you who use the Typewriter tool to make permanent changes to documents, I hope you’ll look at using the new Add Text tool in the Content Editing panel. This allows you to edit any text in the Acrobat document, or simply just type anywhere you want without having to flatten the file later. Try it . . . I stopped using the Typewriter (also known as Add Text tool) since we added this feature.
I hope to cover using the new Content Editing tools in a future post.
