What’s the buzz behind the Marketing Channel Reports?
One of my favorite features of SiteCatalyst is the Marketing Channels report. The Marketing Channels report is configured in the Admin console and will automatically bucket campaigns and external traffic sources into a channel based traffic and conversion report. A 12 part blog post series will document how to set up the Marketing Channels reports, tips & tricks, and how to use the reports for actionable decisions.
My top 5 list for Marketing Channels:
- Admin Console set-up – finally Marketing in charge of Analytics (not IT)!!
- 100% of incoming traffic in one report – I get my pie chart at last!
- First AND Last touch allocation – have your cake and eat it too!
- Easy to use Paid Search and Natural Search reports really do exist!
- Cost & Budget uploads – get actionable conversion reports!
The whole idea of Marketing Channels is that we finally have a report that will account for all entries into the site, and we can auto-bucket them into appropriate channels. Better than that, the business team gets to set the rules and control campaign tracking codes get allocated. This last point, in my opinion, makes Marketing Channels a hands down winner. As Marketers, we are fickle; we change our tracking codes on the fly, mess them up and don’t have time to wait for a release cycle. With Marketing Channel rules an accident of ‘EN-12345” instead of ‘EM-12345’ on the company’s huge anniversary email blast doesn’t cost us all reporting for that campaign. We can easily go to the rule set, adjust the rules to look for the ‘EN’ prefix and nothing is lost.
Setting up Marketing Channels is easy, but there are a few hard, fast rules to stick by in order to make them work well. This series will go through how to set up the rules, and then how to use the reports for valuable insights.
First things first, let’s set-up the report. If you are unfamiliar with the Marketing Channels reports, they are located at the bottom of the left nav report menu in SiteCatalyst. If you don’t see them there have the Supported User for your company contact SiteCatalyst Client Care to enable them for the report suite.
Once you have verified that you have access to the report, setting the rules up is a two step process:
- Name the Channels
- Create Processing Rules for the Channels
We’ll set the channel names in this post and create the rules over the next few posts.
To set up the Marketing Channel reports go to the Admin Console > Report Suites > (select the report suite to configure the rules on) > Edit Settings > Marketing Channels > Marketing Channel Manager.
If you are still using SiteCatalyst 14 and have access to an ASI slot, I recommend setting the rules first on an ASI slot that uses a segment that contains a good cross-section of all the traffic on your site. After the rules are tweaked just right, you can copy them over with a few mouse clicks to your production report suite. If you are on SiteCatalyst 15 or do not have access to an ASI slot, then set the rules on the production report suite with the expectation that you are aiming to get the rules perfected by a cutoff date, like the end of the quarter or month so that you can let everyone in the organization know the Marketing Channel reports will be useable from x day going forward (not back).
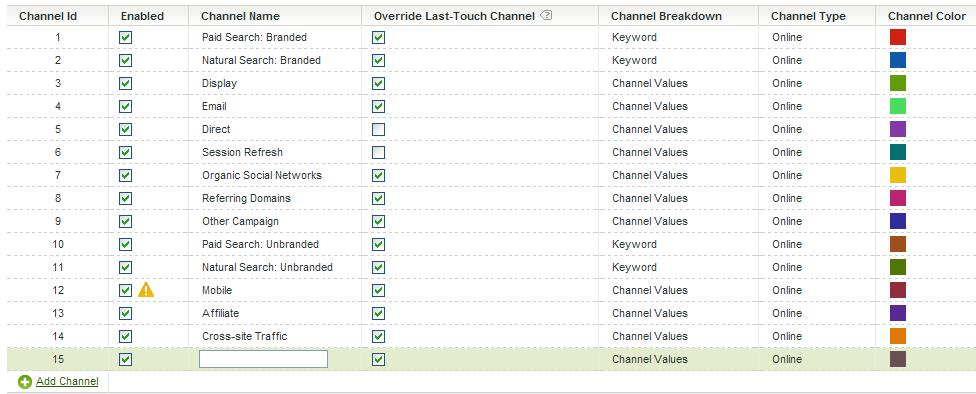
Let’s start setting up the Channel Names. I recommend making a few changes to the default rules. (1) Split out natural search into branded vs. unbranded channels (easier to add the numbers back together than trying to split them out later), (2) add a catch-all channel for ‘Other Campaigns’, (3) rename ‘Internal’ to ‘Session Refresh’, (4) rename ‘Social Networks’ to ‘Organic Social Networks’ and (5) add other top level unique campaign channels your company uses like Paid Social Media, Partnership, Mobile Ads, etc. Your rule set should look something like this:
- Paid Search
- Natural Search: Branded
- Display
- Other Campaigns
- Direct
- Session Refresh
- Organic Social Networks
- Referring Domains
- Affiliate
- Natural Search: Unbranded
- Others
Add a channel for each main category your site’s marketing team uses. For example, if you have a channel for mobile QR codes add it in. Paid Social Media? Add it. Vanity URL’s? Add it. Content Network? You get the idea. You have only 25 channels, so make sure you are categorizing at the top channel level. Also, channel names cannot be deleted, so rename existing channels that you will not use. For example, if you don’t have an affiliate program, name the default channel something new and we’ll reset the rule in the next step.
https://blog.adobe.com/media_c7b8d7adae1eb86aa3afd642f3de337af8b98e43.gif
Make sure the check box to the left of each Channel is checked to enable the rules. And by default the check box under ‘Override Last-Touch Channel’ next to Direct and Session Refresh is unchecked. We’ll go into depth about overrides in another post, for now you just need to know that any channel unchecked will not receive credit for conversions or click-throughs (sort of… stay tuned).
Now that we have the channels identified and enabled, it is time to create rules for each. The next few posts will walk you through how to create rules to optimize your Marketing Channel report.