Marketing Channels: Set your Campaign Tracking for Success!
This post is one part of a series on setting up the Marketing Channels reports in SiteCatalyst. The Marketing Channels report is a fantastic report because it will show you how 100% of your traffic (owned, earned and paid) is coming to your site and converting. The previous posts addressed naming your channels and setting up your search channels. This post will focus on setting up your campaign channels.
The Marketing Channel rules can auto-bucket campaign tracking codes by looking for unique criteria in the query string parameter or tracking code. An Adobe best practice recommendation is to use channel prefixes in your campaign tracking codes.
https://blog.adobe.com/media_2a7d5f1cfdf98dc22a93d854a28e55731aec8c6e.gif
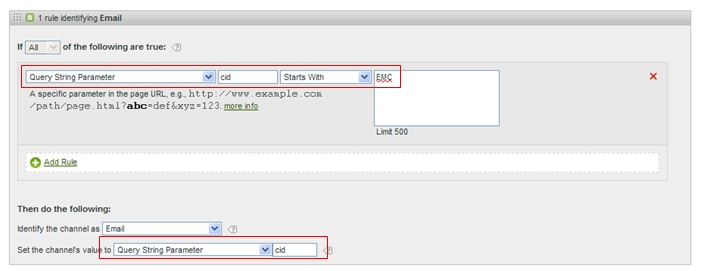
Using easily identifiable tracking codes will make life easier on your analysts using the reports, but also allow for the campaigns to be auto-sorted into different campaign channels. For example, logic in the Marketing Channels processing rules can look for all tracking codes that start with ‘EMC’ and push them to the ‘Email’ channel. This happens automatically on all incoming tracking codes on live data, so we can check on channel level data throughout the day without having to upload new lookup tables or trying to decipher cryptic tracking codes.
Ideally each major campaign channel should have its own unique channel prefix pre-appended to tracking codes. Think ‘BN’ for Banner, ‘PS’ for Paid Search, ‘AF’ for Affiliate, etc. Once this in place we can start to create rules for each marketing channel.
https://blog.adobe.com/media_ace5d9e642402458b7e1d86d17e4b9b582e33fc0.gif
Create a separate rule for each campaign channel, the campaign channel rules should go just below the search rules in the Marketing Channel Manager. Remember the order of the rules is vital, since each click-through into the site will flow through the rules until it find a match and is sorted out.
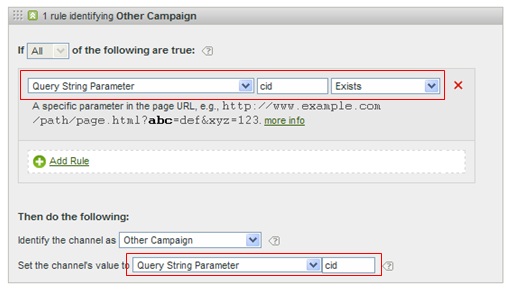
After you have created rules for each channel, create a catch-all rule for ‘Other Campaigns.’ This Channel will essentially catch all incoming traffic that has a tracking code but does not match any of the channel rules above it. Even if you think you have all your tracking codes using a prefix I recommend setting this rule just in case. 90% of sites I’ve set Marketing Channel rules up on forgot about certain codes, had legacy tracking codes still being used by visitors, accidentally used incorrect codes or needed to trouble-shoot tracking codes showing up in ‘Other Campaigns.’
To create the ‘Other Campaigns’ rule, just set the rule to ‘Query String Parameter x Exists’, and set the rule below all the other campaign channel rules.
https://blog.adobe.com/media_1a1143dd27aa57c53704a8fd63677c90415b304c.gif
If you don’t have all of your marketing teams using channel prefixes on tracking codes yet, using ‘Other Campaigns’ is a good way to start using Marketing Channel reports immediately; have all campaign traffic going to the ‘Other Campaigns’ channel, with the goal of eventually putting prefix standards in place at your company to auto-bucket channels. In the meantime you can upload classifications to separate out campaign channels under ‘Other Campaigns,’ but start using Marketing Channel reports now to get the full view of 100% of incoming traffic to the site.
The next post will explain the rest of the Marketing Channel rules.