Creating CDs in Adobe Audition: Part 2
Several weeks ago, we discussed how to quickly burn an audio CD without creating a full layout by using the Export > Burn Audio to CD command. While this is fine for quickly building a CD, it does not provide the flexibility and control necessary for a more professional product. For that, we’ll take a look at creating a CD Layout and how to insert audio and edit CD-TEXT metadata.
A CD Layout consists of audio files, CD Track marker ranges, or a combination of both, inserted into a list. Each item, as well as the project itself, can contain metadata including title, genre, composer, message, ISRC, MCN, etc. A layout file may be saved and opened again at a later date to burn additional copies or to make changes. The typical workflow will be to open the media you intend to write to CD, create a CD Layout, make any changes to the arrangement or metadata, and burn to physical media.
You can create a new CD Layout via a few methods:
- File > New > CD Layout
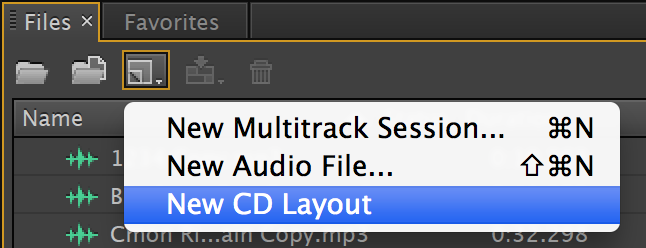
- The New CD Layout option from the New File button in the Files panel
https://blog.adobe.com/media_ba28901904d1cdf3285a61f2d4609d15141f72a3.gif - Select one or more audio files in the Files panel, right-click, and choose Insert into CD Layout > New CD Layout (or an open CD Layout)
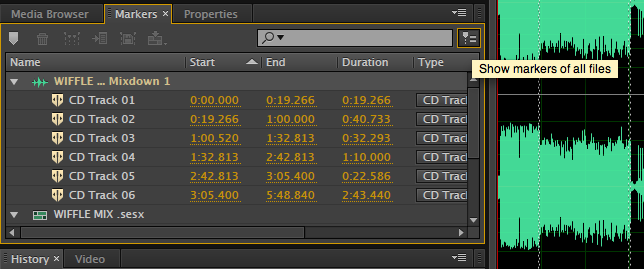
- Select one or more CD Track markers from the Markers panel (see screenshot below,) right-click, and choose Insert into CD Layout > New CD Layout (or an open CD Layout)
CD LAYOUT PANEL
CD Layouts are an alternate view of the Editor panel that allow you to drag-and-drop audio files and CD Track markers, re-arrange their order, adjust their pre-track pause duration, and view and edit CD-TEXT metadata. You can drag files directly from the Files panel or the Media Browser panel, or drag CD Track markers directly from the Markers panel. By default, the Markers panel only displays markers for the active file. You can quickly view markers for ALL open files by selecting the “Show markers of all files” toggle button located near the top-right of the Markers panel:
https://blog.adobe.com/media_09b71365ac08bc99ca0bf1014a1496c31c52513a.gifIt is important to note that only CD Track markers from an audio file may be inserted into a CD Layout. If you’ve created CD Track markers in a multitrack session, you will need to perform a session mixdown first – the CD Track markers will be inserted into the mixdown and can then be added to a CD Layout. You may modify the default “Pause” value under Preferences > Markers & Metadata > Default CD track pause Redbook CD standards require a 2 second pause before the first track, so you will be unable to modify this specific field.
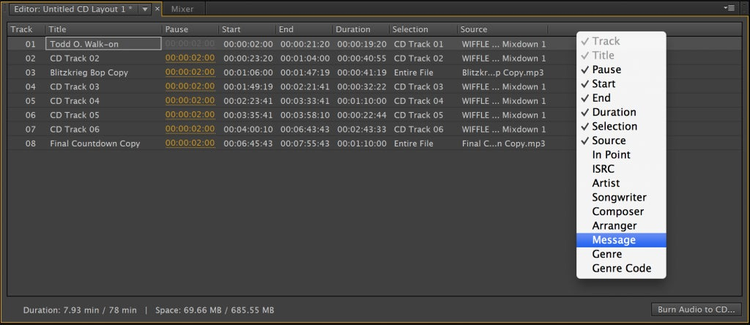
The CD Layout panel displays each track, an editable Title, pre-gap pause duration, and other information associated with the track. Almost any field may be edited by clicking in the existing text. Additional track-specific editable fields can be exposed by right-clicking the column headers and selecting the fields you wish to view:
http://blogs.adobe.com/creativecloud/files/2013/04/Screen-Shot-2013-04-16-at-11.22.39-AM.png
You can modify the overall CD-TEXT fields for the entire layout by opening the **Properties **panel and exposing the CD Text group:
https://blog.adobe.com/media_171380cee302ac58075dd94eb257889b27dd3621.gif
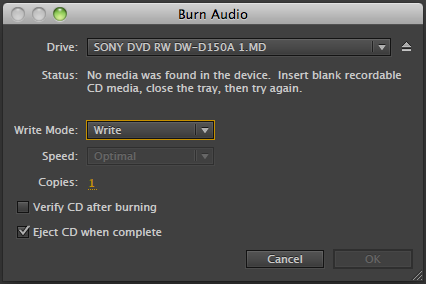
When your layout is finished and your desired CD-TEXT complete, you can bring up the Burn Audio dialog by clicking the Burn Audio to CD… button located in the lower-right corner of the CD Layout panel. This dialog help select the device you wish to write to, select the number of copies you wish to make, and offers a few additional options. (Obviously, make sure you have a blank audio CD in the drive, unlike me!)
https://blog.adobe.com/media_43fa1e8325821575b327a763e3125ee4f565a768.gif
At this point, it might be worth noting that CD-TEXT support is up to the playback device or application, and support can vary. If you’re on a Mac OS X system, you can verify the full CD-Text of an audio CD by opening Terminal and entering the following command: **drutil cdtext **I am unfamiliar with any similar command for Windows systems.