HTML5 Publishing Series Post #3: Creating Android Apps
Dear RoboHelp Users,
In my last post on this thread, I described how you can create multiscreen HTML5 content for various devices using RoboHelp 10. Since my last post, I have had several conversations with users regarding this functionality. I presented the multiscreen HTML5 feature in the TC World Bangalore conference, where a number of users attended the session and asked several questions. A few weeks later, Peter Grainge, who is one of the leading RoboHelp expert, presented the best practices for creating content for multi-screen devices at WritersUA Conference. He also created a sample multiscreen HTML5 project by modifying the Salesbuilder project. You can download Peter’s presentation and the sample project from here. You can also see a working demo of the Salesbuilder project here.
In the last couple of months, we also witnessed that the number of users, who used the multi-screen functionality, increased substantially. Many of them reached out to Adobe and reported a few issues which we have fixed in our RoboHelp 10.0.1 patch. You can see all the issues that we have fixed here.
This is the last post in the multiscreen HTML5 series. In this post, I will show you how you can create native android app for your help projects.
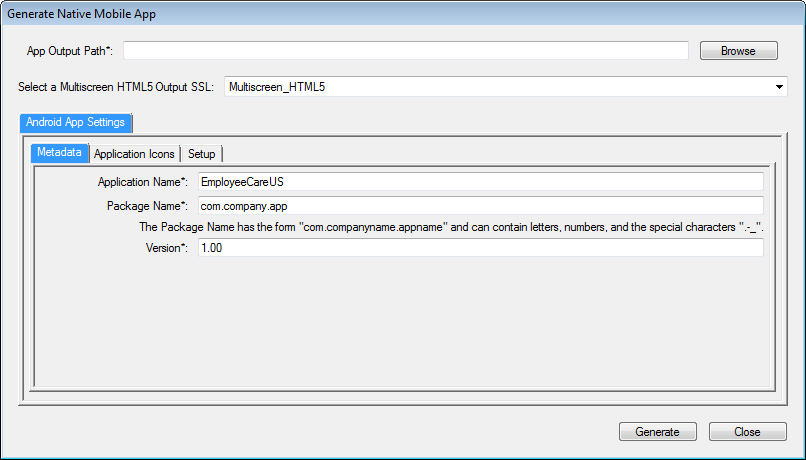
Step 1
In RoboHelp, click on File -> Generate -> Native Mobile App. You will be presented with a dialogue box where you need to specify the output path, where you want to save the app, and the Multiscreen HTML5 SSL, which will define the layouts for the app. One good feature of RoboHelp is that you can create a single Android App which will appear differently on phones and tablets, provided you have specified different layouts for phones and tablets in your Multiscreen HTML5 SSL settings.
Under the “Android App Settings”, you will see the “Metadata” tab where you can specify the metadata such as application name, package name, and application version for your app.
https://blog.adobe.com/media_9f3f7df75c682981076a17801db27e55e84e3809.gif
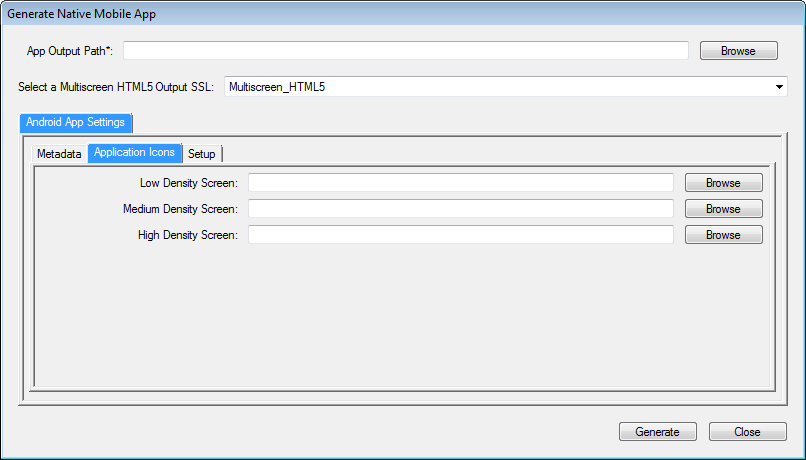
Step 2
In the “Application Icons” tab, specify the images which you want to display as app icons for low density, medium density, and high density mobile/tablet devices. The icons can be of any image type.
https://blog.adobe.com/media_2d9fa756767355d4adb5db080f00c15eb1c39aa2.gif
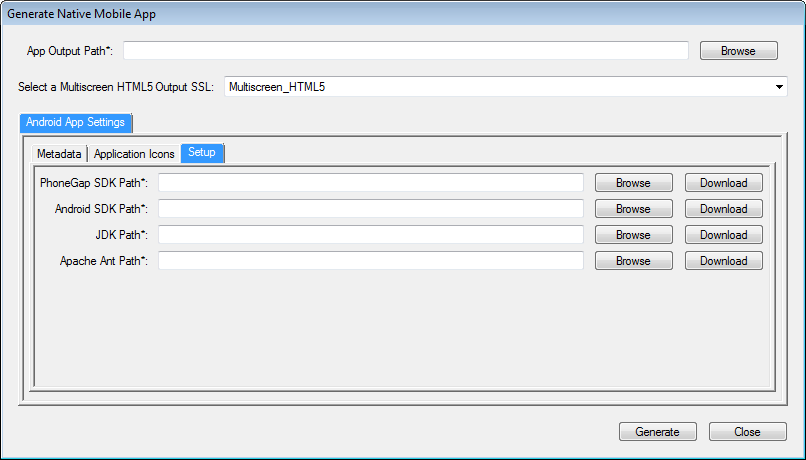
Step 3
The final step is to provide all the necessary SDK/JDK. If you have these setups installed on your machine, you just need to specify the correct path, else you can download them by clicking on the “download” button. Once you specify all the paths, click on generate to create a native Android app for your help project.
https://blog.adobe.com/media_4c37603b833799957078036e4eacac6708a5d265.gif
Distributing the app
Once you have generated the native android app you can make it available for users by either submitting to Google Play Store or by simply distributing the APK file to users via e-mail or uploading to a web-server. The users can download the file and copy it to their Android device. Once copied, opening the file from the device’s file manager will install the application on the device.
I hope you find this information useful and use this workflow to create Android apps. Please send me a mail to provide your feedback.
Other posts in this series
HTML5 Publishing Series Post #1: Why you should publish your content in HTML5
HTML5 Publishing Series Post #2: Creating multiscreen HTML5 output using RoboHelp 10
Vikram Verma
Product Manager – RoboHelp & TCS