Astrophotography Tips from Michael Shainblum, Josh Bury and Alan Erickson
With more access to incredible technology than ever, there’s been an exciting upswing in shared astrophotography photographs and timelapse videos across the web. To take a closer look at how these beautiful photographs are created, we gathered tips from our recent Google Hangout on Air with photographer Michael Shainblum, and Adobe Computer Scientists Josh Bury and Alan Erickson. Armed with these tips and advice from our resident experts, you should have everything you need to either dip your toe in the pool of astrophotography or dive right into the deep end!
Equipment:
Camera/Lens:
- Choose a full-frame camera with high ISO capabilities. Michael uses a Canon 6D, and Josh uses a Nikon D700. To the right, Alan shows us his DSLR with 40mm lens on a tracking mount. Digital SLRs give you full manual control, which is needed for proper long exposures.
- Use a sharp wide lens with a 13-24mm focal length that can stop down to f2.8 to let in as much light as possible.
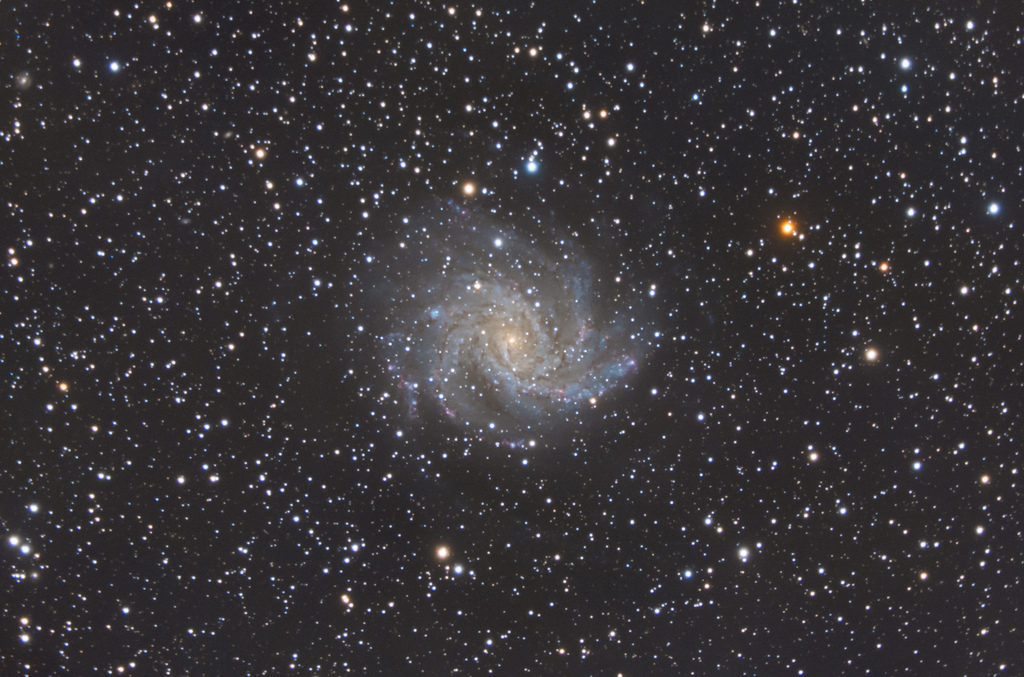
- For more advanced astrophotographers, a telescope can be purchased for deep-space photography.
Accessories:
- Use a cable release for exposures longer than 30 seconds. This lets you lock the shutter open.
- For star-stacking shots, an intervalometer triggers the camera every 20 or 30 seconds with no hassle. Our panelists recommend using an external intervalometer since it’s more flexible than one built into the camera.
- Keep your camera steady with a tripod. If you have a sturdy camera tripod, a battery-operated tracking mount may be useful to get longer exposure images, especially for wide-field shots. Just line up the scope with the North Star and let the tracking mount run. It will rotate according to the Earth’s rotation automatically.
- If you’re shooting constellations, a softening filter allows brighter stars to expand in the photo and makes it easier to tell between the brighter and fainter stars in an image. Softening filters also bring out star colors by diffusing some of the light.
- Bring extra batteries! Taking long exposures of the sky burns through batteries quickly since the shutter is kept open for long periods of time. Our panelists keep about seven batteries handy when shooting long exposure astrophotography.
Shooting:
Shooting Tips:
- Get sharp focus when shooting at night by setting the camera to manual, going in with live view, and setting the ISO as high as possible. Focus on the brightest light or star furthest away. This can take a couple of tries, but if the focus is too soft, you can adjust the focus slightly to find it. However, you won’t get a sharp focus if you set your camera focus to infinity, since the result varies from lens to lens.
- How can you find the best exposure? Michael Shainblum shoots when there’s no moonlight. He recommends starting at a base exposure (30 second exposure with f2.8 at ISO 3200) using a 20mm or 14mm lens. He might go to 20 seconds to get less star blur and sometimes sets his ISO at 6400 for darker backgrounds. Generally, you should start with a base exposure and then adjust based on the circumstances and your goals.
- To get the best picture, make sure the whole sky’s background is exposed in order to have good signal to noise. To guide your exposures, you can look at the histogram on the camera and make sure you see the sky there – it will show up in the shape of a dark mountain.
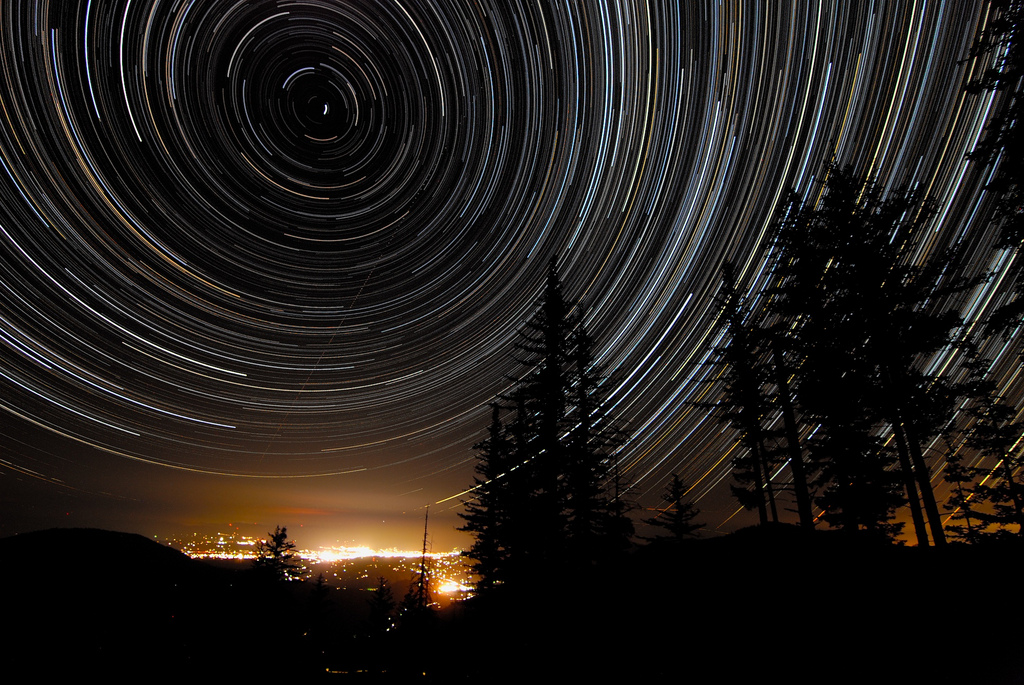
- Can’t get planes out of your shot when shooting star trails? Michael suggests using Photoshop to convert your RAW files into TIFF files and then cloning each light streak out of the planes individually. When you process the star trail, the streaks will be gone. Stacking images beforehand actually makes the trail easy to use. Alternatively, you can use your intervalometer and stack a series of pictures.
Shooting Apps:
-
-
- Use the program StarstaX at an interval of a one second to thirty second exposure. You should not experience any gap issues, unless your camera or tripod is moved, or if you have card issues. When you need to take out an image with a lot of flare, StarstaX has a setting that finds the gaps and fills them in.
- How can you find the Milky Way? Our panelists use the Star Walk app. This app provides the moon phase for any day, when the moon will rise and set, when the sun will rise and set, where the North Star and constellations are, and of course, where the Milky Way will rise and set from your current position. Using this app can help you get a great image like Josh’s below.
-
https://blog.adobe.com/media_df1b1793f4d271fc09c0ee17e90e6d306d6e9e77.gif
-
- Figure out what areas might be darker than others in the U.S. and other countries with the Dark Sky Finder app. This app also lets users set dark sky points they’ve already discovered for others to reference. Another option would be to Google your city, state or location followed by “Milky Way” or “astrophotography” – chances are someone in your area has tried shooting in the area before and can recommend dark places.
- The PhotoPills app offers great tools for composing your shot, including calculators for star trails and time lapse, also showing you where the Milky Way will be.
- BackyardEOS is another cool app that helps with live view, focusing on a star and sequencing your shots. This is available for Canon DLSRs only.
Processing:
-
- Michael begins to process his photos by adding them to a Lightroom catalogue, adding a star to the images that he thinks have potential to look great, and backing everything up right away. He then uses the Lightroom Develop module and does some basic editing for things like contrast, noise reduction, color correct to neutralize the sky, and clicking a point off-set from the Milky Way to neutralize everything. Then, he goes through temperature sliders and tweaks them to adjust for the sky’s color. He uses a gradient tool, especially when he needs to bring up the foreground, and also goes through the shadows slider and the black and white slider. Michael uses the local adjustment brush to bring up clarity in the Milky Way or tone down the foreground clarity. Finally, he opens the image in Photoshop for final modifications, like brushing out the remaining noise and tweaking the colors, saves a JPEG with a watermark, and posts the final product online.
- For most night sequences, our panelists recommend editing one frame and making sure it’s perfect. Then, you can sync your settings, save the metadata, and bring the RAW files into Lightroom or After Effects where you can process time-lapses and adjust any changes in the photo. Once you choose the first and last frames to edit, Lrtimelapse can interpolate the frames in between and gradate each of them.
- Use layer stacking in Photoshop or download the Startrails desktop application to create star-trail photographs. Startrails creates a cleaner picture with a shorter exposure and allows you to stack images with light and blend mode. Josh shared with us a few of his star trail images, including the one below.
https://blog.adobe.com/media_a1453057e014aee47b7be271547d85f0eccf9e38.gif
- There are a few steps you can take to fix gradients within an image where you have uneven color casts, especially over such wide fields. Begin to take down the highlights using the highlight slider to get rid of light pollution. Then, make a curves layer in Photoshop and mask it. If you see some patches in the sky that are brighter than others, make a curves adjustment layer and slightly modify the curve; you also can do this with the brightness and contrast tools. Go through the mask and softly brush through it with 1-3% opacity to fine-tune. For color aspects, use a color layer or a hue/saturation layer. In Lightroom, you can use the local adjustment brush and set a color cast by setting a slightly different color, found in the bottom color box, to look more like the temperature you want to achieve. Then, simply brush that color back in.
- Worried about light pollution or air glow? Set the primary initial white balance for an image so that the galactic core of the Milky Way has slight orange colors, and the sky around it becomes warmer. You can always go back and make edits if you want the sky to be more blue; Michael actually likes to see orange tones in the Milky Way’s galactic core. In the below image, Alan used white balance and noise reduction in Lightroom to compensate for the light pollution.
https://blog.adobe.com/media_f2582ef87698b7a1f8f15e836161e65c19a6d902.gif
Thank you to all of our panelists for sharing their advice and tips, getting us one step closer to creating astrophotography that’s out of this world. Remember to stay creative and keep experimenting. Josh Bury couldn’t have said it better – “…Put the camera on the tripod and take a shot…sometimes there can be surprises in terms of what the camera picks up in the sky that you didn’t first notice.”
You can hear more about our panelists’ creative processes in our Google Hangout, or check out samples of their work online here: Michael Shainblum, Josh Bury and Alan Erickson.