Introducing native multi-device publishing in FM 12 (Part 2)
Hello Framers,
On 13th Feb 2014, Kapil Verma blogged about the new native multi-device publishing in FM 12. Kapil mentioned that now you can publish to 6 different output formats out-of-the-box, which is exciting. In addition, Kapil had already covered the basic workflow to publish various outputs.
In this blog, I am going to dig deeper in the multi-device publishing functionality and show you how you can customize various outputs using the STS (settings) file.
STS File Overview
https://blogsimages.adobe.com/techcomm/files/2014/02/Publish-Pod.png
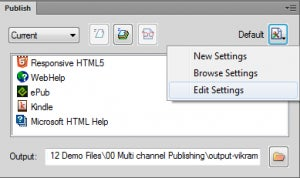
Settings file is located on the top right corner of the publish pod. By default, “Default” settings file is used for publishing which publish the output with the styles applied in the FM document and default configurations for various outputs. However, you can choose to edit the applied settings, create a new one, or load a different settings file from your hard drive or shared location.
One of the big advantage of settings file is that it needs to be configured only once and then it can be easily shared across the organization. To configure a settings file, you can click on “New Settings” in the dropdown as shown in the image. There are two parts to configuring the settings: one is the mapping of various styles, images, cross references, and markers etc., while the second is about configuring various output settings such as Webhelp skin, HTML5 layout, ePub metadata etc.
Configuring the Style Mapping

https://blogsimages.adobe.com/techcomm/files/2014/02/Settings-File.png
In the settings file dialog box, you will find a style mapping tab, in which you can configure various options such as
- Paragraph & Character Styles: Here you can map any FM paragraph and character style and map it to the output styles available in the default CSS shipped along with FM 12. The default styles are available in the output style dropdown. You can also edit the default CSS styles and then map them with the FM styles, or you can import a target CSS in the settings file. Once the styles are mapped, you can preview the desired output style and edit it to suit your needs better. In addition, for paragraph and character styles, there are additional configuration options, for example, you can exclude some of the content having a specific style from the output, configure how the various topics should be split, and define HTML tags. Once the styles are mapped, the target CSS can also be exported for future use in other settings file.
- Tables: Similarly, you can map a different table styles for the output.
- Cross-references: Cross references in FM have a specific reference to a page. However, in the online formats such as Webhelp or Responsive HTML5 etc., there is no concept of page numbers. Using the cross-references settings, you can configure how your cross-references should be transformed. For example, you might want to transform a cross reference “ See PARATEXT on Page 1” to “See PARATEXT” with a hyperlink. All this is possible by configuring the cross-references settings.
- Images: Using the image settings, you can specify whether you want to generate Distiller to generate images, have custom margins and borders, and specify the JPEG quality etc.
- Other Settings: In this settings there are various advanced configurations. For example, you can use FM markers to split the content into various topics, you can specify how the topics should be named. In addition, you can apply DHTML effects on the outputs, and apply the glossary settings so that users can see the term definition wherever the term appears on the output.
To refer to the documentation on style mappings, please click on the link.
For those users, who have been using RoboHelp or the Technical Communication Suite publishing workflows, these style mappings configuration will be familiar. However, if you don’t want to use the style mapping editor, you can also specify a target FM template which has the same style names as your original document/book, but has a different definition of these styles. In the target FM template, you should define the styles based on how you want the output to look like in other output formats. By choosing a target FM template, you instruct FM to apply the target styles to published outputs automatically.
Whether you use the style mapping editor or a target FM template, these output styles are applicable for all published output, however, you can also define style overrides for specific output formats. I will cover this in the next section.
Configuring Output Settings
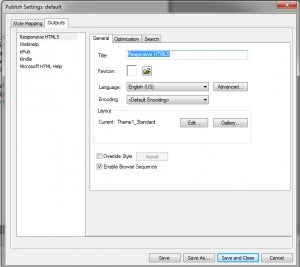
https://blogsimages.adobe.com/techcomm/files/2014/02/Settings-File-2.png
FM 12 allow you to publish to Webhelp, CHM, Responsive HTML5, ePub, and Kindle, in addition to the already existing PDF. All these new output formats have specific settings which can be configured. To see and edit these settings, you can look at the “output” tab in the settings dialog box. Detailed of custom configurations for each of the output formats are described below
- Responsive HTML5: For this output, you can specify things such as Title of the published output, Responsive HTML5 layout, optimization settings including conversion of absolute size tables and images to relative size etc. In addition, you can also specify search settings and override the styles specifically for Responsive HTML5. There is also an option to customize the Responsive HTML5 layout. For more information on how to customize the layout read my other blog on Responsive HTML5 Publishing.
- Webhelp: Customization available in Webhelp are very similar to Responsive HTML5. Instead of the Responsive HTML5 layout, here you can import a Webhelp skin. Webhelp skin editing is not available within FM, but you can import any skin created using RoboHelp.
- CHM: For CHM, you can specify a project title, add breadcrumbs, optimize CHM file size and edit language settings etc.
- EPUB & Kindle: For these outputs, you can specify meta information such as author, publisher, cover image, and description etc. For EPUB, there is an option to validate the generated output.
Some customization options are available for all of these outputs and you can have different value for all different outputs. Here are those options which are available across the outputs.
- Project Title
- Language Settings: This settings allows you to specify the language and you can customize the search experience by specifying synonyms for a search keywords, listing search stop list, and configuring the various labels in the final output.
- Style Overrides: As I mentioned earlier, you can have style overrides for a specific output. This CSS will overwrite the common style mapping that you have. You will need to import a CSS to enable this. The CSS can be either created using the style mapping editor, or you can create the CSS separately and use it for the overwrites.
To refer to the documentation on configuring output formats, please click on the link.
To see the settings file configuration in action, watch the video below
http://tv.adobe.com/embed/1434/21813/
Additional Resources
There are plenty of additional resources where you can find more information about this new capability.
- Help documentation on the multi device publishing functionality is here
- FrameMaker12 reviewer guide with details on the new publishing feature
- Tech Comm Product-opedia page, which lists various other useful resources as well
Hope you will find this new functionality useful. Let us know you reactions through your comments below.
Thanks & Regards,
Vikram Verma
Product Manager – Adobe Technical Communication Products