FrameMaker XML Migration Strategy, Part 4: Illustrated Easy Conversion Steps
Guest Blog by Bernard Aschwanden of Publishing Smarter
In under 2000 words I plan to teach you how to author (basic) content in DITA and get you familiar with structured FrameMaker as a writer, and also to teach you how to create a (basic) conversion table.
In my _recorded _presentation for Adobe, Bernard Sess 1) Easy Steps to Convert Your Content to Structure, I talked about things that you should think about if you try to create structured content and I want to formalize that a bit in this article.
You therefore need to know how to be:
- A structured author so that you know what happens to content AFTER it is structured (someone has to maintain that stuff)
- A conversion table developer to convert legacy content.
- An Element Definition Document (EDD) developer to get it working with your templates.
Once you have those pieces in place, structure becomes easier to understand, and easier to migrate to. To get you started I’ll explore how to create and work with a basic DITA concept, and also how to build a very simple conversion table. Due to the complexity of EDD development it will NOT be discussed in this article.
Write in Structured FrameMaker
The role of a structured author is similar to that of an unstructured author. You just use tools in a new way. The goal is to create the right content, for the right audience, and then deliver it in the right format so that users can make the right decisions. Easy, right?
Change the interface
If you are using FrameMaker in an unstructured way, you first need to switch to the structured interface.
- Select Edit > Preferences, and under Global, select General (that should be the default setting).
- Under Product Interface, select Structured FrameMaker.
- Click OK.
You’ll have to do a restart, but that’s enough to get you into the right interface.
Create an XML document
Once you restart, additional options are available.
-
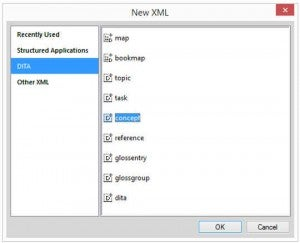
Select File > New > XML and a new dialog appears.
-
https://blogsimages.adobe.com/techcomm/files/2014/09/01-File-New-XML.jpg -
Select DITA, and create a new concept.
Change the workspace
This one is important as it provides the tools that a structured author needs to get started.
- In the top right corner, change the workspace to XML/Structured.
- Select View > Element Boundaries (as Tags).
These tags are print elements, so they show up in PDF or paper output. However, I suggest you work with them early on to get a good chance to see what is in the structure. Plus, it’s a few mouse clicks away from being gone. Just reselect View and disable these if you need to hide them.
Create your first structured topic
This is the easier (easy-ish?) part! Work in the structured content as you normally would. Click and type.
-
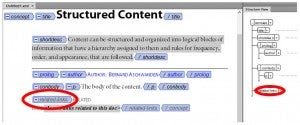
Click <Enter title here> and type Structured Content.
-

https://blogsimages.adobe.com/techcomm/files/2014/09/02-change-workspace.jpg -
Click <Enter short description here> and do so.
-
Repeat the process for the <Author> and <text>.
-
Since there are no <related-links> here, you can delete the element.
-
Click the start of the tag in the Document View or the Structure View.
-
https://blogsimages.adobe.com/techcomm/files/2014/09/03-Start-of-tag.jpg -
Press Delete.
With that out of the way, you now have a valid DITA document. This gives you a very basic idea of the world of a structured author. For more information on structured authoring in DITA and FrameMaker, you may want to watch one of these videos:
With that out of the way, you now have a valid DITA document. This gives you a very basic idea of the world of a structured author. For more information on structured authoring in DITA and FrameMaker, I’d suggest you watch this video: https://www.youtube.com/watch?v=38iccDWB0a0
Creating and developing a conversion table
The next big challenge is to have a conversion table in place. While creating a complete conversion table for a complex document is challenging, in the video (LINK) I do show how a conversion table can be created for a basic document. To get you started, let’s assume that this document exists:
Create a basic sample document
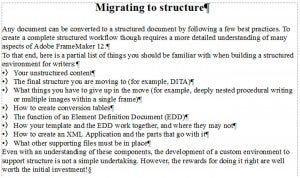
A simple unstructured document can be created using only Heading 1, a few paragraphs, and a bullet list. This document then can be converted to a simple structured document.
-
Select File > New > Document, and click Portrait.
-
Add the sample content seen here:This content has a paragraph tagged as Title, followed by two Body paragraphs, numerous Bulleted paragraphs, and then one more Body It should be easy to recreate this.
-
https://blogsimages.adobe.com/techcomm/files/2014/09/04-Sample-content-MIGRATE-TO-STRUCT.jpg -
Save the file as fm in a test location you can easily find and work with.
For example, you may choose to save it to c:\ConversionTesting\
Create and test initial conversion table
A basic conversion table is easy to create, but can take many weeks, or even months to perfect for a complex set of source documents.
-
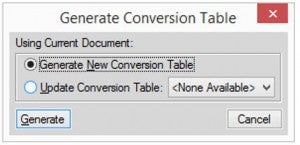
Select Structure Tools > Create Conversion Table.
https://blogsimages.adobe.com/techcomm/files/2014/09/05-Create-Conversion-Table1.jpg -
Click Generate.
The following table is created in a new document.

https://blogsimages.adobe.com/techcomm/files/2014/09/06-Step-2-Generate-TABLE.jpg -
Save the file as fm
-
Save the file in the same test location as the source file to make file management easy.
For example, you may choose to save it to c:\ConversionTesting\ -
Switch to the fm file.
-
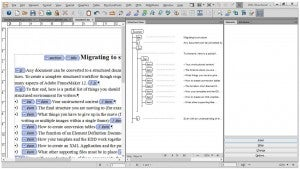
Select Structure Tools > Utilities > Structure Current Document.
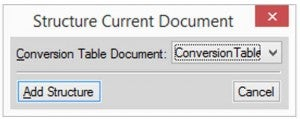
https://blogsimages.adobe.com/techcomm/files/2014/09/07-step-5-table-STRUC-CURR-DOC.jpg -
If required, select the conversion table.
-
Click Add Structure and review the resulting document.
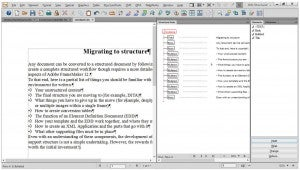
https://blogsimages.adobe.com/techcomm/files/2014/09/08-Step-7-Add-Structure.jpg
The resulting document has a very limited structure with no nested content and all elements converted according to the source file name. -
When done reviewing the file, close it and return to the fm file.
Develop the conversion table to support lists
Once a basic conversion table is created you can begin to explore options for better conversion. This may include changing the names of elements, or even the way that structured content is organized.
In this procedure the name of the default conversion of the Bulleted content is changed to item, and one or more item elements will be wrapped into a list.
-
Update the conversion table by changing the Bulleted text (under the In this element column) to item.

https://blogsimages.adobe.com/techcomm/files/2014/09/09-Step-1-TABLE.jpg -
Add one row to the table with the following content to ensure that one or more item elements are wrapped into a list element:
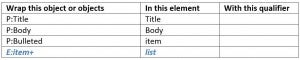
https://blogsimages.adobe.com/techcomm/files/2014/09/10-Step-2-TABLE-.jpg -
Save the conversion table as fm.
While you do NOT need to save the conversion table to test a change, I’m getting you to do it to ensure that you have multiple versions that you can later compare if you wish. Save it to the same location as the previous files. -
Switch to the fm file.
-
Select Structure Tools > Utilities > Structure Current Document.
-
If required, select the conversion table.
-
Click Add Structure and review the resulting document.
Note that the element list, with nested item elements is included. -
When done reviewing the file, close it and return to the fm file.
Finalize the conversion table
Many additional changes can be made to a conversion table and far more complex structures developed. However, to keep this article to under 2000 words, I’ll limit the number of things to think about and get you to simply finish the conversion table. If you wish, after each step you can apply the conversion table structure to the UnstructuredSource.fm file.
-
Update the conversion table to rename other elements:

https://blogsimages.adobe.com/techcomm/files/2014/09/11-Step-1-TABLE.jpg -
Update the conversion table to nest the list element within the p element (the use of the question mark indicates that there is zero OR one list… my documentation will never have two or more lists in a row, and there is no hard and fast rule as to whether a list does actually exist after a p It may, or it may not, and we are covering our bases):

https://blogsimages.adobe.com/techcomm/files/2014/09/12-Step-2-TABLE.jpg -
Update the conversion table to create a valid section element that ties together all the parts :
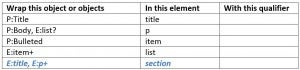
https://blogsimages.adobe.com/techcomm/files/2014/09/13-Step-3-TABLE.jpg -
Congratulations. You’ve now managed to create a basic conversion table. The job isn’t done, but you are in a much better position to migrate content to structure. You would still need to build an EDD, and develop a template (at the very least) but this article should give you an idea of the function of the conversion table, and a bit of insight into how one is developed.Convert the fm file using this final conversion table and review the resulting content noting that there is now a valid section element with a title and one or more p elements. Some of the p elements also contain a list element, and the list element is made up of one or more item elements. You may even opt to View > Element Boundaries (as Tags) to see the structure represented inline within the document!
https://blogsimages.adobe.com/techcomm/files/2014/09/14-DOC-VIEW.jpg
Should you decide to consider structured authoring in your future, do feel free to email me for a more detailed demonstration of the conversion table, DITA, and content analysis needed before making the move. With hundreds of successful conversions I’ve had the chance to see the good (and the bad) that can be done in the migration to structure.
Here we are. I’ve written a total of 1722 words (including these closing comments) and I hope that you have had the chance to do a bit of work with Adobe FrameMaker 12 and have a better understanding of the basics of writing in structured FrameMaker and how a conversion table is one of the steps on the path to migration of legacy content.
I can be reached by email at bernard@publishingsmarter.com and hope that we have a chance to see what we can do together if you do decide to move to structured authoring. All the best.