[Guest Post] “XML Authoring Made Easy, It’s not just for Geeks anymore …”, by Bernard Aschwanden
[Guest blog by FrameMaker XML expert, Bernard Aschwanden of Publishing Smarter]
In this session, I simplify the process of authoring XML content. Since I have to use *a* standard for this, I’ll work with DITA content. My goal is to show you that creating, editing, saving, re-opening and publishing DITA content doesn’t have to be tough. Since DITA is primarily used for tasks, I have created sample task-related content with the aim of showing you the tools to get you up and running.
The goal
At the end of this session, you will be able to:
- Create DITA XML content
- Edit that content
- Publish that content
The goal is to show you (and have you be able to recreate this yourself) how to do all of this without source code editing in any tools. Instead, I’ll show you how to work in a structured environment using Adobe FrameMaker.
Before you begin writing
It’s important to set up a workspace that is best suited to your needs. I’d also suggest looking at a few sample files (and, of course, watching the video that I made first!).
Setting up a Structured DITA Environment in FrameMaker
Ensure you are working with Structured FrameMaker (or using Adobe FrameMaker XML Author) so that DITA is supported.
- Select Edit > Preferences.
- In
Global > General, choose Structured FrameMaker or FrameMaker XML Author. -
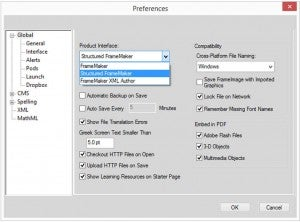
I also like to turn off the Automatic Backup on Save feature to reduce the number of files I end up seeing in my folders.
Click OK, and then restart FrameMaker.
Reviewing some sample files
If you want to explore a set of DITA samples, you can go to C:\Program Files (x86)\Adobe\AdobeFrameMaker12\Structured\xml\TravelDITA and look through the documents that are included. Depending on your installation, this path may be a bit different, but as soon as you get to AdobeFrameMaker12, the rest should be easy.
When working with samples I suggest creating a duplicate of the TravelDITA content and modifying that. Then, if you edit the XML and inadvertently create errors you don’t lose the original content.
If you try to open erroneous content in FrameMaker, it will not be recognized as valid and display an error message.
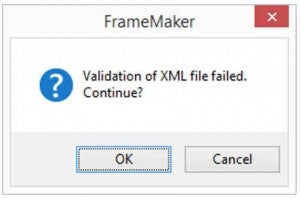
It is best to work in the FrameMaker environment, especially if you are new to XML, because your content will be evaluated against a rule-set that will prevent you from making these kinds of errors.
Configure your workspace
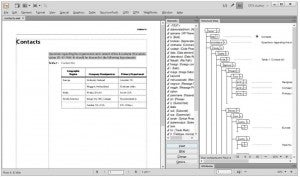
FrameMaker gives you the option to create and manage your workspace according to needs such as authoring or managing graphics. In the Author workspace the default setting will show you the paragraph, font and text catalogs. However, for our purposes choose the XML/Structured Workspace.
In the default workspace, you will see the Structure View, the Elements, and the Attributes, which you can undock and play with to create your ideal environment. This is relatively easy to do and results in a workspace set to your specific needs.
For an idea of how to do this, take the time to watch the video. Details start at about the 16 minute mark. I like to have the Element Catalog, and the Structure View displayed, and often keep the Attributes tucked away, but quickly available. You should set the display up based on your screen size, work environment, and the specific job you have, but FrameMaker allows broad customization.
While working, you can view the elements within the document view and the Structure View windows, so you can better understand how those elements affect your content as you edit.
- Select View > Element Boundaries (as Tags) View tab.
The appearance of XML
XML does not have any formatting associated with it, so FrameMaker’s formatting is useful if you want to use styles to create a different look and feel for your document. FrameMaker templates can be configured to work with differing needs using a familiar interface to customize content appearances.
For example if you are delivering content that needs to be optimized with differing styles for global publishing, you may need an 8.5 by 11 page, and an A4 page. Both templates can also contain multiple different styles, and all you to format your content so that it can be delivered to the right audience in the right page configuration, with all the look and feel of your company design, and even reuse much of what you may have done to customize unstructured templates. You do NOT need to work with FO, or other code to drive the appearance!
These optimizations are important if you need to cater to an international audience, which is increasingly the case.
Working in FrameMaker also helps you quickly adapt to unstructured templates used by a company, because you will already understand the concepts behind paragraph tags, character tags, master pages and reference pages.
FrameMaker also integrates with the DITA Open Toolkit so that you can convert and later publish your content. There is also support to publish to outputs such as ePUP or Responsive HTML5, based on preconfigured style sheets.
Our first DITA XML Document
Create an XML document
- Select File > New > XML > DITA, or select DITA > New DITA File, and choose the option that best describes your content (e.g. New <map>, New <bookmap>, New <topic>)
- Using the Element dialog, the Structure View, and the Document view, populate the document as needed.
Element dialog overview
The function of this dialog is to contextually display elements you can choose. If you click on or in between different elements, then different options appear in the dialog.
For example, clicking below the taskbody gives you the option to insert related-links or a task. If you click below the title, then you will have the option to insert an abstract, a short description, title alternatives, related-links, tasks or the taskbody.
Insert a valid element
- In the Elements window double-click an element.
- Helpful descriptions of different elements can be found in Oasis’ Darwin Information Typing Standard Version 1.2, a searchable PDF of industry standards for DITA elements:
- https://www.oasis-open.org/standards
Creating content for use with DITA
There are concepts, tasks, and references, as well as maps that you can create. If you watch the video you can see my build a few of these, but I’ll outline some steps below as well for a few types of content.
Create a task
Procedural “how to” information in DITA is based on the task element and contains support for a taskbody with steps. Within steps one or more step elements are added, and each contains, at a minimum, a cmd.
- Select DITA > New DITA File, and choose New <task>.
- Click in the placeholder text Enter title here and type Create documents.
- Add your name as the author.
- Click in the placeholder text Enter taskbody here and insert the element steps.
- Remember that you can double-click it in the Element Catalog to insert it.
- The nested children step, and cmd are added as well.
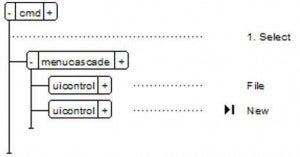
- Type in the word Select, and add one space.
- In the Element Catalog double-click menucascade.
- The nested child uicontrol is added as well.
-
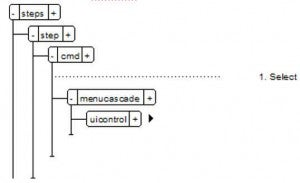
- Type File.
- Click immediately below the uicontrol and insert a second uicontrol.
- Type New.
-
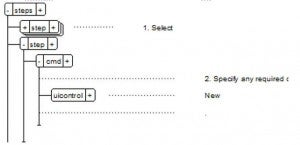
- Collapse the step by clicking the minus sign on the left side of the element.
- Click below the collapsed step and insert another step.
- Type Specify any required options and click New. as seen below.
-
- Save the file as xml in a folder that you can manage content from.
- I like to have a dedicated folder, such as one on the Desktop titled SampleDITA or something similar to this. For the purpose of the video, I created one called TekWriterPro and I populated it with a mix of topic, concept, and task files.
Tip: To clean up your Structured View, you can collapse any element by clicking on the minus symbol beside it. You can also hold Shift, and then click on the minus to collapse (or expand) all equal siblings.
Create other content
Using the same general ideas as demonstrated for the task, you can also create concepts, tasks, and references, as well as generic topics. In the video I demonstrate a few ideas that help you along the way.
Create a map
After you have created a collection of files, such as tasks, content, and topic, you can create a corresponding DITA map for those files. This allows content to be organized, grouped, and eventually published.
Tip: If you give your map the same name as your introductory topic, and simply use .ditamap rather than .xml as the file extension, then they will be stored together.
- Before creating a map, ensure you have several topics, and that they are created based on a planned hierarchy.
- In FrameMaker, select DITA > New DITA File > New <map>.
- Select DITA > Insert Topicref > Topicref.
- At this point, there is a lot of similarity to adding content to a book.
- Click Browse.
- Select a topic to add.
- To select more than one, select the first topic, then press and hold Ctrl and click additional topics, and click Select when done.
- Reorganize the topics using the arrows at the top of the ditamap.
Toggle the map view
You can also view the map as a map, or as a structured file.
- Select View, and then choose Document View or Resource Manager.
Publishing DITA content
Forget working with stylesheets and FO development. You can publish using the Adobe FrameMaker connection to the DITA Open Toolkit, or simply publish content to FrameMaker documents and use the integrated publishing features.
Generate using the Open Toolkit
The DITA Open Toolkit provides a basic interface for publishing content and is integrated right into FrameMaker.
- While in a DITA map document, select DITA > Generate DITA-OT Output.
-

- Choose an output type, sect any options, and click Build.
Generate using FrameMaker to publish
For greater control, you can also publish using FrameMaker and its built in and visual editor.
- While in a DITA map document, select File > Publish.
-
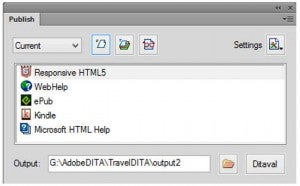
- Set the Output
- Double click one of the output types.
- I suggest that you start with Responsive HTML5 and then resize the resulting browser window.
- Change Settings if desired, and then double click to rebuild output.
What’s next?
If you are a beginner FrameMaker user, I suggest that you get comfortable with generating content that you can play with. Once you have become more advanced you can begin working with longer documents, converting them to PDFs and publishing them in the necessary platform.
If you need further help generating, mapping, and publishing DITA content, then please don’t hesitate to contact me and I will assist you by answering questions you may have or providing you with sample content that you can play with.