Establishing a Dreamweaver CC and WordPress Workflow

I grew up a chemistry nerd and still vividly remember the thrill of sprinkling iron filing over my mini Bunsen burner to view the sparkling fireworks. The idea that two elements could combine to such a spectacular effect was mind-blowing to me. I experienced the same synaptic joy when I discovered how WordPress and Dreamweaver were made for each other.

WordPress is, undeniably, the most popular CMS in use today. With the lion’s share of the market (47.5% of the top 10k sites, according to BuiltWith.com), vast array of templates and plug-ins, not to mention an ever-evolving ease-of-use, WordPress offers a direct route to a wide spectrum of site destinations. But what if you don’t want to go exactly where a WordPress template says you should? What if your client—or your own personal design sense—requires a custom online presence? Then let me introduce you to the best design and coding partner WordPress never knew it had: Dreamweaver CC.
I’m a huge fan of the Dreamweaver / WordPress workflow and having combined these two elemental power tools for years to construct sites for clients who need content management capabilities along with a personalized look-and-feel. Dreamweaver is, I believe, well-suited to the task, not only as a design engine to perfect the front-facing site, but also as an efficient coding environment for handling custom, inevitably necessary, PHP functions.
WordPress Advantage: Dreamweaver CC
What does Dreamweaver bring to the table that makes it so well-suited to WordPress development? The key is the combination of Live View and PHP support. WordPress is a PHP/MySQL framework and Dreamweaver’s ability to process the server-side language is critical. Dreamweaver’s Live View executes the PHP code, integrates the MySQL data, and displays the output HTML5 and CSS 3 design with browser-compatible precision—all while keeping everything interactive and editable.
WordPress is an incredibly complex templating application that depends on almost 100 included and interwoven separate files to generate a single page. How do I know this? Just open an index.php file from a WordPress site root and give Dreamweaver the go-ahead to discover dynamically related files. You’ll soon see a multitude of available files—PHP, CSS, JavaScript, and XML—atop the Document Window in the Related Files toolbar. And Dreamweaver not only gives you access to each and every one of them, but processes them all and presents the rendered result faithfully. Very powerful.
Filtering for essential files
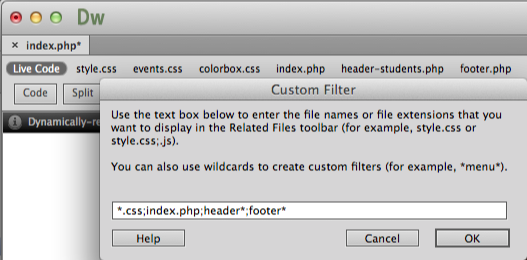
Of course, the availability of such a large number of files can be counter-productive when you’re trying to hone in on just the right CSS or other file. Dreamweaver CC includes the perfect tool for targeting select files: Filter Related Files. This facile feature makes it possible to display only certain types of files (like PHP or JavaScript) or individual files. I routinely use the Custom Filter option of this feature to work just on my theme’s CSS, index, header and footer pages, like this:
*.css;index.php;header*;footer*
https://blog.adobe.com/media_96f5f722920d6ba831d715073c8763583b6dfe1e.gif
When entered in the Custom Filter field of the dialog, only the files I need—including those in any active themes or child templates—are displayed in the related files toolbar. Now I can work with code in Split view and a quick refresh depicts any updates in Live view.
Swift styling
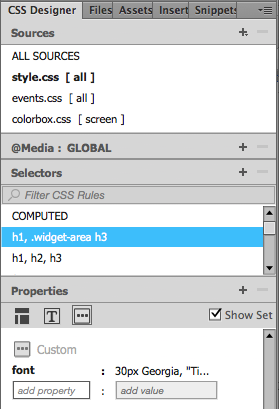
Integration with CSS is even tighter, with changes made to the Dreamweaver’s CSS Designer panel taking effect immediately. In addition to offering the full palette of CSS properties, the interface gives direct access to multiple sources, even those used in media queries, so you can be sure you’re working with the proper CSS file.
https://blog.adobe.com/media_504fd2693d1ae75005819cc5acb5dcf82f56ed76.gif
Best of all, it’s quite easy with the newly evolved Live view to pinpoint exactly what screen areas or elements need to be addressed. Just navigate to the desired page using the Follow Link feature and then enable Inspect mode. Dreamweaver processes your WordPress page flawlessly and then highlights the corresponding CSS selector and its properties for point-and-click modification. More in-depth edits are just a right-click away when you Go to Code.
WordPress specific code hinting
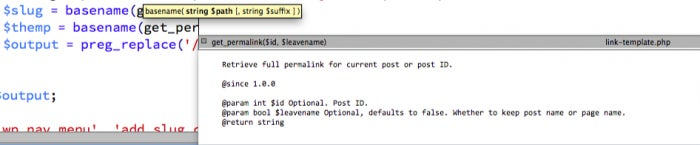
Speaking of code, in addition to the general compatibility with all PHP applications, Dreamweaver CC also provides support for specific WordPress functions. Because not all projects are WordPress sites, this targeted feature is enabled on a site-by-site basis by choosing Site > Site-Specific Code Hinting. The subsequent dialog that opens detects your installation and automatically selects WordPress as well as the relevant code root. Honestly, in most scenarios, all you need to do is run the command, open the dialog and click OK: the rest is automatic. Now, hints for all the WordPress functions, complete with syntax and brief description pop-up as you code.
http://blogs.adobe.com/creativecloud/files/2015/02/code-hint.png
Gearing up for a Dreamweaver and WordPress workflow
So what does it take to get up and running with a Dreamweaver and WordPress? Surprisingly little. Here are the key steps:
1. Set up Apache, PHP and MySQL
To serve WordPress properly, you’ll need a local web server (typically Apache) along with both MySQL and PHP capabilities, collectively known as an AMP stack.There are two basic routes you can take to meet this requirement: separate components vs. software bundle. Installing and enabling separate components (Apache server, MySQL, PHP, and usually a database management program like phpMyAdmin) takes longer and requires more technical expertise but offers more control.Installing a software bundle like MAMP (Mac and Windows) or Wampserver (Windows only) is a one-stop, point-and-click dirt-simple process, but relinquishes detailed system management.Lynda.com offers a course that covers the entire AMP waterfront and author David Gassner walks you through each of the scenarios, complete with trouble-shooting. (If you’re not a Lynda.com member, get 10 days free to view this course and any others, including my own Dreamweaver / WordPress courses.)
2. Create a database
Once your development environment is rolling along, you’ll need to create a database for the WordPress installation—a snap with every database manager program. You can name the database whatever you like; I typically go with something client-based because I develop a lot of WordPress sites locally. And the database is all you need: all the tables and schema are created for you during the WordPress install.
3. Define your Dreamweaver site
Your Dreamweaver site should be in a folder within your local web root, so that it can be browsed via a http://localhost/ web address. (Note: depending on your Apache server’s configuration, you may have to append a port number.). In addition, a testing server that specifies the local web root as well as a PHP server model is required.
4. Set up WordPress in your Dreamweaver site
I always download the latest version from WordPress.org when starting a project. The framework is frequently updated with both minor (bug-fix-oriented) and major (enhanced features) versions. Keeping up-to-date is especially important from a security standpoint these days; the WordPress team is quite vigilant in strengthening any perceived vulnerabilities. Store the contents of the downloaded archive in your Dreamweaver local site folder. If the site is completely WordPress driven, put the files in the root of the directory; if you’re integrating a WordPress blog into a site, keep all the WordPress files in their own folder off the site root.
5. Install WordPress
Even though this is where all the actual work takes place, installing WordPress is perhaps the easiest step, thanks to the framework’s insistence on a foolproof, no-brainer, easy-peasy approach.Simply browse to your site’s wp-admin folder (with a URL like http://localhost/My_WP_DW_Site/wp-admin/) and you’re off.WordPress will detect the lack of a configuration file and confirm that you want to create one. Once you do so, you’ll need to enter some core information, like database name and credentials. Then, if you’ve followed the previous steps correctly, you’ll be greeting with one of the most satisfying installation messages ever created: “Alright Sparky!” It makes me smile every time. One more click and the installation is completed: you’re ready to log in and start working with WordPress.On the Dreamweaver side, make sure you’re in Live view and open the WordPress index.php. BAM! There’s your default WordPress theme and example post. Techno-abracadabra.
World of possibilities revealed
Now the real fun begins as you begin to explore both sides of the workflow: Dreamweaver and WordPress. And there’s a ton you can do with both, including child themes, plug-ins, custom pages, and even a personalized WordPress administrative interface, the Dashboard. Dreamweaver CC can handle it all, from CSS design to PHP functions. Try it and see if it doesn’t set off a chemical reaction of your own.