Designing WordPress Child Themes with Dreamweaver CC

WordPress is by far the most wide-spread content management system ( CMS) in use today. Much of what has helped WordPress become so ubiquitous can be contributed to its chameleon-like ability to radically change the look-and-feel of a site with, literally, the click of a button. And clicking that button activates a new theme.
http://blogs.adobe.com/creativecloud/files/2015/03/dw-4.png
Tens of thousands of WordPress themes are available, from the absolutely free to the seriously expensive. Sure, a pre-made theme is the perfect solution for many situations—but how often is any template exactly what’s needed? The overwhelming chances are that some customization, whether to the layout, CSS or functionality, is required to satisfy your client, not to mention your own artistic cravings. In a previous blog post, I detailed how you could leverage the power of Dreamweaver CC to customize any WordPress site. Now I want to show you how you can personalize any existing WordPress theme to get the precise, desired final output through the wonder of child themes. All in Dreamweaver, all under your complete control.
Understanding How WordPress Themes Work
Before you can jump into the WordPress theme pool, it’ll help to dig a little foundation, so let’s take a moment to explore just how a WordPress page is created on the fly and where the theme methodology comes into play.
Let’s say you browse to the home page of a WordPress site, index.php. Open that WordPress file in Dreamweaver and you won’t see much: there are more comments than code. But the very first line of actual, executable code tells WordPress to use themes—and the only other line of code includes another file which loads the overall environment and the current template, an essential part of the theme.
In the land of WordPress, a theme is comprised of the constituent parts of the primary page—header, body, footer and often sidebar—along with a CSS style sheet and any associated assets, such as images or videos. All themes are contained in their own folder within the wp-content > themes folder. Each theme folder has its own index.php file which pulls together the various page components. In addition, a theme may include a number of other pages used to display a single post, archive listings, search results or site-specific content. Any page may also have a custom header, footer or sidebar.
A Child Theme is Born
Themes can be quite complex: one of the two themes included with the current WordPress install, Twenty Fifteen, is comprised of 16 PHP files and 25 asset files. This complexity is a small price to pay for the extreme flexibility WordPress offers. Many customizations—like specifying a header image or setting the font color—can be accomplished via the WordPress administrative interface. However, the theme has to be programmed to integrate these changes. For me, I almost always hit my head on this particular design ceiling, no matter how many options are available.
The alternative is to modify the code directly. Changing a CSS property is pretty straight-forward: most themes use a single CSS file, style.css, which can be modified. Personalizing the layout can be a bit trickier, but once you identify the WordPress template part that contains the code you want to change, you can change to your heart’s content. However—and it’s a really big however—it’s really not a good idea to change a theme’s original pages. Themes are often updated to keep up with WordPress’ ever-evolving versions and, should you update an existing theme, any mods you’ve made to any of the code will be wiped out.
The answer to the theme customization dilemma is an easy-to-implement, but robust one: child themes. A child theme integrates with the identified parent theme and only those files included in the child theme folder replace their matching file in the parent theme folder. Remember how your parents always used to handle a specific chore, like taking out the trash, and once you were assigned that task, they no longer did it because it was now your job? Child themes are like that. If you include a header.php in your child theme, it overrides the header.php file in the parent theme. This separation allows parent themes to be updated without losing the modifications brought by the child theme.
Creating a Child Theme in Dreamweaver
Frankly, understanding how child themes work is the toughest part of setting one up. The actual creation of a child theme, especially in Dreamweaver, is a piece of delicious cake. Here are the key steps to take:
- Open your Dreamweaver site where you have installed WordPress. If you’re not sure of the installation procedure, here’s a quick refresher.
- In the Files panel (Select Window > Files), expand the wp-content folder in the site root and select the themes folder within it.
- Right-click on themes and choose New Folder from the context menu. Name the folder whatever you want to call your child theme, like mycustom.
- Create a new CSS file within the child theme folder named style.css.
- Add a comment to identify the parent theme.
https://blog.adobe.com/media_f1277ce65f5232c2caa68902c554e609ad0244f6.gif
As you can see, the only required file in a child theme is the previously mentioned style.css; all others are optional. Within style.css, you’ll need to include a comment right at the top of the page to tell WordPress the name of the theme as well as a few other important details, like the author, URI, description, etc. You can see an elaborate example of such a comment in any default WordPress theme’s style.css file.
To indicate that a theme is a child theme, you need to add one line to the CSS comment that contains the key word “Template” followed by the folder name—not the theme name—of the parent theme. For example, if I were creating a child theme called “My Custom” based on the Twenty Fifteen parent theme, the comment that starts off style.css might look like this:
/*

Theme Name: My Custom

Author: Joseph Lowery

Template: twentyfifteen

Version: 1.00

*/
And that’s it, at least on the Dreamweaver side of the workflow. Pretty easy, right?
Activating a Child Theme
Once your child theme is established, you’ll need to activate it to put it to work. Switch over to your local WordPress site and log in by browsing to http://localhost/[sitefolder]/wp-admin/. Once you’re in the administrative interface, go to Appearance > Themes. The currently active theme is displayed first and noted as Active. Your new theme will be shown along side other installed themes.
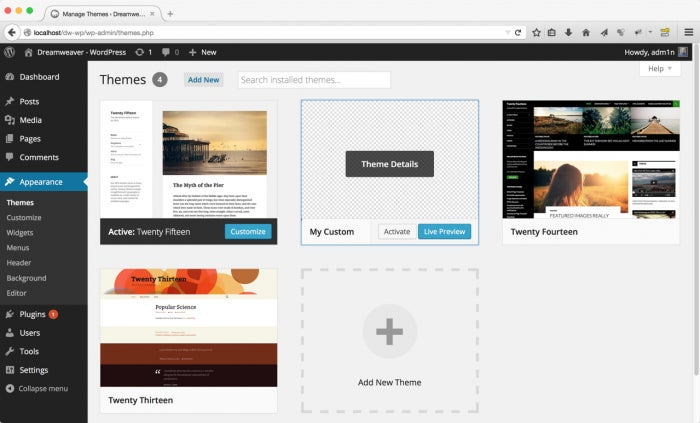
http://blogs.adobe.com/creativecloud/files/2015/03/themes-1.png
Although the theme is available, there’s no thumbnail to represent it, so it doesn’t exactly stand out. No worries – that, too, is a simple fix. Create a PNG of your design, sized to match, proportionally, 880 pixels wide by 660 pixels tall, and save it in your child theme folder with the name screenshot.png. To illustrate, I took the Twenty Fifteen PNG and added a big ‘ole plus sign to make it my own and stored it in the mycustom folder. Once that’s done, I just refresh the Themes page in WordPress and, hover over the new thumbnail, and choose Activate. Now my child theme is activated and moved to the front of the line. That’s all we need to do in WordPress; the rest is up to Dreamweaver.
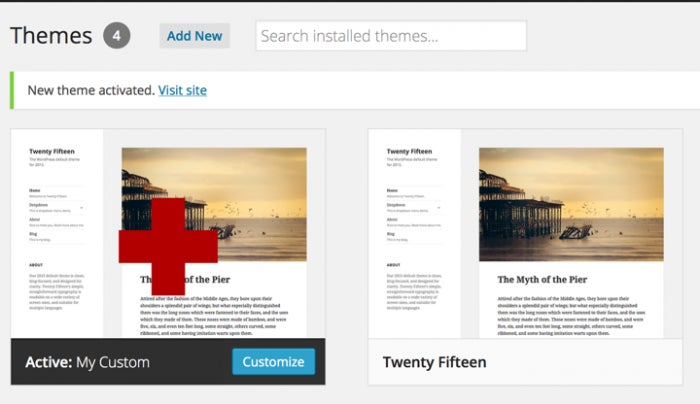
http://blogs.adobe.com/creativecloud/files/2015/03/themes-2.png
Building up your custom child theme
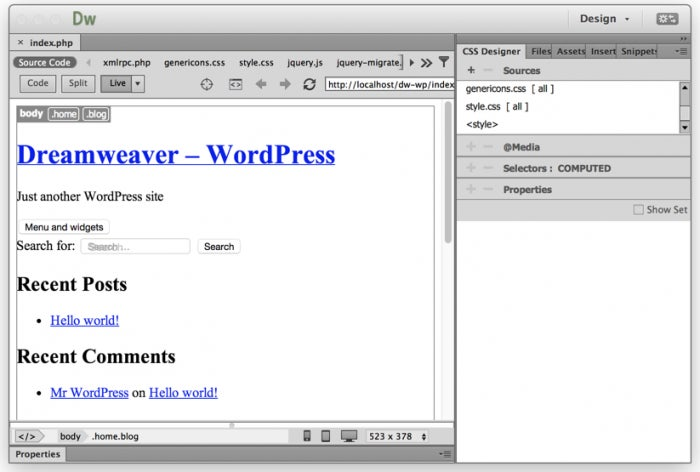
In Dreamweaver, let’s see how our child theme is shaping up. Open the index.php file from the WordPress site root (not to be confused with the index.php file in any theme folder). Power up Live view and—whoa!—where did all the styling go?
http://blogs.adobe.com/creativecloud/files/2015/03/dw-1.png
You’ve just seen why the most important concept to keep in mind when working with child themes is that any page you create in your child theme folder overrides the corresponding one in the parent theme folder. And that includes the style.css file we created. Because there are no CSS declarations in our stylesheet, the page is as plain as can be. To remedy the situation and work from your parent theme starting point, import the style.css file from the parent theme folder. I’ll add the following code to my style.css page:
@import url('../twentyfifteen/style.css');
After I refresh the page, I get the original look-and-feel, ready to be customized.
To facilitate your workflow, I highly recommend limiting the Related Files to just those your focusing on. WordPress integrates almost 100 separates files to display a single output page—and Dreamweaver makes them all available to you once you enter into Live view and click Discover. To pare down the overwhelming number of files, use the Filter Related Files feature found on the right side of the Document window.
https://blog.adobe.com/media_9039d20e4b217ac9e89bcf87503c5d168b1b12a6.gif
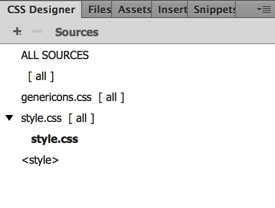
Because I’m just interested in CSS at this point, I can deselect all the other file types and leave .css by its lonesome. This will result in just four files displayed as related files: source code, Genericons.css, and two style.css files (parent and child). You will, of course, want all your custom CSS rules to go into the child style.css file. The two CSS style sheets are also accessible through the Source pane of the CSS Designer panel; here, the upper-most style.css file (with the adjacent right triangle pictured below) is the child theme version. The parent theme CSS is indented below it.
https://blog.adobe.com/media_aadcd433d30e88d4658b36fa172a186bba316036.gif
Working the Dreamweaver CSS workflows
There are two different CSS workflows you’ll need when crafting a custom child theme. First, any rules involving new classes, IDs or other selectors can be inserted directly into the child theme style.css file via either the CSS Designer panel or directly in Code view. If you’re going the CSS Designer panel route, you’ll want to make sure to select the proper entry from the Sources pane.
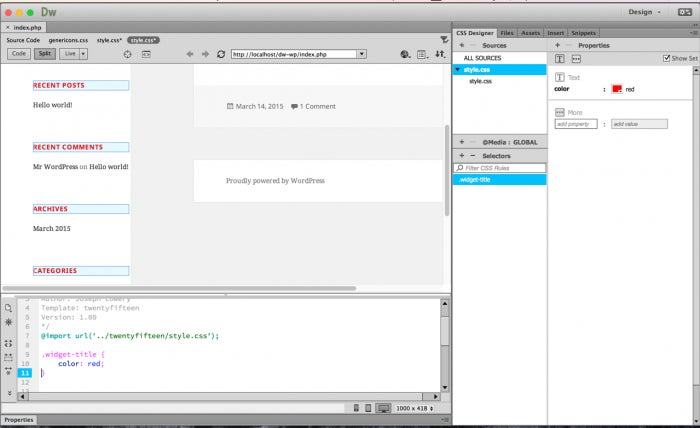
The other workflow is to use the exact same selector found in the parent CSS stylesheet. Because you have imported the style.css file, you’ll need to override any set properties you wish to change. For example, let’s say that you want the titles above all the sidebar widgets to be red in your child theme. To make sure you’ve got the proper syntax, the best course is to trigger Inspect mode and then identify the CSS selector styling your links in the current design. When I do that, I can see that the class .widget-title, coincidentally enough, is in control.
https://blog.adobe.com/media_9e84da2cbefe640992903a3b466579b57663f871.gif
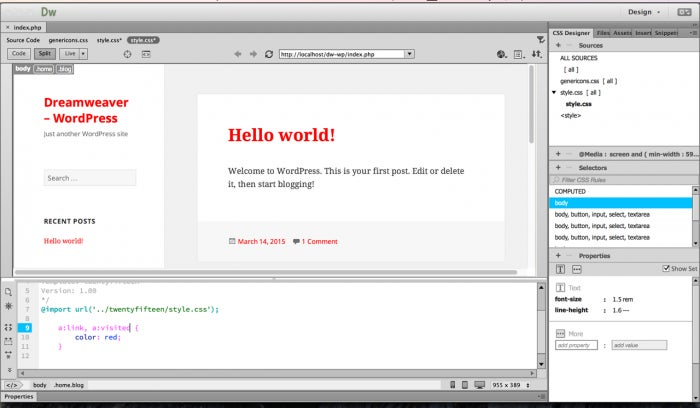
Now, I know exactly what selector to insert into my child theme stylesheet. Once I do that—and specify my new color:red declaration—I’ll need to refresh the Dreamweaver page to see the style take effect.
http://blogs.adobe.com/creativecloud/files/2015/03/dw-6.png
Sometimes, you need to modify a slew of properties for an existing selector. In that scenario, Dreamweaver CC has a couple of really nifty, little known features that can ramp up your efficiency. After you’ve pinpointed the selector in the parent style sheet, in the CSS Designer panel, right-click on it and choose Duplicate. This will create an exact copy of the CSS rule. Neat, eh? That’s somewhat-hidden feature #1… ready for somewhat-hidden feature #2? Drag the newly minted rule from the Selector pane to the Sources pane and drop it on your child style.css file. Boom! Now you can modify any or all of the properties, properly, either in through the graphic UI of the CSS Designer panel or manual in Code view. Best of all you’ll be sure to have the correct syntax for overriding the existing style and integrating your own.
Adjust the layout and beyond
Beyond tweaking the CSS, child themes can also modify any other aspect of your WordPress site, such as page layout. The basic technique is to copy the file you want to modify, like header.php, from the parent theme folder and paste it in the child theme folder. Then, open that newly-created file in Code view and make any desired changes. Be sure to save the modified file before refreshing Live view to see your updates.
There’s a lot more interplay possible with Dreamweaver CC and WordPress, but with the know-how you now have, you should be able re-style and modify any WordPress theme, safely, securely, and efficiently.
Download Dreamweaver CC today to get started!