Tips & Tricks: Adding a Witness to an E-signed Document
Big, life-changing events like mortgages and marriage certificates need dual signatures; but did you know that many of life’s more minor documents need a witness signature as well?
Think about how things run in your office or at home, and you’ll probably come up with a few common situations where you need a witness signature, like Power of Attorney, or real estate transactions. In spite of everyone’s best plans to keep on top of things, these situations can come up at the last minute and need your immediate attention.
Say you need a Power of Attorney document signed. Take a look at how you can handle the signature process in just a couple of minutes—without paper or running around the office—using Adobe Document Cloud eSign services.
From Acrobat DC open the Power of Attorney document.
- Click the Send for Signature tool in the Acrobat DC right-hand pane.
- Click Ready to Send and enter the e-mail address for the first signer (Roger) twice. It’s good practice to let the signer know they’ll be receiving two e-mail messages. The first message is for Roger to e-sign, and the second is for Roger to delegate to the witness.
https://blog.adobe.com/media_fae6e97899a1d544a5a265943746bc800368a2ba.gif
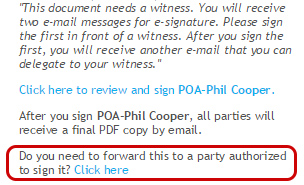
Moments later, Roger receives the first Please eSign e-mail, which he e-signs in front of a witness by selecting the “Click here to review and sign” link in the message. After Roger signs the document, he will receive a second e-mail. To obtain a witness’ signature, Roger clicks the link following the message Do you need to forward this to a party authorized to sign it? in his e-mail.
https://blog.adobe.com/media_bb833e58d8253bc521bc1d287e1b97327d6480ac.gif
Adobe Document Cloud opens and Roger types in an e-mail address and message for the witness signature, then clicks Delegate. The witness will then receive an e-mail message to review and sign the Power of Attorney document.
Within minutes, the files are processed, signatures stored, and all concerned parties receive e-mail messages with a link to the completed document.
Tip: You can also delegate the second signature directly from Adobe Document Cloud eSign services Dashboard. Select the agreement from the Manage tab, click the History tab, and choose Replace Signer. Enter the second signer’s e-mail address and a message, and click Replace Signer. On receipt, the second signer can add their signature, and return the signed document. The entire trail is managed and stored in Adobe Document Cloud. Here is a link to the quick steps you can use to Replace signer in an agreement.
Try downloading a free 30-day trial of Adobe Acrobat DC today.
