Embed Adobe eSign services Agreements to Sign into Adobe Muse Projects

Have you ever hosted documents that people need to sign on your website? For many people, the solution has often been to upload and link to a PDF to a website. The user would then have to download the PDF, print it out, sign it, then send it back via scanning, fax, or worse: mail. This is not an ideal digital experience.
What if you could embed documents for people to sign directly into your web projects that you design in tools like Adobe Muse? You can! Adobe eSign services, as part of Adobe Document Cloud, allows you to embed signable documents for signature directly into any webpage using widgets. Post your documents online for people to sign on any device.
Here are instructions on how you can easily embed an eSign widget into your richly designed web pages in Adobe Muse.
Not using Adobe Muse? No problem. Widgets can be embedded into any website by using the embed code provided when creating a widget using the instructions below.
What You Will Need
Before you get started, make sure that you have the following:
- Adobe Muse or Adobe Creative Cloud subscription
- Adobe eSign services Business or Premium subscription
- The eSign widget for Adobe Muse. Download here
- Document(s) you would like to convert into a widget
Word, Excel, PowerPoint, PDF, etc. A full list can be seen here.
Create a Widget
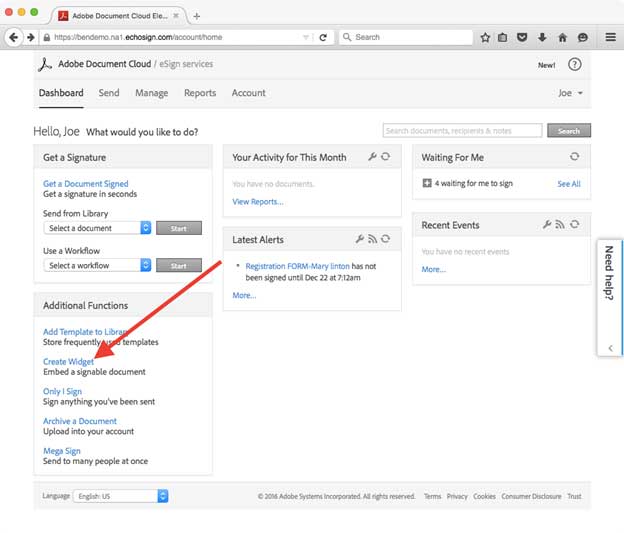
First, you need to create a widget within your eSign services. In this example, we are using a Model Release form for a Photo Studio who needs models to sign the release on an iPad before the shoot.
You can do this by doing the following:
- In your web browser, navigate to http://secure.echosign.com/public/login and log into your Adobe eSign service.
- On the main dashboard, click on Create Widget.https://blog.adobe.com/media_ebdde6de1d2892478530d6c88d112164de698013.gif
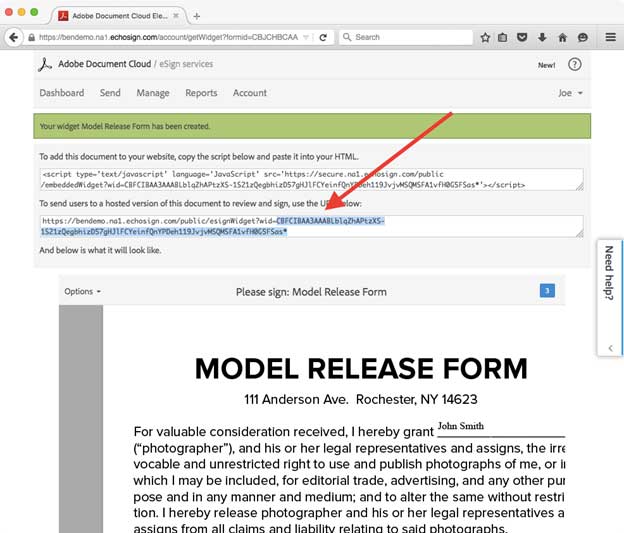
- In the Widget Name field, enter the name of the widget.
Ex. Model Release Form. - Upload your documents you need signed by clicking Upload or drag and drop documents into where it says Drag files here.
- Depending on how your documents are tagged, you may want to use Preview, position signatures or add form fields to add interactive fields to your document(s). You can see more information about this here.
- Click Create.
- Copy and paste the widget ID (wid).https://blog.adobe.com/media_c6f3cfe34fa558b34401fa8045a30cdfc215ac00.gif
You have now created a new widget. Using the
Embed into Adobe Muse Project1. Download the file from here.
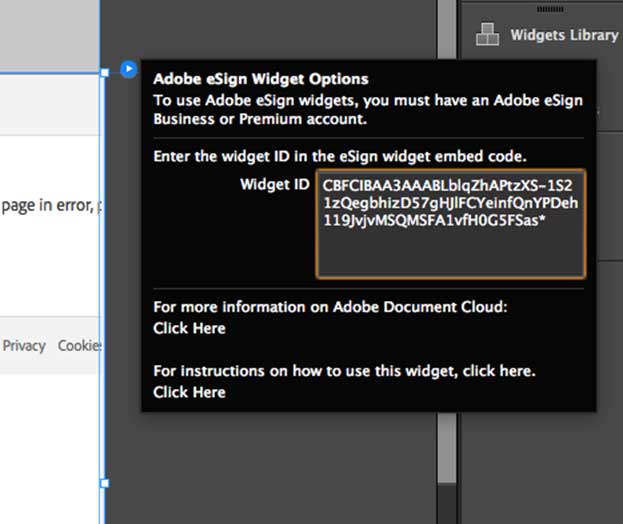
- _In _Adobe Muse, go to File > Place.__
- __Select the mucow file.__
- _**Click Open.******_
- Place the widget in the appropriate location and resize as needed.
- In thewidget fly-out menu, paste the widget ID that was copied from the embed code in the eSign dashboard. ****https://blog.adobe.com/media_32aa1d481177ed0ba307f28009e2bbf0c29985cf.gif****