Working across Multiple Resolutions with Adobe Animate CC
Adobe Animate CC takes a fluid approach to resolution. This allows you to create content with the minimum of fuss and also ensures that your work outputs to any screen size without a loss of fidelity.
What you will learn…
- How to scale your stage content to a size that is comfortable to work with
- Rotate the stage to draw easily at particular angles
- Export your work for multiple screen resolutions including 4K video
In this tutorial we’ll walk through the steps required to finish an animation and export it for high definition video. Along the way we’ll also explore some features of Animate CC that make life easier when drawing each frame of animation.

Figure 1. Some animation frames from the complete project.
Figure 1 above shows some frames from the animation that we’ll be completing. Most of the hard work has already been done for you, allowing us to focus on only the features relevant to this tutorial.
Getting Started
You’ll need Adobe Animate CC – download a trial.
A document file has been prepared for you to work from and can be downloaded from GitHub. You can find the document within the repository at: start/guardian.fla. A version of the document containing the finished animation that we’ll be working towards can be found within the repository’s final/ folder.
Note: There is some glitch in the github repository. Please download the raw file from https://github.com/ccaleb/custom-resolutions-animate-cc-tutorial/blob/master/start/guardian.fla and https://github.com/ccaleb/custom-resolutions-animate-cc-tutorial/blob/master/final/guardian.fla
You may encounter errors if it is downloaded from https://github.com/ccaleb/custom-resolutions-animate-cc-tutorial/tree/master/start and https://github.com/ccaleb/custom-resolutions-animate-cc-tutorial/tree/master/final
Exploring the Document File
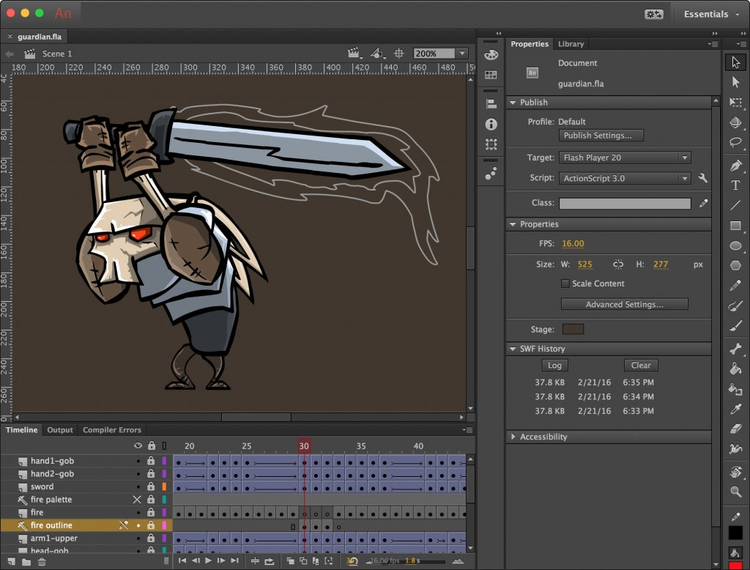
Take a look at the guardian.fla file provided. On the stage is a depiction of an evil guardian clutching a flaming sword. You can see from the timeline panel that the guardian is constructed using a series of layers. Those layers span across 50 frames of the timeline producing an animation of the guardian lifting and swinging the sword forward as if to attack an opponent.
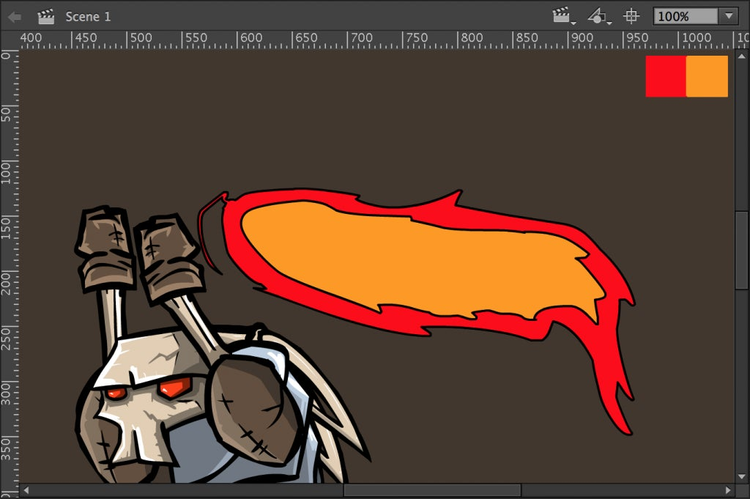
There are also a couple of guide layers. We’ll explore those layers soon enough but first familiarise yourself with the other layers. Take a look at the animation in its current form by scrubbing through the timeline. While the animation is almost complete you should notice that the flames around the sword have yet to be finished on frames 30, 31, and 32. Instead, a rough sketch exists in their place and can be seen in Figure 2 below.
http://blogs.adobe.com/animate/files/2016/03/figure-2.png
Figure 2. A rough sketch of the flames surrounding the sword on frame 30.
Before continuing, feel free to preview the animation. You can do this by clicking the timeline’s play button or by pressing Enter on your keyboard. This will play the animation once. You can force the animation to loop by first toggling the timeline’s loop button (Option-Shift-L | Ctrl-Shift-L).

http://blogs.adobe.com/animate/files/2016/03/figure-3.png
Figure 3. Looping the animation across the entire timeline.
After turning on the loop option you may also need to extend the timeline marker range to span across all 50 frames. You can do this by dragging the handles to the start and end of the timeline. This will ensure that looping takes place on the entire animation rather than a section of it. This is shown in Figure 3 above.
Additionally, it’s also possible to preview your work by selecting Control | Test Movie | In Animate (Cmd + Enter | Ctrl + End) from Animate CC’s dropdown menu.
Scaling the Stage and Your Artwork
The document currently has a stage size of 525 x 277 pixels. However, if we’re going to be adding a few frames of animation then it’s probably a good idea to work with a larger stage size that makes drawing more comfortable.
Animate CC allows you to easily resize the stage while also scaling up any artwork. There’s absolutely no need to recreate your artwork for different stage sizes as Animate CC will take care of that for you.
Let’s go ahead and double the size of the stage.
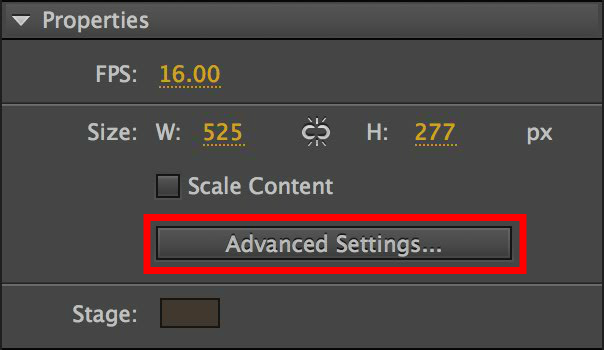
First, click on an empty area of the stage. The stage’s current width and height will be shown in the Properties panel. Now click on Advanced Settings (Figure 4) to open the Document Settings panel.
https://blog.adobe.com/media_b427aea4543cd0e14cabad16a09087a07ddd6240.gif
Figure 4. The Properties panel.
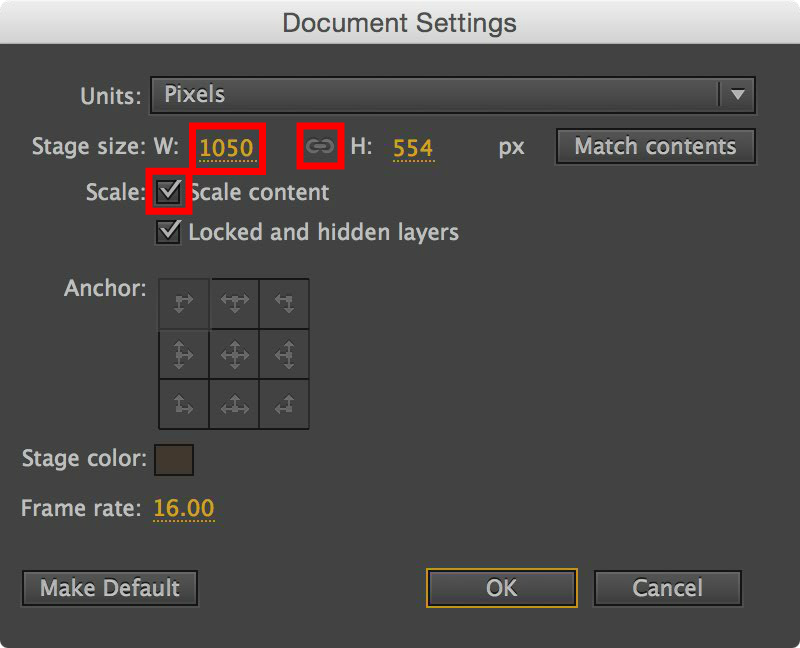
From the Document Settings panel we can change the stage’s size and scale our existing artwork.
Do this by first clicking the aspect ratio lock to ensure that both the width and height will scale together.
Then click the Scale content checkbox to ensure that any artwork on the stage will scale with the stage.
Finally, edit the Stage size by setting the width to 1050 pixels and pressing Enter. The height will automatically update to 554 pixels.
https://blog.adobe.com/media_8c9962c971431baacae820fff0e116229b517f70.gif
Figure 5. The Document Settings panel.
Your Documents Settings panel should look identical to that shown in Figure 5. If so, click OK and the changes will take place. Your stage and its content will now be twice their original size. All your artwork has seamlessly scaled-up to its new target resolution.
As you can appreciate, being able to scale content gives you the confidence to create artwork knowing you can easily resize the stage later. It also makes it extremely easy to repurpose any existing projects for a wide range of screen sizes.
Drawing your Line Art
We’re now in a position to start drawing our missing flame artwork.
Move to frame 30 of the timeline. There you will see the first of our incomplete animation frames. A rough outline of the sword’s flames has been drawn onto the layer named fire outline.
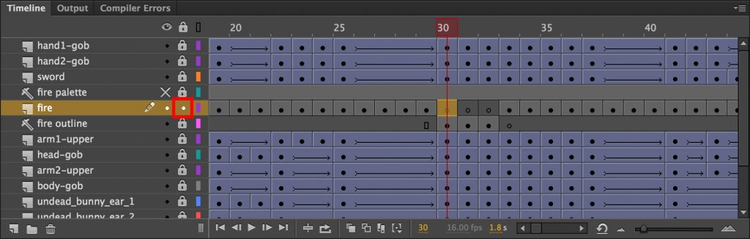
We’ll draw the final artwork for our flames onto the layer named fire, which can be found directly above the fire outline layer. Unlock the fire layer and click on frame 30 within it (Figure 6). You may also want to temporarily hide the sword layer to ensure you can see the outline artwork in its entirety.
http://blogs.adobe.com/animate/files/2016/03/figure-6.png
Figure 6. The unlocked fire layer selected on frame 30.
We’ll use the Paint Brush (L) tool to draw the final version of the line art. Select it, set the stroke colour to black (#000000) and set a thickness of 2.00.
As you can see from the rough outline that already exists, the fire surrounding the sword is made up of an inner and outer outline. Let’s start by doing the inner outline. Simply draw over the top of the original rough outline.
You may also wish to use the Zoom (Z) tool to help draw your detail more accurately.
Stage Rotation
Each of the flames moves away from the sword at different angles, which can make accurately following the outline tricky. Drawing this on paper probably wouldn’t be as much trouble as you could simply rotate the piece of paper as you went.
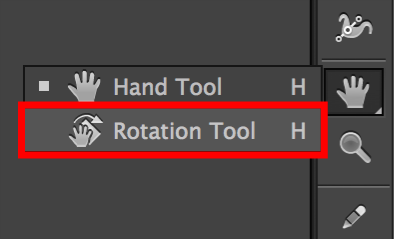
The good news is that Animate CC provides a new Rotation tool that allows you to temporarily rotate the stage as you work, helping you to draw easily at particular angles. The Rotation (Shift + H) tool can be found in the Tools panel and is grouped with the Hand tool (Figure 7).
https://blog.adobe.com/media_c0270ab1c5a18f051d889a73ce941beafe8119bf.gif
Figure 7. The Rotation tool.
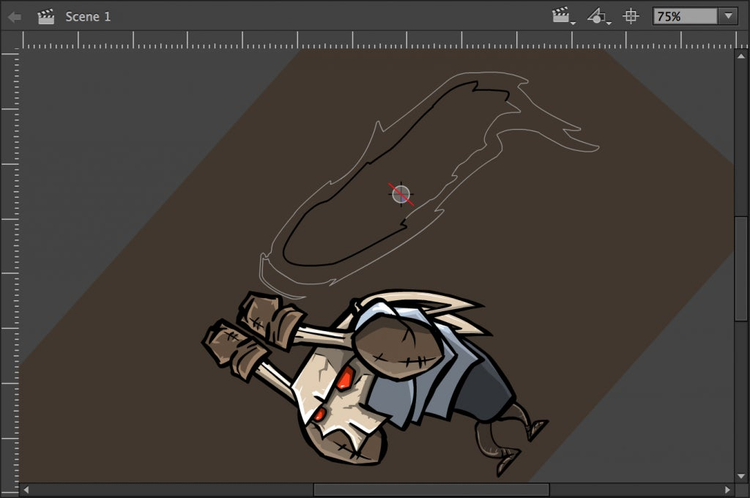
Let’s go ahead and try this as we continue drawing our flame outline. You can quickly rotate the stage regardless of which tool you have selected by simply holding down the Shift and Space keys together, then dragging the mouse to rotate the view (Figure 8). Alternatively, if you’re working with a touch device such as the Wacom Cintiq then you can take advantage of multi-touch to rotate the stage instead.
Give it a go, rotating the stage to various angles as you draw the line art. You should find that achieving your end result is easier and that the final quality of your work has improved using this approach.
http://blogs.adobe.com/animate/files/2016/03/figure-8.png
Figure 8. Rotating the stage.
It’s also possible to change the Pivot point for rotation. The pivot point is depicted by a crosshair and can be seen in Figure 8 above. Simply click on a new position within the stage and it will become the new pivot point for stage rotation.
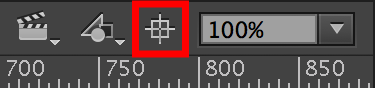
Stage rotation is temporary. It doesn’t affect the actual rotation of your completed work. You can return the stage to its original orientation at any point by clicking on the centre stage button (Figure 9).
https://blog.adobe.com/media_35ea5cec708b4d8d222df66b16fed35d1cf7ef9b.gif
Figure 9. The centre stage button.
Go ahead and complete both the inner and outer line art for frame 30. Once you have finished, double-click both your inner and outer outlines and ensure that there are no gaps in the line art. If there are then use the Paint Brush (L) tool to plug the gaps. Alternatively you can use the Selection (V) or Subselection (A) tools to help join any broken line segments together.
Colouring your Artwork
With the line art on frame 30 complete, we can go ahead and add some colour. We’ll paint the inner part of the sword’s flame orange, while the outer flame will be coloured red.
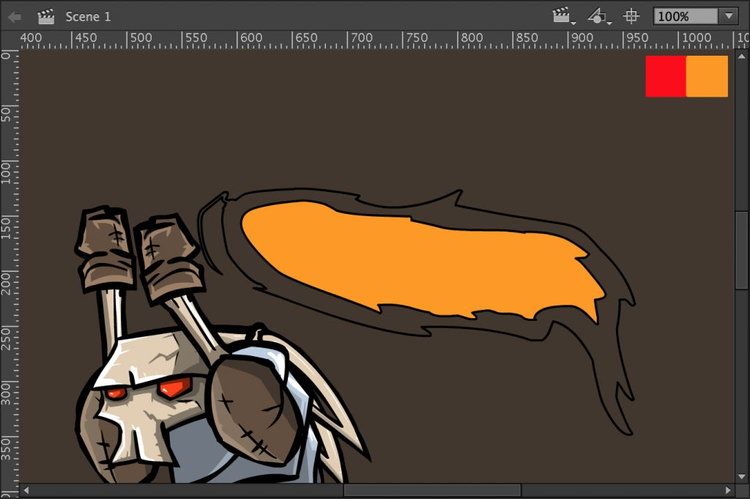
Select the Paint Bucket (K) tool and set the fill colour to orange (#FF9A01). To save you entering a colour value, there’s a guide layer on the timeline named fire palette. It contains an orange and red square. Both represent the colours we’ll need for the swords flames. You can simply use the colour picker to obtain the correct colour value from each square.
Click in the centre of the flame line art to colour it orange (Figure 10). If it fails to fill with colour, or both the inner and outer sections get coloured, then it means that your line art has breaks in it. Join any breaks in your outline then repaint.
http://blogs.adobe.com/animate/files/2016/03/figure-10.png
Figure 10. Inner flame coloured orange.
Now set your fill colour to red (#FF0000) and colour the outer part of your flame artwork (Figure 11). Again, if the outer area fails to fill with colour then you likely have a break in your line art somewhere. Correct this then repaint.
http://blogs.adobe.com/animate/files/2016/03/figure-11.png
Figure 11. Outer flame coloured red.
The final step is to remove the line art that you have just drawn. We only actually need the filled colour. To do this, double-click on each line and press the Delete key to remove it.
Finally, temporarily hide the fire outline layer and check that you are happy with your work.
Completing the Other Two Frames
With frame 30 complete we can go ahead and do the same for frames 31 and 32. Simply move to each frame, draw over the rough outlines, then apply the correct colour fills. Remember to take advantage of the new stage rotation feature as you draw your line art. You’ll find drawing much more comfortable when using it.
Also, don’t forget to remove the line art after you’ve coloured each frame.
Previewing Your Work
Once complete, look over each frame and make sure you’re happy with the end result. Also, make the sword layer visible again.
It’s a good idea to check how your three frames look within the context of the whole animation by using the timeline’s play button or by pressing Enter on your keyboard. Alternatively, you can test your movie by selecting Control | Test Movie | In Animate (Cmd + Enter | Ctrl + End) from the dropdown menu.
If you’re happy with your work then go ahead and remove the fire outline layer from the timeline as it’s no longer required. Feel free to also remove the fire palette layer too.
Export as 4K and Ultra HD Video
With our animation complete we can go ahead and export it as a video.
Adobe Animate CC introduces the ability to export your content to custom resolutions, allowing you to target any screen, including the latest ultra high definition displays. While we changed the physical stage size earlier, that’s not necessary in order to export video at different resolutions. We can simply specify a target resolution as part of the video export process. Let’s go ahead and export our content for full 4K.
From the Animate CC dropdown menu select File | Export | Export Video. The Export Video panel will appear.
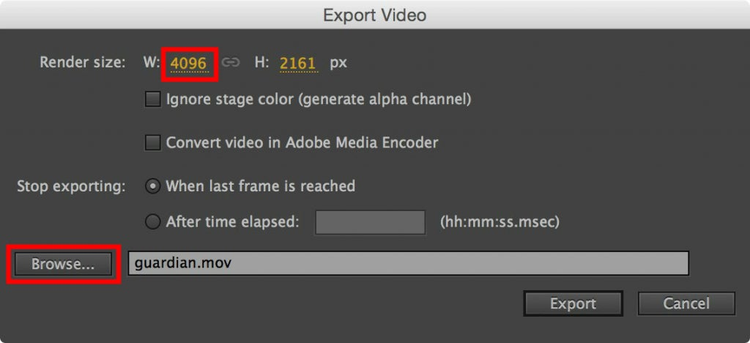
Within the panel, set the target width to 4096. The height will automatically update to ensure that the video’s aspect ratio is maintained (Figure 12).
http://blogs.adobe.com/animate/files/2016/03/figure-12.png
Figure 12. Exporting for 4K video.
Click the Browse button and select a destination for the video.
Finally, click Export to generate the video.
Find your saved video file and play it back. You’ll see your animation playing in glorious high definition. All your original vector artwork has been perfectly scaled to this new resolution as part of the video export process.
Summary
We’ve worked our way through the process of creating an animation and exporting it as video. Along the way we’ve taken advantage of some of Adobe Animate CC’s exciting new features including stage resizing and rotation, content scaling, and video export to custom resolutions. While Animate CC offers many more new features, even this small subset can significantly improve your workflow and help you produce content that is optimised for any resolution including Hi-DPI, Retina, and Ultra HD 4K displays.
Artwork by: Alex Fleisig
http://blogs.adobe.com/creativecloud/files/2016/02/afleisig.jpg

Alex Fleisig is a professional animator and game designer. He has worked for some of the largest CGI film production companies in the industry including Pixar and DreamWorks. His character animation portfolio stretches across an impressive number of movies including How to Train Your Dragon, Megamind, Madagascar, Shrek, and Finding Nemo. Recently, Alex set up his own indie game label where he released platform action game, Corgi Warlock, on Steam.
Alex’s blog can be found at www.alexfleisig.com and he tweets as @alexfleisig.