[Guest Post] “Customize FrameMaker 2015 DITA Templates for your Corporate Design” by Bernard Aschwanden

In about 1,500 words I plan to teach you how to change the look of the default templates provided by Adobe for authors who create DITA content. I include step-by-step illustrated exercises to get you started. Even with no real FrameMaker experience you can quickly update the appearance of a format.
You can change formatting assigned to an element (pretty easy, and what I show in this blog), customize an EDD to configure templates (more involved, and not something we dive into), and even add full DITA support to your existing templates (very involved).
I focus on FrameMaker (2015 release), but many steps also work with earlier releases. In my webinar “Setting up a Corporate Template for DITA with FameMaker 2015” from March 8, 2016, I showed a lot more, but for those who want to start with simple to follow step-by-step instructions I suggest the steps in this article. It’s written for those who have aspirations to develop complex templates, but initially don’t want to dive into working with an EDD.
You need to be:
- familiar with building templates and modifying paragraph tags (using the Paragraph Designer),
- comfortable working with a structured DITA document (so ensure you can create a task, concept, or reference with basic content).
Initial setup work
Before we go too far, let’s ensure we have copies of the source files (so that you can reset your system to the Adobe provided ‘default’ installation) as well as some initial content to work with. Without this, you run the risk of overwriting source files that can only be recovered through installation.
Create a backup
Before you do anything in this tutorial create backups of the default templates used by authors.
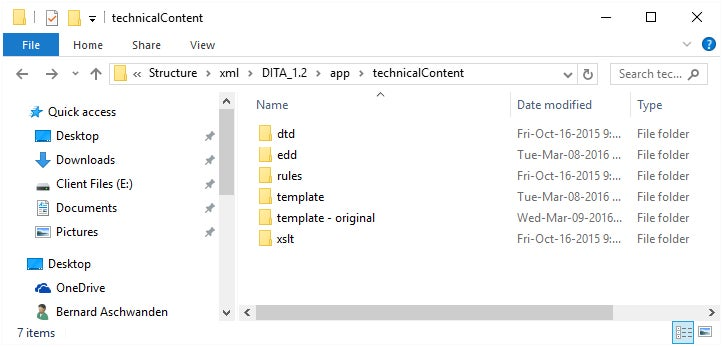
- Navigate to
C:\Program Files (x86)\Adobe\AdobeFrameMaker2015\Structure\xml\DITA_1.2\app\technicalContent - Your path may start a bit different but the highlighted information should be easy to find once you locate the Adobe installation folder.
- Duplicate the template folder provided by Adobe.
- Rename the duplicate folder template – original.
Launch FrameMaker as an administrator
Due to Windows permissions, it’s best to launch FrameMaker as an administrator. I’ll explain the process for Windows 10. If you use a different version check online or talk to an administrator for tips.
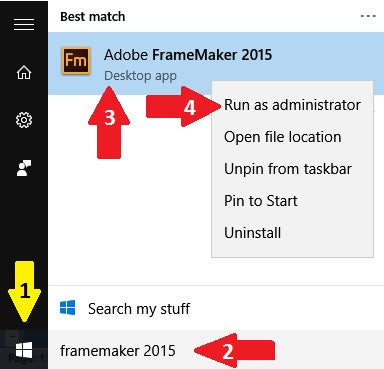
- Click the Windows Start button.
- Type FrameMaker 2015 (or similar content to find your FrameMaker launch icon).
- Right click Adobe FrameMaker 2015 in the matches.
- Choose Run as administrator.
The software launches with full administrator privileges.
Create a basic concept
Ensure FrameMaker is in the Structured interface.
Read this FrameMaker (2015 release) help article to learn how to Choose an authoring mode.
- Select DITA > New DITA File > New <concept>
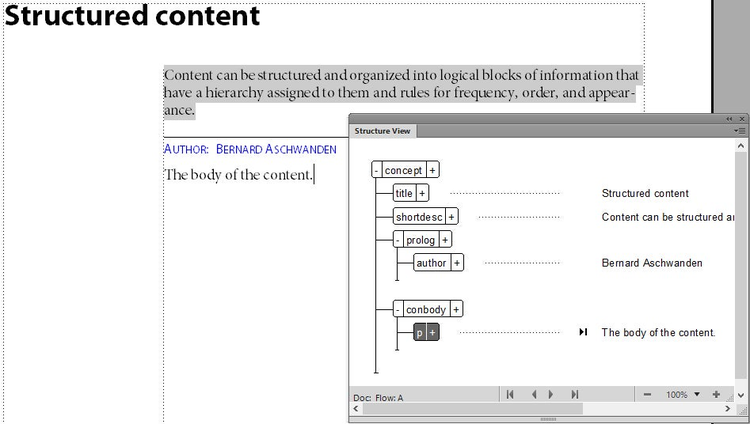
- Click <Enter title here> and type Structured Content.
- Click <Enter short description here> and do so (see the illustration below for the “Content can be structured…” sample text).
- Repeat the process for the <Author> and <text>.
- Click <related-links> in the Document View or the Structure View.
- Press Delete.
- Save the file as SampleConceptContent.xml in a location you can easily find again (for example, to the Desktop, or a personal folder).
Nice work. You now have a valid DITA document.
For more information on structured authoring in DITA and FrameMaker, I’d suggest you watch this video:
Updating a style
The next challenge is to reformat content. The challenge isn’t making a single change, it’s getting that format change to “stick” to content.
Update content in an open document
The current document has default formatting which you can modify. This isn’t what you actually do to succeed though, but rather I’m getting you to do this to help illustrate WHY modifications within a single open file is not the right approach. It’s just a minute or so to do this, so please perform these steps.
- In your open concept (the one we created and saved) press Ctrl + m to open the Paragraph Designer.
- Click anywhere in the shortdesc element (it has a shaded background).
- Review the Default Font properties of the paragraph.
-
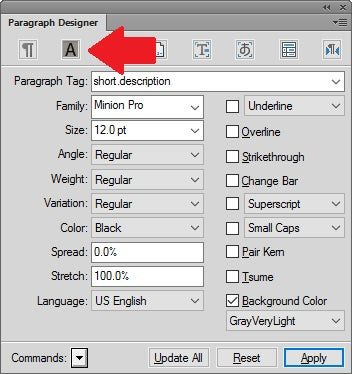
- The paragraph is tagged as short.description and has a Background Color assigned to it.
- Change the Background Color to Yellow and click Update All.
- If prompted about changing the paragraph formatting, click Continue.
-

- Review the change.
- Close the file, and then reopen it and review the format of the shortdesc element.
- Close the file one more time.
At this point it is both normal and fair to wonder what happened to the formatting. It’s reverted.
When you saved the document as XML formatting was not retained (nor should it as the formatting is added by FrameMaker for your convenience using a visual interface). Every time any DITA file is opened by FrameMaker it is “imported” to a template. The trick is to adjust the template file instead. Specifically, to change the appearance of a shortdesc element in the template. Conveniently for you, that’s the next topic.
Change the shortdesc element in a template
FrameMaker templates exist in a default installation location. Remember to make a backup before you edit any of these files.
- Open the file concept.template.fm located in C:\Program Files (x86)\Adobe\ AdobeFrameMaker2015\Structure\xml\DITA_1.2\app\technicalContent\template.
- If required, insert a concept element, and add text and elements to create the following, noting that the shortdesc element has a bit of text added to it.
-

- Press Ctrl + m to open the Paragraph Designer.
- Click anywhere in the shortdesc element (it has a shaded background).
- Review the Default Font properties of the paragraph.
- Change the Background Color to Yellow and click Update All.
- If prompted about changing the paragraph formatting, click Continue.
-
- Review the change.
- Select all the body content (for example, click the concept element in the Structure View, or press Ctrl+a to select the text and elements).
- Press Delete so that you have an empty text frame.
- Close the file, saving the change when prompted.
If you see a message that tells you that you cannot lock the file it is because you do not have administrator privileges (review the earlier requirement and instructions to launch as an admin).
Test the template changes
Once you have updated a template, any file that is opened using that template should reformat. Since we only changed the concept template any concept will either be created based on this, or re-open using the template.
- Open the file SampleConceptContent.xml from the location you saved it to earlier (for example, the Desktop, or a personal folder).
- Review the short description elements content (now with an updated background color).
Next steps
Congratulations. You’ve managed to make an update to a template file. The job isn’t done, but you are in a much better position to apply your preferences to a template.
Review the FrameMaker template folder carefully. There are many defaults you can changed. As you become more comfortable working with the templates changes can be made quicker. There are also ways that you can modify your own templates to work with DITA. Videos and webinars Adobe provides help with that as well.
Start slow. Experienced template developers can adjust the appearance of an author template in a reasonable amount of time, and it’s all done using a visual interface. No need to dive into learning the DITA Open Toolkit, or scripting solutions. It’s not something that you do in a few hours, but within a week or so an experienced developer can get you up and running with anywhere from 50% to 90% of what you need. The remainder could be days, weeks, or even months of effort and testing.
Some of my clients are up and running in DITA – with a custom template – in a matter of hours (it is easiest when the default FrameMaker DITA templates are almost perfect for you and only a few minor edits are needed). Other clients have very strict regulatory, governmental, or other restrictions to work with. Some want to have every font, character space, table line width, and image placement checked and triple-checked by marketing, legal, sales, and development. They have unique rules for every type of bullet (first/last/middle/single) and multiple levels of nested bullets, again, each with unique rules.
The more you want to customize the formats in the templates, the more you add complexity and overhead. Both add more time to a project, but to your benefit it is a project driven by visual and immediate feedback. Not by having to muck around in code and rebuild output every time a change request is made.
Should you decide to try structured authoring feel free to email me for a more detailed demonstration of the template development process, DITA, and analysis needed as you make the move. With hundreds of successful conversions I’ve had the chance to see the good (and the bad) that can be done in the development of custom templates.
I’ve written a total of 1543 words (including these closing comments) and I hope this helps you learn about Adobe FrameMaker 2015 and gain a better understanding of the basics of updating a template on your path to working with DITA.
I can be reached by email at bernard@publishingsmarter.com and hope we have a chance to see what we can do together if you do decide to develop custom DITA templates. All the best.