Easing and the Motion Editor
Even a small amount of easing, if applied correctly to an animated object, can go far in conveying a truer sense of reality and weight. Animate CC includes a number of mechanisms for applying easing in this way, and we will examine how to apply simple and advanced easing in this article… with a focus on the new and improved Motion Editor.
https://blog.adobe.com/media_f52b9c7d0b741f1c3025948a9f4e88d8ce671890.gif
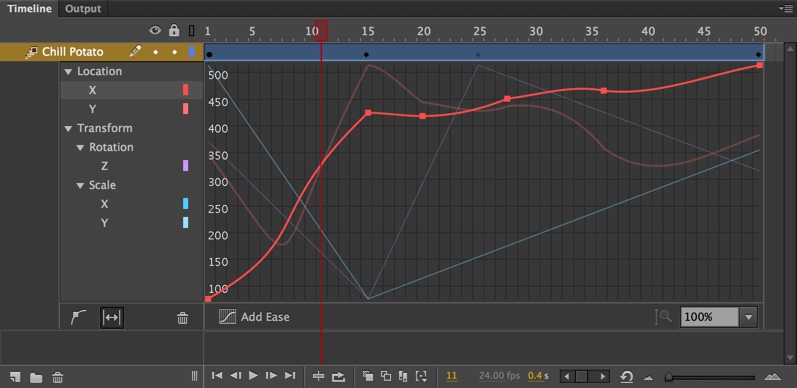
Figure 1. The Animate CC Motion Editor
The Motion Editor is a mechanism that can be used exclusively with Motion Tweens to perform advanced easing upon any tweenable property of a symbol instance being animated through an applied Motion Tween. When using a Shape Tween, a Classic Tween, or animation with an IK Armature, the Motion Editor will not be available – yet other easing mechanisms can still be applied through the Properties Panel.
Fall and Rise of the Motion Editor
The background of the Motion Editor is actually quite similar to that of the Bone Tool and associated inverse kinematics armature support within Animate back when Flash Professional (Animate’s former identity) was updated from the CS6 version to CC. The application was completely rewritten to modernize the codebase and make it more powerful than ever. However, certain features such as the Motion Editor and Bone Tool were not rewritten along with the core application. This meant that for a few release cycles, the program did not include a Motion Editor at all!
With that said… Adobe had hinted that certain features left out of the program, due to the aforementioned rewrite, would be added back in if there was enough of a desire for them. In June of 2014, we saw Flash Professional receive a revamped and reintegrated Motion Editor – and this is now available in Animate as well. Whereas the old Motion Editor was a completely separate panel (and a bit clumsy to use), the new Motion Editor is integrated directly in the Timeline and allows direct manipulation of each property of an object across time in fine detail.
Simple Easing with the Properties Panel
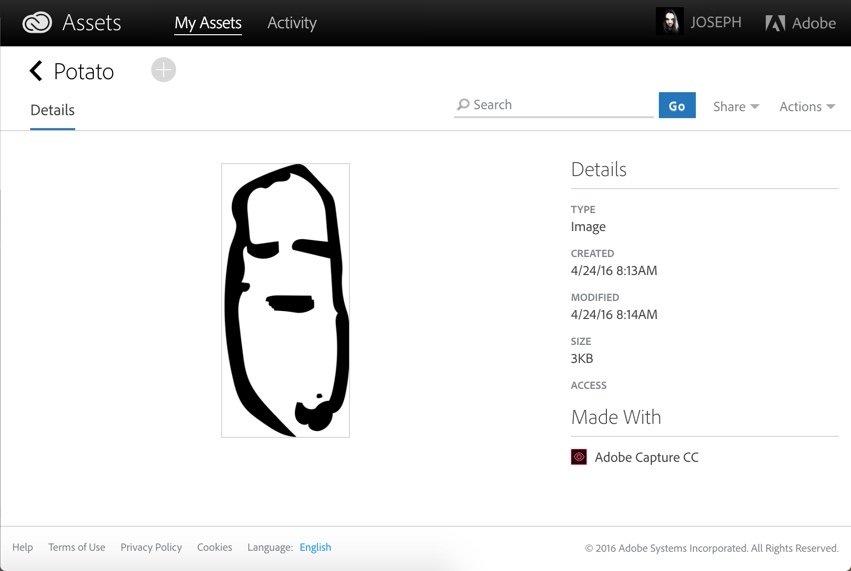
For an example, we’ll create a Movie Clip symbol instance in Animate and perform a variety of easing procedures upon it. First, I’ve gone ahead and captured a rough sketch created by one of my daughters with the Adobe Capture CC mobile app.
https://blog.adobe.com/media_867dbc78fa91bef3e4a252cad28abd7761b3b34a.gif
Figure 2. Captured potato shape in my CC Library
I’ve used the tools within Capture CC on Android (you could use iOS instead) to convert the sketch into a shape and have saved it to a CC Library in order to use it within Animate. You can download the shape, or sync it to a CC Library of your own by using this share link.
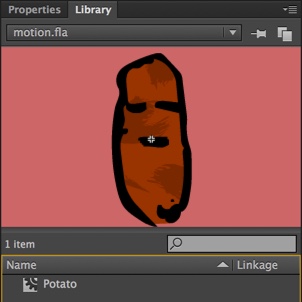
Once brought into a document with the CC Libraries panel within Animate CC, I’ve gone ahead and applied some color to the sketch by using the Brush Tool, Fill Tool, and even some nice vector art brushes using the new Paint Brush Tool. With the coloring stage completed, I’ve gone ahead and created a Movie Clip symbol from the fully colored potato assets by selecting all of its component shapes and choosing Modify > Convert to Symbol from the application menu. In the dialog which appears, I’ve given it the name of “Potato” and chosen Movie Clip as a symbol type.
https://blog.adobe.com/media_138e123960a70640b224faf51f9373d2270c6e78.gif
Figure 3. Movie Clip Symbol – Chill Potato
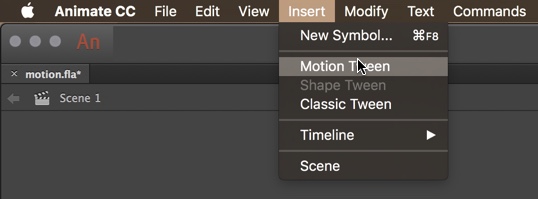
The symbol now exists within the project Library and I have an instance of it on my Stage to work with. Extending my frame span out across 50 frames in the Timeline by placing the playhead at frame 50 and choosing Insert > Timeline > Frame from the application menu, I can now begin to animate. I will create a Motion Tween across all this frame span by clicking upon any one of those 50 frames, going to the application menu, and choosing Insert > Motion Tween. I now have a Motion Tween established along the Timeline for this particular instance.
https://blog.adobe.com/media_78040ae64598450500169eab41ccfbd65731615d.gif
Figure 4. Creating a Motion Tween
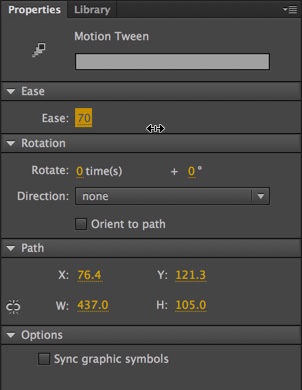
Simple eases can be applied to any tween type through the Properties panel when any frame of a tween is selected. The Ease value can be set from -100 (indicating a strong ease in) all the way to 100 (for a strong ease out).
https://blog.adobe.com/media_35df261f7fc360bda1c17ec9ee96b9fe68f74b31.gif
Figure 5. Easing through the Properties panel
As indicated, any negative value will cause a simple ease in to occur for that tween, while any positive value will result in a similar ease out. While this easing can be performed on any tween type, there are some drawbacks to this method if you require anything beyond a simple ease. In fact, any easing applied in this way will apply to all instance properties that are being animated by the tween – they cannot be isolated to exhibit different easing types through this method.
Even though we’ve created a Motion Tween and applied this simple easing to that tween, as mentioned previously – we actually have another interface at our disposal within Animate to create easing on specific properties with complete customization of those eases through a visual user interface. This is what we will examine next.
Advanced Easing with the Motion Editor
To access the Motion Editor from an existing Motion Tween, all that needs to be done is to double-click on the frame span of the actual Motion Tween. The Motion Editor will then contextually emerge from the Motion Tween, within the project Timeline. To close the Motion Editor, simple double-click on the tween once again and the Motion Editor will collapse back within.
Examining the Motion Editor Interface
Once the Motion Editor is exposed, you’ll likely wonder how to go about using it! At first glance, it may be intimidating with all of its graphs, buttons, and individual properties. Learning what these interface elements are and what they do will go far in gaining an understanding of the sort of advanced work you can accomplished with this tool.
https://blog.adobe.com/media_dc312bb36009e3a428d4a2c24079cbab73dc7e8d.gif
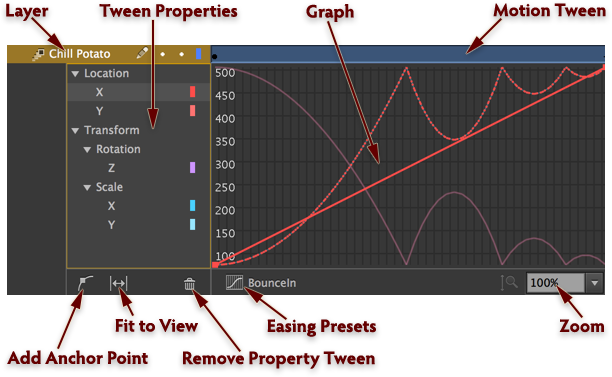
Figure 6. Motion Editor Controls
As you can see – there are quite a few tools, functions, and display adjustments to consider while using the Motion Editor. Here follows a rundown of everything detailed in the above figure.
Layer: This is the layer which contains the Motion Tween that the Motion Editor is tied to. In our example, the “Potato” Movie Clip symbol instance resides within this layer and has a Motion Tween applied to it.
Motion Tween: Double-click upon the Motion Tween to expand or collapse the Motion Editor.
Tween Properties: This column will contain all the properties of the instance being tweened which currently have some sort of value change attributed to them. Various position, scale, skew, rotation, color, and filter properties can all be manipulated through the Motion Editor.
Graph: The graph area displays all of the different property curves for this tween. Selecting a particular property along the side will highlight the associated property curve. The selected curve can then have its anchor points modified using the Selection Tool.
Add Anchor Point: Allows you to add anchor points to a property curve. Once an anchor point is added, this tool is automatically deselected so that the new anchor point can be further manipulated with the default Selection Tool.
Fit to View: This button will expand the Motion Editor along the entire width of the Timeline, making it easier to work within the graph area and further manipulate the various property curves.
Remove Property Tween: Selected property tweens from the left-hand column can be removed with this function. They can be added back in by adjusting those properties across the Motion Tween as you normally would, and then further tweaking them within the Motion Editor.
Easing Presets: Upon choosing this, a small interface will appear which allows you to apply easing presets to the selected property tweens.
Zoom: Will zoom the graph area in height for more precise modification of property tween curves.
Using Easing Presets
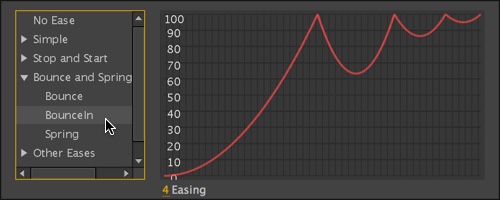
The use of easing presents is the simplest way to apply an effective ease to an animated property. Clicking on the Easing Presets icon will pop up a small selection window which includes a number of common easing presets, organized by category. Expanding these categories give you access to the individual presets with a visual representation of the property curve displayed across an internal graph.
https://blog.adobe.com/media_8e3f3660c8bbb70d02e29446f48fd030f4b81231.gif
Figure 7. Motion Editor Easing Presets
Selecting each preset will apply the selected preset to the individual selected property. Note that you can also apply the same Easing Preset across multiple property tweens by selecting them before entering the Easing Presets.
Modifying Property Curves
Likely, when you first enter the Motion Editor, you won’t actually see any property curves that are very curvy – they’ll more likely appear as straight lines. No matter how linear these paths are at first, they will have an existing anchor point at each end. These curves can be made more complex by adding additional anchor points along the length of the path.
Use the Add Anchor Point Tool to add new anchor points along a property curve. With the tool enabled, just click anywhere along the existing path to add a new anchor point. When this tool is not selected, it is possible to click on and modify existing points and even select and delete them. Doing this, you can manually adjust each property curve to your exact specification.
https://blog.adobe.com/media_b6425f116c6a6340c3228ddcb061b4286c4895ff.gif
Figure 8. Modifying Property Curves
You can perform these actions in a freeform way, or even use an Easing Preset to get you started, and then tweak the resulting property curves with these modification methods. If you are used to working with paths and anchor points within Illustrator, Photoshop, or even in Animate itself… the same properties apply here.
Preview the Animation
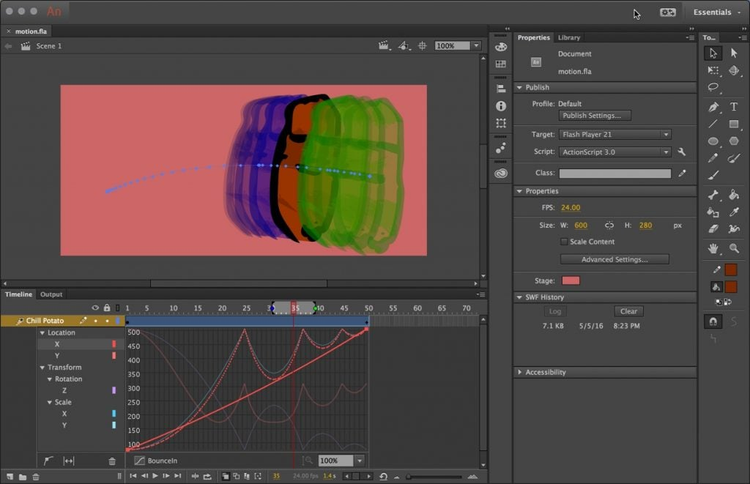
Animate provides a mathematical-visual representation of the property value modifications through the Motion Editor graph. You can also use other tools available within the Timeline to really get a feel for your animation even before a true preview.
http://blogs.adobe.com/animate/files/2016/05/figure9-1.jpg
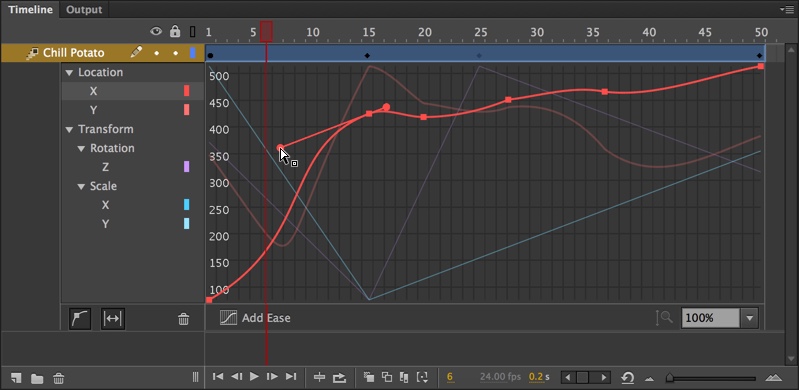
Figure 9. Preview with Onion Skinning
For instance, in the figure above, we are using a combination of the Motion Editor along with Onion Skinning turned on across a number of frames. Animate now provides definite colors to the onion skinning where frames that precede the selected frame have a blue tint, and those following it are tinted green. The number of frames included in either direction can be adjusted by clicking and dragging the small blue or green circles on each side of the onion skin indicators in the Timeline.
Oftentimes, using a combination of features within Animate can produce a clearer vision of what to expect when the content is actually running!
Conclusion
As demonstrated in this article, there are many options available within Animate CC to add a bit more weight and realism to your animated content. Easing with the Properties panel or with the Motion Editor can enhance any project type, including rich ads, web animations, interactives, and more!