[Guest Post] “Let your clients speak to your Online Help – Google’s Speech API with RoboHelp Responsive HTML5 Output” by Theresa Munanga

As part of our commitment to provide our customers with the best user experiences possible, our company implemented speech recognition with our RoboHelp (2015 release) Responsive HTML5 online outputs. We embrace the future of technical communication, so why not incorporate Google’s Speech API? Even if it’s only available for Chrome browsers right now (version 25+), we can use it and add the others later.
This is a tutorial on just one way to use Google’s Speech API with RoboHelp HTML5 output files. Here are a few caveats:
- This is not a tutorial on the proper way to write JavaScript code.
- Although our users speak – and Google recognizes – many different languages, this tutorial provides instructions for English.
- There are other online tutorials that may be helpful. I learned about speech recognition and synthesis from tutorials and projects created by Agunloye Oluwatobiloba, Ian Devlin, George Ornbo, and Matt West.
- Only one browser tab can have the microphone in use at one time.
- If the files are on a secure network (HTTPS), a function can be added to keep the browser listening. Otherwise, it shuts off after ten seconds of silence and any code to keep it on constantly reprompts the user for permission.
In this Blog Post

Google Speech API Constraints
Due to the early nature of browser speech recognition, we have to work around the Speech API’s limitations. That means we might have to:
- Use additional or replacement keywords in the JavaScript code based on what the browser “hears.” For example, in this tutorial and our own projects, I’ve had to add “Maine” (for “main”), “dependence” (in addition to “dependents”), and “Healthcare” (for “healthcare”). It’s essential to use Chrome’s console to see exactly which words and spellings are recognized by the browser when we speak.
- Use multi-syllable keywords for clearer word recognition.
- Be aware that the Speech API shuts off after ten seconds of silence. When this happens over non-secure HTTP, refresh the browser page and click Allow again. Over HTTPS, use the function that keeps it on all the time.
We also need to provide instructions for using the voice recognition feature. This can be in the form of short instructional text at the top of the main landing page, tooltip type hover text, a button for the user to click for instructions, a pop-up message, or something else.
Prerequisites
You should be comfortable with HTML and understand at least a little JavaScript before attempting to use this tutorial with your own RoboHelp projects. Also, make backup copies of the files before you start editing, and save them outside of the project folder.
For this tutorial, you will modify these RoboHelp project output files in a text editor:
Topic.slp(screen layout file)index.htm(generated output) – this is the output start page; you might call it something elsetoc.new.jsfiles (generated output) – these include the numbered files, such astoc1.new.js,toc2.new.js,toc3.new.js, etc. The total number of these files varies depending on the project’s table of contents
Tutorial Examples
For an example of a regular website using speech recognition, visit our documentation portal’s landing page at https://documentation.stchome.com. You must use Chrome browser version 25 or later and click Allow when prompted for microphone access. (If not prompted for microphone access permission, check Chrome’s settings to allow pop-ups and microphone access.) Speak the keywords on the page, which are the main words in the links (i.e., Home, Login, Products, Philosophy, Cartoon, and Socialize).
For an example of RoboHelp Responsive HTML help output using speech recognition, see https://documentation.stchome.com/voicedemo/files/index.htm. This opens RoboHelp’s Employee Care 3 sample Responsive HTML output with our speech recognition additions. The keywords here are Contents (or Table), Index, Glossary, Filter, and Search. For the topic titles, each keyword has an asterisk (*) immediately following it. Also recognized are Main (to re-open the main table of contents list) and Stop (to shut off the Speech API).
Tutorial Steps
This tutorial is based on the Azure Blue screen layout, but can be adapted for any screen layout, as long as you can find the navigation link section that includes the link click commands. For Azure Blue, the click command is $mc.toggleActiveTab().
Note about RoboHelp books
If a book is used in the table of contents without a linked topic, the file path (URL) for the first topic in that book should be used to open the book. For example, if the book title is “Travel” but there is no linked topic, and the first topic in that book is “United States,” the JavaScript code for the “Travel” keyword should contain the file path for the “United States” topic. You can either use two different keywords – one each for the book and the first topic – with the same file path, or the same keyword (and file path) for both.
- Edit the
Topic.slpfile for your screen layout so that the ID tags are automatically included in theindex.htmfile every time the output is generated.
-
- Locate the
Topic.slpfile (in the project’s!Screen Layout!/[layout name]folder), save a copy of it elsewhere on your computer, and open it in a text editor. - Search for the area of the code where the navigation links (and click commands) are located. In the Azure Blue layout, it is in the section labeled “Function bar with TOC/IDS/GLO/FILTER/FTS buttons.” The links are individually identified in this section by their class name, although there may be additional words in the quotation marks after the
class=prefix:class="toc"– table of contentsclass="idx"– indexclass="glo"– glossaryclass="filter"class="fts"– search
- Add an ID to each of the links. This will allow the JavaScript code to force the click event when the user speaks the keyword. You can use any ID name, but I use these:
class="toc"–id="vtoc"class="idx"–id="vidx"class="glo"–id="vglo"class="filter"–id="vfilter"class="fts"–id="vfts"
- This is what that area of the code looks like after we’ve finished adding the link IDs (such as id=“vtoc”):
- Locate the
<div class="functionbar" data-css="width: sidebar_width | screen: 'desktop'" data-class="sidebar-opened: $mc.isSidebarTab(@KEY_ACTIVE_TAB); desktop-sidebar-hidden: @.l.desktop_sidebar_visible == false || @.l.desktop_sidebar_available === false; mobile-header-visible: @.l.mobile_header_visible">
	<div class="nav">
		<a class="toc rh-hide" id="vtoc" data-if="KEY_FEATURE.toc" data-class="active: @KEY_ACTIVE_TAB == 'toc'" data-click="$mc.toggleActiveTab('toc')" data-attr="title:@KEY_LNG.TableOfContents; href: '#'"> </a>
		<a class="idx rh-hide" id="vidx" data-if="KEY_FEATURE.idx" data-class="active: @KEY_ACTIVE_TAB == 'idx'" data-click="$mc.toggleActiveTab('idx')" data-attr="title:@KEY_LNG.Index; href: '#'"> </a>
		<a class="glo rh-hide" id="vglo" data-if="KEY_FEATURE.glo" data-class="active: @KEY_ACTIVE_TAB == 'glo'" data-click="$mc.toggleActiveTab('glo')" data-attr="title:@KEY_LNG.Glossary; href: '#'"> </a>
		<a class="filter rh-hide" id="vfilter" data-if="KEY_FEATURE.filter" data-class="active: @KEY_ACTIVE_TAB == 'filter'; filter-applied: @.l.tag_expression.length"  data-click="$mc.toggleActiveTab('filter')" data-attr="title:@KEY_LNG.Filter; href: '#'"> </a>
		<a class="fts rh-hide" id="vsearch" data-if="@KEY_SEARCH_LOCATION == 'tabbar'" data-class="active: @KEY_ACTIVE_TAB == 'fts'; search-sidebar: @KEY_SEARCH_LOCATION == 'tabbar'" data-click="$mc.toggleActiveTab('fts')" data-attr="title:@KEY_LNG.SearchTitle; href: '#'"> </a>
	</div>
</div>
-
- Note that the click command (
$mc.toggleActiveTab()) for each link is located within the data-click attribute. The location of the click command within the links varies between screen layouts. - Save and close the file.
- Note that the click command (
- Generate the output using the modified screen layout.
- Edit the newly generated
index.htmfile (or equivalent) to add one more ID and the JavaScript code.
-
- Locate the
index.htmfile in the!SSL!folder, save a copy of it, and open it in a text editor. - Locate the
iframesection. The location can vary between screen layouts and there may be more than one instance ofiframein the file. In Azure Blue, it’s located in the Topics section and includesclass="topic". Add an ID to thisiframe(e.g.,id="vframe").
- Locate the
<div class="topic-state" data-class="loading: EVT_TOPIC_LOADING; filtered: EVT_TOPIC_IS_EMPTY" data-if="@EVT_TOPIC_LOADING || @EVT_TOPIC_IS_EMPTY"></div>
<iframe id="vframe" class="topic" name="rh_default_topic_frame_name"></iframe>
<a class="to_top" data-trigger="EVT_SCROLL_TO_TOP"> </a>
-
- Add the following JavaScript code to the bottom of the
index.htmfile, immediately above the</body>tag. (If HTTPS is used, uncomment therec.onendfunction.)
- Add the following JavaScript code to the bottom of the
<script type="text/javascript">
	(function() {

		// Define a new speech recognition instance
		var rec = null;

		try {
			rec = new webkitSpeechRecognition();
		}
		catch(e) {
			console.log(e);
		}

		if (rec) {
			rec.continuous = true;
			rec.interimResults = false;

			// In this case, we're using English
			rec.lang = 'en';

		  // Uncomment this function to keep the microphone working
		  // if using HTTPS. Otherwise, the microphone needs to be
		  // reset after 10 seconds of silence.
			//rec.onend = function() {
				//rec.start();
			//}

			// Set the confidence level threshold for recognition results
			var confidenceThreshold = 0.5;

			// Check for the existence of "s" in the string
			var userSaid = function(str, s) {
				return str.indexOf(s) > -1;
			}

			// Process the results when returned
			rec.onresult = function(e) {

				// Check each result starting from the last one
				for (var i = e.resultIndex; i < e.results.length; ++i) {

					// If this is a final result
	       	if (e.results[i].isFinal) {

	       		// Check that the result is equal to or greater than the required threshold
	       		if (parseFloat(e.results[i][0].confidence) >= parseFloat(confidenceThreshold)) {
		       		var str = e.results[i][0].transcript;

							// Write what the computer heard to the console so we
							// can check it if there are problems
		       		        console.log('Recognized: ' + str);

							// What did they ask for?
							if (userSaid(str, 'glossary')) {
								document.getElementById('vglo').click();
							} else if (userSaid(str, 'index')) {
								document.getElementById('vidx').click();
							} else if (userSaid(str, 'content')) {
								document.getElementById('vtoc').click();
							} else if (userSaid(str, 'table')) {
								document.getElementById('vtoc').click();
							} else if (userSaid(str, 'filter')) {
								document.getElementById('vfilter').click();
							} else if (userSaid(str, 'search')) {
								document.getElementById('vsearch').click();
							}
						}
					}
				}
			}
			rec.start();
		}
	})();
</script>
-
- Locate the output’s
toc.new.jsfiles (including the numbered files, such astoc1.new.js,toc2.new.js,toc3.new.js, etc.) in the project output’swhxdatafolder and open them in the text editor. These files contain the book and topic titles, as well as the paths to the files, which we need to use in the JavaScript code. - If you want to somehow visually mark the keyword for each title in your output’s table of contents, you’ll need to edit these
toc[#].new.jsfiles and save them. We added an asterisk after each keyword. - The following code snippet shows an example
toc.new.jsfile from a different project where an asterisk was added after each title keyword. Notice that some of the titles in the file may have “toc3,” “toc4,” etc., instead of file paths. These indicate that they are books and that the topic titles for each book are in that numbered file (for example,toc3.new.js,toc4.new.js).
- Locate the output’s
(function() {
    var toc =  [{"type":"item","name":"Projects Overview*","url":"WorkWithProjects.htm"},{"type":"item","name":"Add* or Edit a Project","url":"AddEditProject.htm"},{"type":"item","name":"Project Phases*","url":"Phases.htm"},{"type":"item","name":"Link* Projects","url":"LinkProjects.htm"},{"type":"book","name":"Contacts*","key":"toc3"},{"type":"book","name":"Actions*","key":"toc4"];
    window.rh.model.publish(rh.consts('KEY_TEMP_DATA'), toc, { sync:true });
})();
-
- In the
index.htmfile, we need to add the JavaScript code for the individual topic keywords. After theelse ifstatement’s closing bracket for the “search” keyword, using the keywords and file paths in thetoc[#].new.jsfiles, add this code for each keyword:
- In the
else if (userSaid(str, '[keyword]')) {
    document.getElementById('vframe').src="[path]";
}
-
- Replace
[keyword]with the actual keyword and[path]with the path to the file. This is the most time-consuming part of the process. This code makes the Speech API “listen” for the keyword and, when it “hears” it, open the related topic in theiframesection of the onlineindex.htmpage. - Note: Each keyword must be unique. For easier tracking of duplicates, list the keywords in alphabetical order instead of in the TOC’s order.
- The following code snippet shows a small portion of the keyword JavaScript code for the Employee Care 3 output example:
- Replace
} else if (userSaid(str, 'policies')) {
    document.getElementById('vframe').src="Employee_Care/HR_Policies/Attendance.htm";
} else if (userSaid(str, 'attendance')) {
    document.getElementById('vframe').src="Employee_Care/HR_Policies/Attendance.htm";
} else if (userSaid(str, 'sick')) {
    document.getElementById('vframe').src="Employee_Care/HR_Policies/Company_Sick_Pay.htm";
}
-
- After all of the keywords have been added, save and close the file. Close the
toc[#].new.jsfiles as well.
- After all of the keywords have been added, save and close the file. Close the
- Upload the output help files and test them. (The Speech API only works when the files are online and accessed over the internet.) To test the voice recognition feature:
-
- Use Chrome to open the
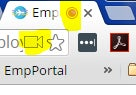
index.htmpage online and click Allow when prompted for permission to access the microphone. (If you do not see this pop-up, check your pop-up settings. If pop-ups are allowed and you still do not see it, there is something wrong in the JavaScript code within thewebkitSpeechRecognition()function in theindex.htmfile.) - Once you click Allow, you can verify that the microphone is in “listening” mode if you see a red circle icon after the title on the web page tab, and a video camera icon in the address bar. These two icons are highlighted in the image below:
-
- Right-click in a white-space area of the
index.htmpage and select Inspect. Chrome’s DevTools opens. Click Console to open the console log. This is where you can watch to see what the browser “hears” when you speak. - Use your microphone to test the Contents, Glossary, Index, Filter, and Search keywords. After a slight delay, each section should open when you say the word. If a section does not open, check the console to see what word, if any, the browser “heard.” If the word is correct, the error is in the JavaScript code in either the
Topic.slporindex.htmfile. (Check the link IDs as well.) If the word displayed in the console is spelled differently (including capitalization), you may want to add that word to yourelse ifstatements. If no words appear in the console at all when you speak, the browser is not “hearing” you – you might need a better microphone or a less noisy location. - Continue the test with the topic keywords. Again, watch the console to see if you need to add or edit the keywords. (In the Employee Care 3 example, I had to use both “dependents” and “dependence” because the console frequently showed that it was registering “dependence” when I said “dependents.”)
- If you edit the code, save the files again, upload them again, and re-test them.
- Use Chrome to open the
What Next?
Congratulations! You’ve incorporated speech recognition into your help files! If you want to continue from here, you can:
- Add speech recognition code to the filters, allowing users to speak keywords to select an option and then sending the user directly to that section of the document.
- Do the same for searches, allowing the user to speak their search term and see the correct search results.
- Add text-to-speech capabilities so that users can hear the documentation being read instead of (or in addition to) reading it.
- Include JavaScript code to determine which browser is being used, then send the user to the correct
index.htmfile. (This is helpful when using special characters to visually mark topic title keywords; non-Chrome users can be sent to a help page that doesn’t have marked keywords in the table of contents.). - When other browsers eventually add voice recognition features, add them to the code.
- Write a script to automatically pull the topic titles and paths from RoboHelp’s JavaScript files.
- Write a script to dynamically add HTML attributes (i.e., bold, underline, color) to the title keywords in the table of contents to use instead of or in addition to special characters.