Adobe Animate CC’s powerful illustration and animation capabilities, combined with its HTML5 export target make it the perfect tool for creating rich web-based content including games.
Over the course of this tutorial series we’ll build a simple Flappy Bird clone. In the first two parts we’ll concentrate on the artwork. In the remaining parts we’ll add interactivity and game logic using the JavaScript programming language. We’ll finish up by adding some sound to our game.
What you will learn in part one…
- How to create and work with an HTML5 Canvas document
- How to create artwork suitable for export to HTML5
What you will need…
- A familiarity of the basic drawing tools provided by Adobe Animate CC or Flash Professional
Flappy Bird has to be one of the most memorable casual mobile experiences. It’s great fun to play, incredibly addictive, and its one-touch gameplay makes it easily accessible to everyone. But on top of all that, its simplicity also makes it a perfect teaching aid for anyone wanting to learn how to make their own games.
In this tutorial series we’ll build a Flappy Bird clone by walking through Adobe Animate CC’s entire designer-developer workflow. You can see the final result above. Give it a try.
Getting Started
You’ll need Adobe Animate CC. Download a trial version.
A document file has been prepared for you to work from and can be downloaded from a git repository. You can find it within the repository at: start/flappy.fla.
A version of the document containing the finished artwork that we’ll be working towards can also be found within the repository at start/flappy-artwork.fla. Feel free to use this version of the FLA as a reference at any point during the tutorial.
Creating an HTML5 Canvas Document File
Before we dive into the flappy.fla file that has been provided, it’s important you know how to create and set-up an HTML5 Canvas document yourself.
Figure 1. Creating an HTML5 Canvas document.
Open the New Document panel by selecting File | New (Option-N | Ctrl-N) from Animate CC’s dropdown menu. From this panel you will be able to select from many document types. Since we’ll be targeting HTML5, click on the HTML5 Canvas option. Additionally, we’ll use this opportunity to set the size of our stage and also the game’s target frame rate. Set the width and height fields to 300 and 400 respectively. Set the Frame rate field to 60 fps. You can see these changes in Figure 1 above.
Finally click OK to confirm your changes. Your HTML5 Canvas document will be created.
These are the same settings that were used when the flappy.fla file was created. Since it already contains some artwork and reference material for you we’ll work from it rather than the FLA you just created. Close your current FLA document and open flappy.fla instead. Going forward, we’ll work from it.
Exploring the Document File
Our Flappy Bird clone will contain the following objects:
- A flappy bird
- A static background
- A ground strip that scrolls as the bird flies through the game world
- Pipes for our bird to fly through
- A handful of user interface elements
- A screen flash that takes place when the bird collides with a pipe or the ground
The artwork for the game’s background and user interface elements has already been provided within the FLA for us. The rest we’ll create throughout the course of the next two tutorials. To help us do that the FLA contains some reference material. The reference material comes in the form of rough sketches that you can draw over the top of.
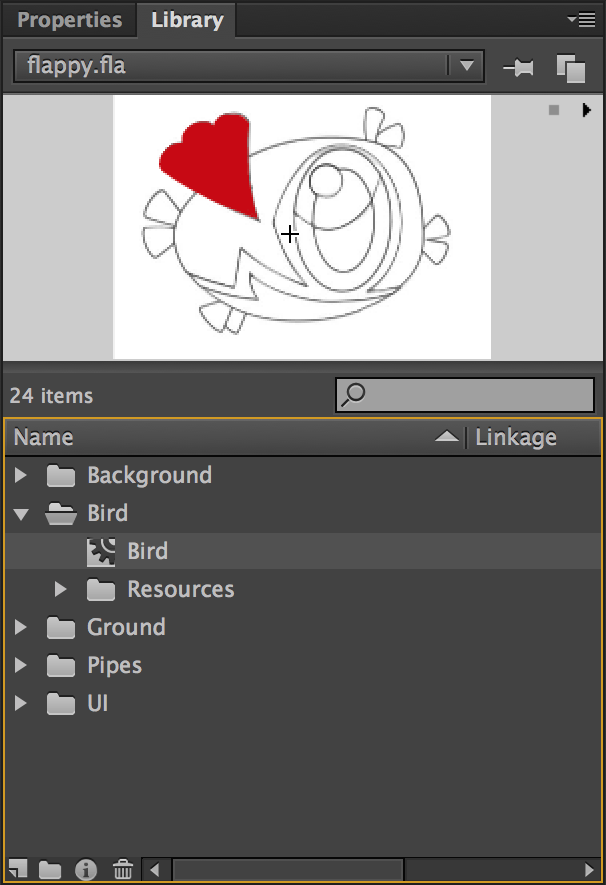
Figure 2. The Bird movie-clip with the library.
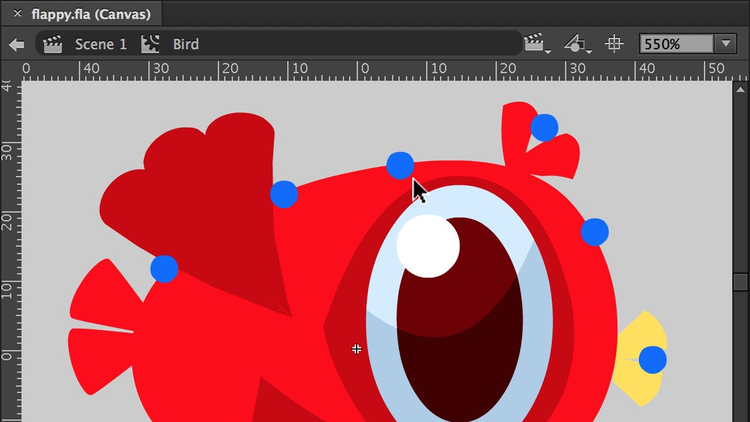
Take a look at the FLA’s Library panel. Within it you’ll find various folders. There’s a folder for each of our game element types (Figure 2) and within each folder is at least one movie-clip. Each of these movie-clips represents one of our game objects. For example, if you expand the Bird folder you’ll find a movie-clip also named Bird, which represents our game’s little hero.
What about the other game objects? The static background is represented by a movie-clip aptly named Background which lives in the folder with the same name. The ground strip will be made from a series of ground slices that will be chained together. You can find the Ground Slice movie-clip within the library’s Ground folder. Two movie-clips named Lower Pipe and Pipe are used to represent the pipes and can be found in the Pipes folder. Finally, the user interface elements can be found within the library’s UI folder.
Let’s take a look at the Lower Pipe movie-clip in more detail. Double-click on it to move to its timeline. You’ll find a layer named Reference that contains a rough line sketch of a pipe. Soon we’ll add additional layers and artwork to this movie-clip using the rough sketch as a reference.
Find the movie-clip named Background within the library and double-click on it. You’ll find the final artwork for this movie-clip already exists. It depicts a blue sky with a band of clouds near the bottom along with a stylised representation of a forest. Final artwork also exists for various user-interface elements in the following movie-clips: Game Over, Get Ready, and Start Instructions. They can be found within the library’s UI folder. Feel free to take a quick look.
Spend a little time exploring the other movie-clips within the library. You’ll see that each one has a reference layer that contains a rough sketch that will help us create the remaining artwork.
During this tutorial we’ll create the artwork for the ground layer, the pipes, and the screen flash.
Creating the Ground
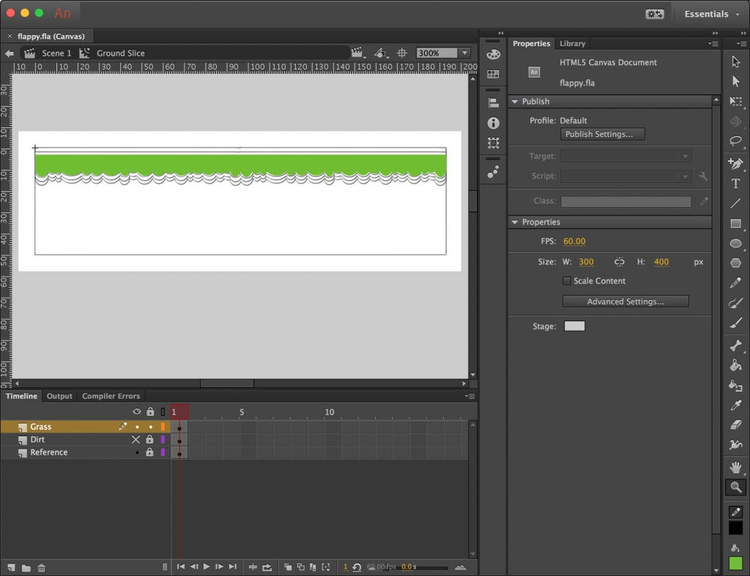
We’ll begin by recreating the artwork required for the ground. The ground is made up of a series of slices that are joined together to form a horizontal layer that spans across the screen.
Find and double-click on the Ground/Ground Slice movie-clip within the library.
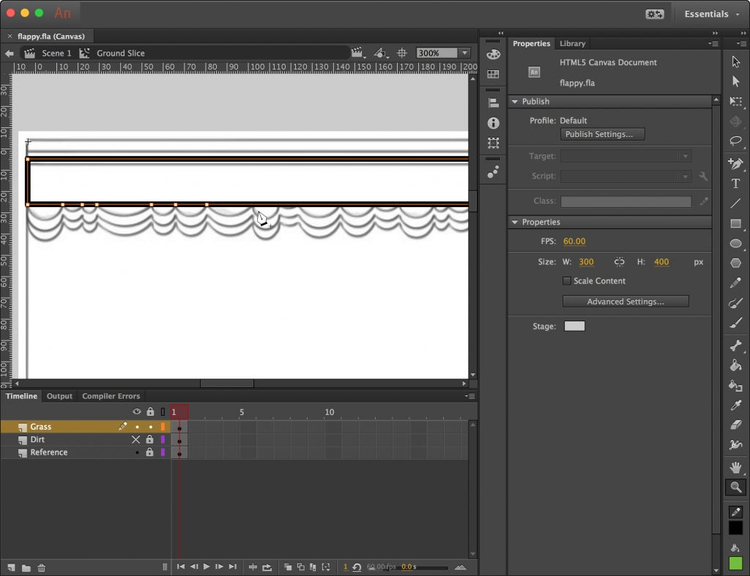
A layer named Reference exists within the timeline. It contains a rough sketch that you can follow.
Begin by creating a new layer named Dirt. Position it directly above the Reference layer.
Draw a brown (#7B6233) rectangle onto the stage that covers the area taken up by the sketch. There’s no need for an outline around the rectangle so ensure that no stroke colour has been selected before you draw it. Use the Properties Inspector to get the size and position of the rectangle just right. Position it at (0,0) on the stage and ensure its dimensions are 193×50. Lock the Dirt layer and temporarily hide it from view so we can see the reference artwork underneath it.
Create a new layer named Grass directly above the Dirt layer. Draw another rectangle of size 193×8. This rectangle should have a black outline and no fill initially. Position the rectangle at (0,3).
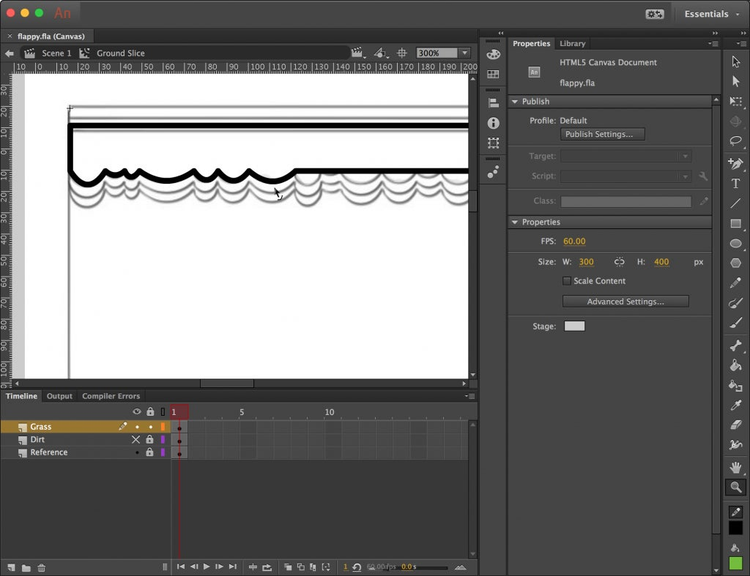
Figure 3. Creating a series of line segments.
The next step requires some precision, which will be easier if you you use the tool to zoom into your artwork. I’ve gone for magnification but feel free to pick something that you feel comfortable with.
Now select the tool. Using the rough sketch as a guide, make your way along the rectangle’s bottom horizontal line, adding anchor points at the end of each curve that you see in the sketch’s line art (Figure 3). Doing this will create a series of line segments that span across the bottom of the rectangle.
Figure 4. Creating curves from the line segments.
Now change to the tool and recreate the curves you see in the rough line art. You can do this by positioning the mouse over the centre of each line segment then clicking and dragging the line downward. Work your way from left to right doing this with each line segment that you’d previously created (Figure 4).
Now, using the tool, fill your shape using a green colour (). Finally, remove the black outline surrounding the shape. Figure 5 below show how your grass layer should now look.
Figure 5. A completed grass layer.
We need two more shapes that are similar to the one you’ve just created. We can do this by duplicating the layer and making adjustments. Right-click on the layer and select . A new layer named will be created. Drag this layer directly below the Grass layer. Also, hide the layer from view so that we can easily work with our duplicate layer.
Change the colour of the shape in the duplicate layer to a darker green () and set its y-position to .
Make a duplicate of the layer. A new layer named will be created. Drag the layer directly below the Grass copy layer and also hide the layer. Change the colour of this layer’s shape to brown () and set its y-position to 7.
Now all that’s left to do is add some edges to the top of our movie-clip. You can see this in the reference artwork that’s provided – there are two horizontal lines that are used to cap the ground.
First hide the layer then create a new layer named Place it above all the other layers. Draw a dark green () rectangle across the top of the ground slice. It should be pixels in size and be positioned at . Make sure that the rectangle does not have a stroke applied to it. Create a duplicate copy of the rectangle and place it 2 pixels below the other. Apply a lighter green colour () to the duplicate rectangle.
Figure 6. The finished ground slice.
Make all your layers visible again with the exception of the Reference layer. Instead, hide it from view and change it to a guide layer since it’s no longer required. Figure 6 above shows how the finished version of your ground slice should look.
Creating the Pipes
With the ground slice movie-clip taken care of we can move onto the pipes that our flappy bird will fly between.
Find the movie-clip named Pipes/Lower Pipe within the Library panel and double-click on it. As before, you’ll find a layer named Reference that contains a quick sketch. This time the sketch depicts a vertical pipe. Remember, you can use the Zoom (Z) tool to maximise the size of the sketch when drawing on top of it.
The pipe is split into two sections: a lower vertical column, and a wider top section. We’ll start by drawing the lower part.
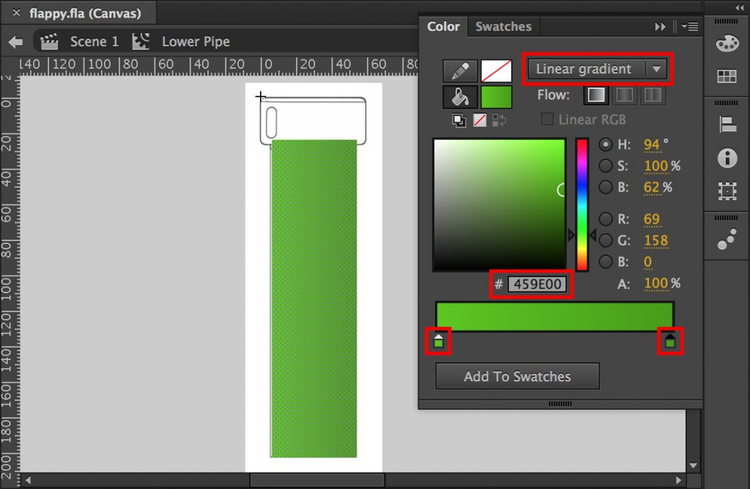
Create a layer named Pipe Bottom and place it directly above the Reference layer. Onto that layer, draw a rectangle that has a green (any shade of green will do) colour fill and no stroke. The rectangle should be 48 pixels wide and 179 in height. Position it at (6,24) on the stage.
Next we’ll apply a liner gradient to our rectangle. Click on the rectangle to select it then open the Color panel by selecting Window | Color (Shift-Option-F9 | Ctrl-F9) from the dropdown menu. Within the Color panel, select the Linear Gradient type. Select the left-most colour pointer and set it to a light green (#59C900). Now select the right-most colour pointer and set it to a darker green (#459E00). We’ll use this gradient again so click on the Add to Swatches button so we can reference it again shortly.
Figure 7. Applying a linear gradient to the pipe.
You’ll now see that a linear gradient has been applied to your pipe (Figure 7). Lock your layer and also temporarily hide it.
We’ll now make a start on the pipe’s wider top section.
Create a new layer directly above the Pipe Bottom layer and name it .
Now let’s use the tool again. From the , set the fill colour to the green linear gradient we just added to our swatch list and also ensure that the rectangle does not use a stroke. As you can no doubt see from the rough sketch, the pipe’s top section has curved edges. We can achieve this from the section within the Properties Inspector panel. Simply set a radius of for your rectangle’s corners. Now draw a rectangle of size and position it at on the stage.
Lock your layer and also hide it from view.
We’ll now add some shadows to the pipe. Let’s start with the shadow at the top of the pipe’s vertical column.
Create a new layer named and place it directly above the Pipe Bottom layer. To create a shadow, select the tool and specify a green fill () and no stroke. Also, apply a to the green fill so that the rectangle will be slightly transparent. Also, from the section, reset the corner radius values back to . Now draw your rectangle, giving it a size of pixels. Position it at on the stage. Finally, use the tool to drag the rectangle’s bottom-left corner up slightly to match what’s shown in the reference sketch (Figure 8).
Figure 8. Creating a shadow near the top of the pipe.
Lock your layer. Now create a new layer also named , and place it directly above the layer. We’ll use this layer to apply a shadow to the pipe’s top section.
Once again we’ll use the tool. Create another rectangle that has the same green fill () and no stroke colour. From the section, set a radius of on the top-left and top-right corners. The other two should have a corner radius of . To set each corner radius independently remember to click the toggle. Now draw your rectangle at position and with a size of .
Once finished, lock your second layer.
Now all that’s left to do is to add some highlights to the pipe. Create one more layer and name it . Drag it above all the other layers.
Select the tool. From the Properties Inspector set the line’s width to and assign a light green colour () to it. Using these settings draw two vertical lines. Give the first line a height of and place it on top of the pipe’s top section at position . Draw a second vertical line over the pipe’s bottom section. Give it a height of pixels and position it at .
Lock the layer once you’re finished. Make all the other layers visible with the exception of the Reference layer. Instead set it to a guide layer and change its visibility to hidden. Figure 9 shows how your finished pipe should look.
Figure 9. The finished pipe artwork.
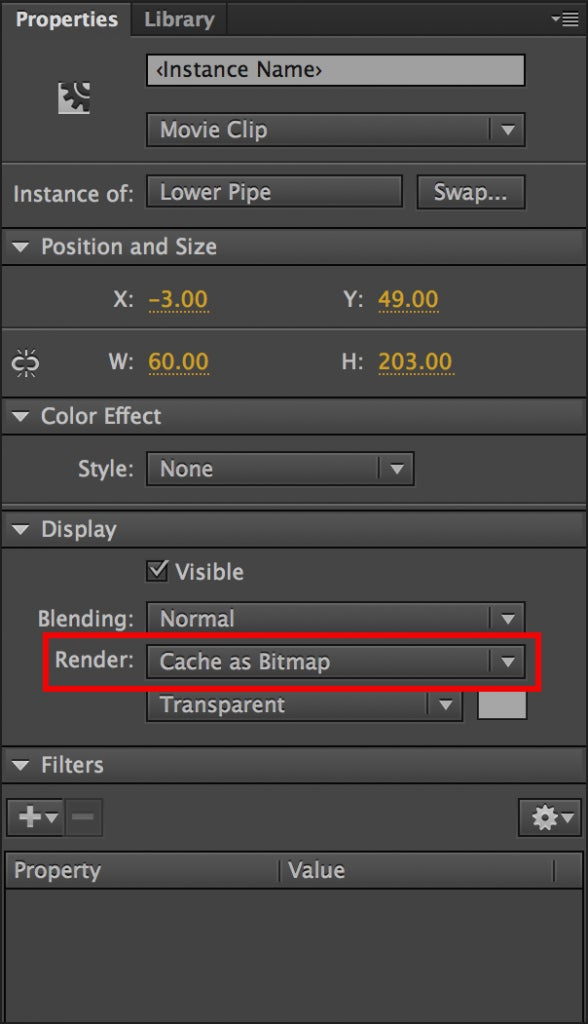
In Flappy Bird, the player has to navigate through a gap between two pipes. If you find and double-click on the movie-clip within your library then you’ll see exactly that. Two instances of the pipe you just created are being used together to create the gap that the player must fly between. You may need to zoom out of the stage slightly to see both pipes together.
Click on either one of the two pipe instances and take a look in the panel. Within the section, you should see that the pipe’s field is set to (Figure 10). This setting will give a performance boost during gameplay. It will convert our pipe to a bitmap, which can be drawn to the screen faster than the original vector artwork. Typically this setting should only be applied to movie-clips that don’t contain timeline animation, and don’t change size or rotation frequently.
Figure 10. Setting Cache as Bitmap.
Caching vectors as bitmaps is a very handy optimisation technique that, when used right, can give great performance boosts to your HTML5 games. We’ll use it again in part two on some of our other game objects.
Creating the Screen Flash
When our little flappy bird crashes into a pipe we’ll trigger a quick screen flash. We’ll achieve this by applying an alpha tween to a white rectangular movie-clip that covers the screen. In a future tutorial we’ll write some JavaScript to perform the tween but for the time being let’s create the actual white rectangle.
Create a new symbol within the library by selecting I nsert | New Symbol (Option-F8 | Ctrl-F8) from Animate CC’s dropdown menu. The Create New Symbol panel will appear. Set the symbol’s name to Screen Flash and ensure its type is set to Movie Clip. Now click OK to create the symbol. You’ll be taken to its timeline.
Using the Rectangle (R) tool, draw a white rectangle (#FFFFFF and 100% alpha) that’s 300×400 pixels in size. Before you actually draw the rectangle, you’ll also need to set the radius for each of its corners to 0. Position the rectangle at (-150,-200) on the stage.
With that done, exit back to your document’s main stage. Also, if your Screen Flash movie-clip isn’t sitting within the library’s UI folder then drag it in there so that it’s sitting with all the other user interface elements.
This is probably a good point to save all your changes.
Summary
We’ve made quite a lot of progress with our HTML5 game. You’ve drawn the artwork for the game’s ground layer, the pipes that our little hero will fly between, and also created a movie-clip that will be used to produce a screen flash when the player crashes into an obstacle. You’ve also seen how to take advantage of Animate CC’s Cache as Bitmap feature to help optimise your content for HTML5.
In part two we’ll finish off the game’s artwork and also use the stage to set up the game world that our flappy bird will inhabit. Along the way, we’ll learn how to use Animate CC’s new vector brush tool and also spend some more time working with bitmap caching. We’ll also learn how to publish our finished artwork to an HTML5 compatible browser and see how it looks.
See you soon.
Keep reading:
Part 1, Part 2, Part 3, Part 4, Part 5, Part 6
Artwork by: Steve Koren
You can see more of his work at www.popjunk.co.uk