Part 2: Building a HTML5 Flappy Bird Clone with Adobe Animate CC
Welcome to part two of this HTML5 Flappy Bird tutorial series. Today we’ll create the remaining artwork for our game and finish up by using Animate CC’s stage to lay out the game world. This will position us perfectly for part three where we’ll start writing JavaScript to add interactivity to the objects within the game world.
What you will learn…
- How to create artwork suitable for export to HTML5
- We’ll explore Animate CC’s vector brush tool
- How to use the stage to visually lay out your game world
- How to publish and test your HTML5 content within a browser
What you will need…
- A familiarity of the basic drawing tools provided by Adobe Animate CC or Flash Professional
By the end of part two you’ll be one step closer to your very own HTML5 Flappy Bird clone. If you need a reminder as to what you’re working towards then feel free to spend some time playing the finished version below. Careful though! It’s extremely addictive.
EMBED: http://yeahbutisitflash.com/projects/flappy-animatecc/flappy.html
Our Flappy Bird HTML5 clone.
Getting Started
You’ll need Adobe Animate CC – download a trial version.
We’ll continue to use the flappy.fla file that you worked from in part one. If you haven’t already worked your way through part one then please do so before continuing.
A version of the document containing the finished artwork that we’ll be working towards can also be found within this github repository. Feel free to use this version of the FLA as a reference at any point during the tutorial.
Creating the Bird
In part one we created the artwork for the ground layer, the game’s pipes, and the screen flash that occurs when the player collides with an object. Also, to keep things simple, various user interface elements were provided for you.
Now all that’s left for you to create is our little flappy friend himself. He’s probably the most complex of all the game objects but don’t worry we’ve got another rough sketch that we can draw over the top of.
Take a look in the library’s Bird folder. Find the movie-clip with the same name and double-click on it. You’ll see that the Bird movie-clip already has two layers: one named Reference and another named Wing, which is currently hidden from view. As usual, feel free to increase the magnification to fit the content comfortably on the stage.
If you take a look at the sketch you’ll see that the bird can be broken down into a few constituent parts: its feet, tail, crest, body, eye, and wing. We’ll tackle things in that order.
The Bird’s Feet
Create a new layer on the timeline named Feet and place it directly above the Reference layer.
We’ll take advantage of Adobe Animate CC’s new vector art brushes feature. This will allow us to draw both feet using only two lines! Let’s start by drawing the right-most foot, which sits under the other foot.

http://blogs.adobe.com/animate/files/2016/07/fb2figure-1.png
Figure 1. Drawing a line to represent the bird’s right-most foot.
Select the Line (N) tool. From the Properties Inspector, set a yellow stroke colour (#E5C222) and initially set the stroke thickness to 1. Now draw a line from the centre of the foot’s base and extend it just inside the bird’s body (Figure 1).

http://blogs.adobe.com/animate/files/2016/07/fb2figure-2.png
Figure 2. Opening the Brush Library panel.
Now click on the Selection (V) tool and select the line you just drew. Within the Properties Inspector, set the stroke width to 10 then click on the Brush Library icon next to the Style option (Figure 2). You’ll be presented with the Brush Library panel where you can select a vector art brush. Find the Line Art | Basic | Flame Left brush and double-click on it. The brush will be applied to your line, which will now accurately depict the shape of the bird’s foot. Close the Brush Library panel.

http://blogs.adobe.com/animate/files/2016/07/fb2figure-3.png
Figure 3. The finished feet.
We can do the exact same for the other foot. Make sure you use a slightly lighter yellow (#FFE054) this time. The vector brush will already be applied to the Line (N) tool by default, so just go ahead and draw from the centre of the left-most foot’s base towards (and slightly inside) the bird’s body.
If everything’s gone according to plan you’ll see two yellow cones that represent the bird’s feet (Figure 3).
The Bird’s Tail
We can use the same trick for the bird’s tail too. We’ll begin by drawing the top tail feather.
Create a layer named Tail and place it directly above the Feet layer. Ensure all layers are locked except this one.
Select the Line (N) tool again and set the stroke colour to red (#FF0000). The Flame Left brush should already be set as the default stroke style. You should find that the previous stroke thickness of 10 is also set.

http://blogs.adobe.com/animate/files/2016/07/fb2figure-4.png
Figure 4. Using the Flame Left brush to draw a single tail feather.
Using the rough sketch as a guide, draw a line through the middle of the tail feather, starting from the outside of the tail and ending just inside the bird’s body. The brush style will be applied to your line, which should give you a fairly accurate depiction of the feather (Figure 4).
Now move onto the bottom tail feather. Once again draw a line starting from the outside of the feather and ending just inside the bird’s body.
Finally, lock your Tail layer.
The Bird’s Crest
For the bird’s crest and beak we’ll revert back to the line tool’s solid stroke style, and simply draw over the rough outline that has been provided. Let’s start with the crest.
Create a new layer named Crest and place it directly above the Tail layer.
https://blog.adobe.com/media_88542ab409e8a121d6f90eed4e6d86dc838b06bb.gif
Figure 5. Selecting the solid stroke style.
Select the Line (N) tool. From the Properties Inspector, select the solid stroke style from the Stroke style dropdown box (Figure 5). Ensure the stroke thickness is set to 1 and also set the stroke colour to black (#000000).

http://blogs.adobe.com/animate/files/2016/07/fb2figure-6.png
Figure 6. Outline of the bird’s crest.
Following the rough sketch, draw a series of lines around the two feathers that make up the bird’s crest. Reshape your lines to create curves that more accurately follow the feathers. Also, make sure the lines all join together to create an enclosed shape around each feather (Figure 6).
Now we’ll colour both feathers. Select the Paint Bucket (K) tool and set the fill colour to red (#FF0000). Fill the inside of both feathers.
Now that we’ve coloured the feathers we don’t need the outline around them any more. Using the Selection (V) tool, select the outlines and delete them.
Lock the Crest layer.
The Bird’s Beak
It’s the exact same deal for the bird’s beak. Create a new layer above the Crest layer and name it Beak. Using the same tools as before, draw around the bird’s beak. Colour the beak yellow (#FFE054) then delete the outline. Lock the layer once you’re done.
The Bird’s Body
We’re making real progress. Let’s start to flesh out the body. We won’t worry about the bird’s eye at the moment – let’s just concentrate on the body shape and the detail surrounding the eye. You may want to hide the Beak, Crest, Tail, and Feet layers while you do this.
Create a new layer and name it Body. Drag it directly above the Beak layer.

http://blogs.adobe.com/animate/files/2016/07/fb2figure-7.png
Figure 7. A very loose oval around the bird’s body.
We’ll start by using the Oval (O) tool to create the bird’s general body shape. Ensure the stroke thickness is set to 1, the stroke colour to black (#000000) and that there’s no fill colour being used. Now draw an oval that very loosely follows the bird’s body shape (Figure 7), then use the Selection (V) tool to bend and shape the oval to create a better fit (Figure 8).

http://blogs.adobe.com/animate/files/2016/07/fb2figure-8.png
Figure 8. The oval re-shaped to fit the bird’s body.
Now use the Line (N) tool to trace over the details within the body. As you draw each line, reshape it to follow any curves. Also, make sure your lines are connected. Figure 9 shows you how your finished outline should look.

http://blogs.adobe.com/animate/files/2016/07/fb2figure-9.png
Figure 9. The finished outline for the bird’s body.
Now using the paint bucket tool, colour the bird’s breast white (#FFFFFF). Fill the area around the eye socket, dark red (#C90102). Finally, make the rest of the body bright red (#FF0000). Figure 10 shows you how the painted body should look.

http://blogs.adobe.com/animate/files/2016/07/fb2figure-10.png
Figure 10. The bird’s body after it has been painted.
As was the case with the other parts of the bird, we don’t need our black outline. Remove it then lock the layer.
The Bird’s Eye
Now we can draw the eye.
Create a new layer named Eye and place it directly above the Body layer. While you’re at it, hide the Body layer so that we can see the rough sketch sitting on the Reference layer below. We’ll continue to use it as a guide as we draw the eye.
Use the Oval (O) tool to draw the outer circle that makes up the eye. When drawing the oval, ensure that it uses a black stroke and has no colour fill.
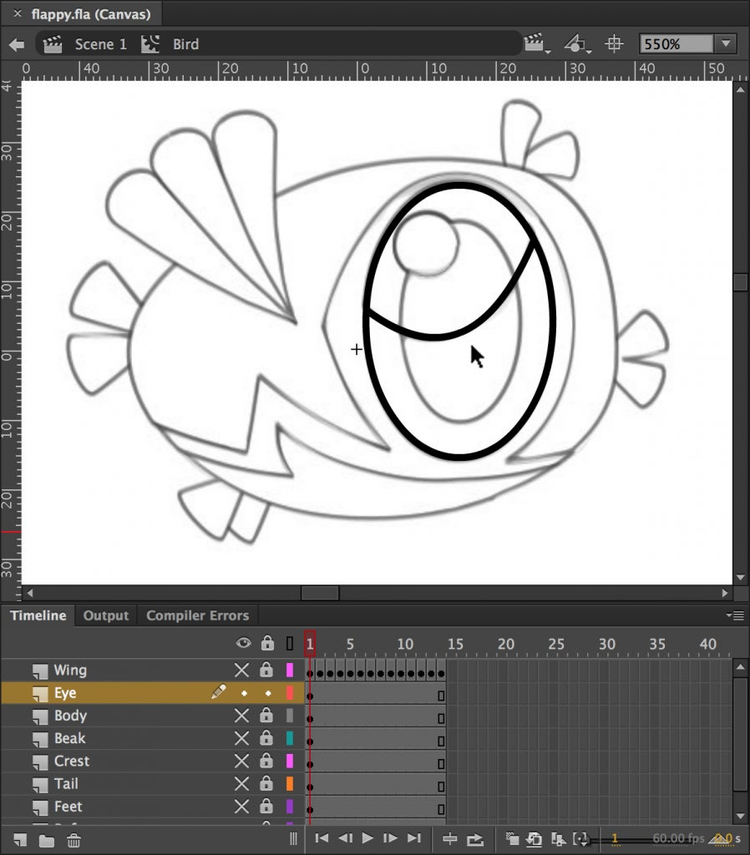
http://blogs.adobe.com/animate/files/2016/07/fb2figure-11.png
Figure 11. The curved outline stretching across the top of the eye.
Next, draw a curved line that crosses horizontally across the top region of the eye (Figure 11). Again, use the rough sketch as a guide.
Now draw an inner oval to represent the eye’s pupil and finish up by drawing a smaller circle near the eye’s top-left.
Okay. Let’s use the Paint Bucket (K) tool to add some colour. We’ll start by colouring the pupil. Paint the lower half of the pupil a dark brown (#410000) and the upper half a slightly lighter shade (#6D0000). Move onto the outer circle. The upper half should be filled with a pale blue (#D4EBFF) and the other half should be coloured a slightly darker blue (#AECCE7). Finish up by painting the small circle on the top-left white (#FFFFFF).
https://blog.adobe.com/media_340d560dcfe7859b80835214ed83422c3027f6a9.gif
Figure 12. The finished eye and body.
Now that the colour has been applied, remove the outlines. Lock the layer and also make the Body layer visible again so we can see both the bird’s body and eye together. While you’re at it, reveal the Beak, Crest, Tail, and Feet layers again. Figure 12 shows you how your artwork should now look.
The Bird’s Wing
Our little bird’s wing should flap up and down to give the impression he’s flying during play. Timeline animation however is outside the scope of this tutorial. Therefore we won’t spend time covering the steps required to create the wing and its animation. Instead you’ll find that it has already been provided for you. Simply make the Wing layer visible and take a look.
The animation spans across 14 frames. Take a look by scrubbing through the frames or preview the animation by clicking the timeline’s play button (Enter). You can also force the animation preview to loop by first toggling the timeline’s loop button (Options-Shift-L | Ctrl-Shift-L).
Each of the wing’s feathers are actually drawn using the same vector art brush trick we utilized earlier to create the bird’s feet and tail. Essentially, each feather is a line with the Flame Left brush applied.
To see the wing animation in context, hide the Reference layer and make sure all the other layers are visible.
Finally, convert the Reference layer to a guide layer since it’s no longer required.
Hopefully you’re happy with the end result. Doesn’t Mr Flappy look great!
Adding Collision Points
We haven’t quite finished with our Bird movie-clip. In order for accurate collision detection to take place during game play we’ll need to create a number of ‘collision’ or ‘hit points’ around the bird.
Create a new layer named Collision Points and drag it above all the others. Now draw a blue circle that’s 4×4 pixels in size and position it near the top of the bird’s crest. Incidentally, the color of the circle isn’t important, just so long as you can easily see it against the edge of the bird. Also, there’s no need for a stroke color.
Select your circle and convert it to a movie-clop by selecting Modify | Convert to Symbol (F8) from Animate CC’s drop down menu. When prompted, name your symbol Collision Point and set its type to Movie Clip. Also ensure it’s Registration point is set to the center.

http://blogs.adobe.com/animate/files/2016/07/fb2figure-13.png
Figure 13. The nine hit points surrounding the bird.
For house keeping purposes, place your newly created symbol within the library’s Bird folder. Now drag and drop 8 more instances of your Collision Point symbol from the library onto the stage. Using Figure 13 as a guide, position them around the bird. Finally, use the Properties Inspector to provide a unique Instance Name for each of the hit points, starting with hit0 and ending with hit8.
Don’t worry too much about these collision points. Typically collision detection is done by checking if the centre point of a movie-clip intersects the bounding box of another. In other words, if the center point of our bird falls within the bounding box of a pipe. While this is adequate for some games it’s not enough for a game such as Flappy Bird where the player’s character is an irregular shape requiring very precise collision detection around its edges. Therefore, to increase the accuracy of our collision detection we’ll check to see if any of our collision points fall within a pipe’s bounding box rather than checking only the bird’s center point.
Oh, and it’s probably worth pointing out that we’ll eventually write some JavaScript to hide the collision points from view during play.
That’s us finished with our flappy bird. Lock the Collision Points layer and save your work.
Laying Out Content on the Stage
We’ve got a library full of content but our document’s main stage is currently empty. Let’s go ahead and drag our movie-clips onto the stage to create our game world. In part three of this series we’ll start writing JavaScript to add interaction to this content. Let’s begin with the game’s background image.
Adding the Background
There should be a single layer on your timeline named Layer 1. Rename it to Background and drag your Background movie-clip from the library onto the stage. Using the Properties Inspector, position your movie-clip at (0,0).
Within the Properties Inspector’s Display section, set the Render field to Cache as Bitmap. This setting will give a performance boost during gameplay. It will convert our vector background to a bitmap, which can be drawn to the screen faster than the original vector artwork. Typically this setting should only be applied to movie-clips that don’t contain timeline animation, and don’t change size or orientation frequently. We’ll use the Cache as Bitmap setting on a few more of our game objects shortly.
Adding the Pipes
Lock the Background layer and create a new layer named Pipes that sits directly above it. From the library, drag three instances of the Pipe movie-clip onto the stage. Position the first pipe just outside the stage’s left-hand side at (-57,100). From the Properties Inspector panel, give the pipe an instance name of pipe0. Position the second pipe in the middle of the stage at (123,200) and give it an instance name of pipe1. The third pipe should be positioned outside the stage’s right-hand side at (303,250) and be assigned an instance name of pipe2.
The instance names will provide a mechanism for us to reference and use these movie-clips within our game’s JavaScript code.
You may have noticed that the far-left and far-right pipes have different vertical positions from the centre pipe. These represent the highest and lowest positions that a pipe can appear on screen. We’ll write some JavaScript at a later date to pick-up these values and use them internally within the game.
It’s also worth noting that there’s no need to set Cache as Bitmap for any of the pipe instances. You may find this odd, but if you think back to the first tutorial you may remember that we applied Cache as Bitmap to the child instances within each pipe. Therefore there’s no need to do the same to the parent clips.
You may also be wondering why we only have three pipes when our Flappy Bird clone clearly has more than that during play. Well three is enough to give the illusion that there are more pipes. During gameplay, we’ll scroll each of the pipes towards the left-hand side of the screen. Once a pipe has moved off the screen we can reposition it just outside of the stage’s right-hand side. If we keep this up, it will give the illusion of an endless number of pipes scrolling from right to left.
Adding the Ground
With the pipes added, let’s now focus on the ground. Lock the Pipes layer and add a new layer directly above it named Ground. Drag three instances of the Ground Slice movie-clip from the library onto the stage. Position the first at (0,351), the second at (187,351), and the third at (374,351). Give the first movie-clip an instance name of ground0, the second a name of ground1, and the third ground2. Finally, select all three movie-clips and set their Render field to Cache as Bitmap.
We’ll eventually write some JavaScript that will scroll all three ground slices from right to left. When a ground slice moves out of view we’ll reposition it directly after the right-most slice. As with the pipes, this will give the illusion of the ground scrolling endlessly.
Adding the Flappy Bird
Now it’s time to add our game’s hero. Lock the Ground layer and create another layer named Bird. Drag the layer directly above the Ground layer. Find the Bird movie-clip within the Library panel and drag it onto the stage.
Using the Properties Inspector panel, assign an instance name of bird to it and set its position to (94,175). We’ll also need to resize the bird. Staying within the Properties Inspector, lock the width and height values together and then set the bird’s width to 33 pixels.
Finally, lock the Bird layer.
Adding the User Interface Elements
We’re almost done. Just the various user interface elements to go.
Create a Layer Folder on your timeline and name it UI. Position the layer folder above all your other layers. Create four new layers within the layer folder named: Screen Flash, Game Over, Get Ready, and Start Instructions. Make sure the Screen Flash layer is sitting above the other layers.
Drag the Start Instructions movie-clip from the library’s UI folder onto its designated layer. Using the Properties Inspector, set its instance name to startInstructions and position it at (151,243). Also set its Render field to Cache as Bitmap.
Now, with the Get Ready layer selected, find the Get Ready movie-clip within the library and drag it onto the stage. Give it an instance name of getReadyPrompt and position it at (151,86). This movie-clip should also have the Cache as Bitmap setting applied to it.
Select the Game Over layer. Now find the Game Over movie-clip with the library and drag it onto the stage. Set its instance name to gameOverPrompt and give it a position of (151,86). Once again, set the Render field to Cache as Bitmap.
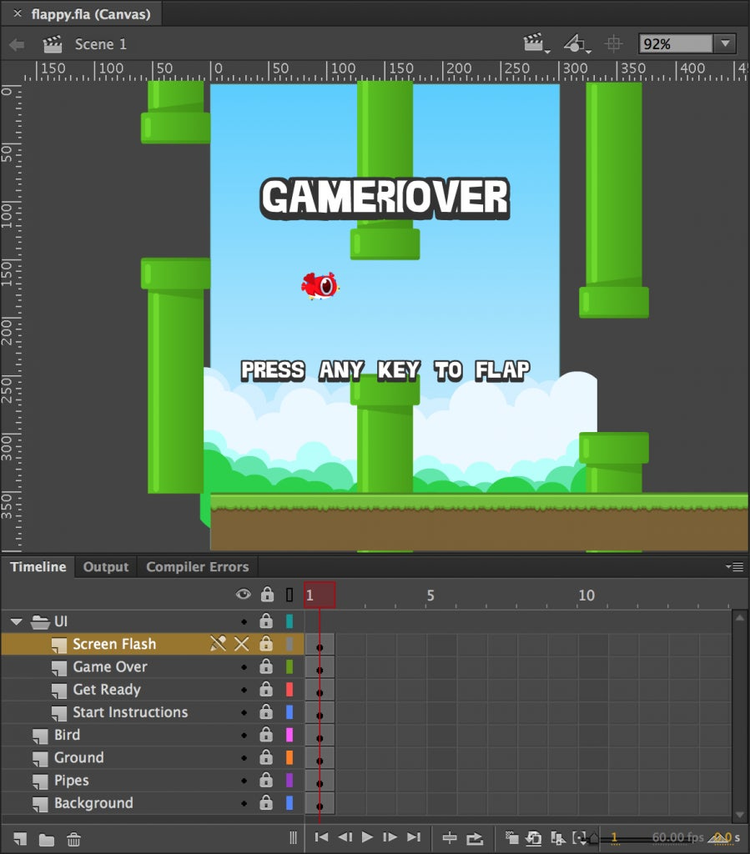
Let’s add the Screen Flash movie-clip that you created in part one. Find it within the library and drag it onto the stage’s Screen Flash layer. Give it an instance name of screenFlash, set its position to (150,200) and ensure that Cache as Bitmap is selected. Since this movie-clip covers the whole screen, hide its layer from view so we can see everything else within our scene.
Lock all your layers.
http://blogs.adobe.com/animate/files/2016/07/fb2figure-14.png
Figure 14. The game objects added to the stage.
If everything has gone according to plan your stage and timeline should look similar to that shown in Figure 14 above.
Adding the Score Text Field
There’s one user interface element that’s missing: a text field that shows the user’s current score.
Let’s finish up by creating it. Create a new layer named Score and place it within your UI Folder Layer. Position the new layer directly below the Screen Flash layer.
Select the Text (T) tool. From the Properties Inspector panel select Dynamic Text from the Text type dropdown field. Set the font Family to Arial Black and set its size to 24 pt. Also set the Color field to white (#FFFFFF).

http://blogs.adobe.com/animate/files/2016/07/fb2figure-15.png
Figure 15. The score text field and its properties.
Now draw a text field onto the stage and type a 0 into the field as its default text value. Using the Properties Inspector panel, set the text field’s size to 125×38 and position to (87.5, 7). Finally, assign it an instance name of score (Figure 15).
Lock your layer.
Publishing to the Browser
Congratulations! That’s everything in place and doesn’t it look great! We’re now in a position to write the game logic in JavaScript, which we’ll start in part three.
To finish up with, let’s actually take a look at your finished artwork within the browser. You’ll need to temporarily guide out your Screen Flash layer first. Once you’ve done that simply select Control | Test Movie | In Browser (Cmd-Enter | Ctrl-Enter) from Adobe Animate CC’s dropdown menu.
Your default browser will launch and display your game’s content (Figure 16). You should see your little hero happily flapping his wings along with the other game objects.

http://blogs.adobe.com/animate/files/2016/07/fb2figure-16.png
Figure 16. Your HTML5 content running in a browser.
If you take a look at your browser’s address bar you should notice that your content is running in a local web server, which is required to run your HTML5 content. Adobe Animate CC has a built-in web server that is run whenever you publish your content.
Once you’re done, close the browser and move back to Animate CC. Unguide your Screen Flash layer and save your work.
Summary
We’ve finished building the artwork for our Flappy Bird clone. Along the way we explored Animate CC’s new vector brush tool to easily draw complex shapes. We also saw how the stage can be utilised to visually lay out our game’s content in preparation for adding interactivity. Finally, we learned how to quickly publish and preview our content within a browser.
Next time we’ll start coding the game logic for our Flappy Bird clone using the JavaScript programming language. See you soon.
Keep reading:
Part 1, Part 2, Part 3, Part 4, Part 5, Part 6
Artwork by: Steve Koren

http://blogs.adobe.com/animate/files/2016/06/skoren.jpg
Steve Koren is a professional illustrator, character designer, and animator whose portfolio spans web, print, and mobile. His body of work includes a number of iOS apps that have been featured by Apple and downloaded several million times. Steve also has many years experience creating highly engaging virtual content for online distribution across social networks including Viber, Kik, Line, and WeeWorld.
You can see more of his work at www.popjunk.co.uk