Working with Immersive VR Video

Immersive video has been around in different forms for decades, however it hasn’t been able to break through on a large scale until recently.
The most common VR video solution places the viewer inside of a sphere, and wraps a video stream around the sphere. This solution can be even more immersive when using stereoscopic video, allowing the viewer to see a unique stream of wrapped video for each eye. This is the sort of viewing experience provided by YouTube, Google Cardboard and Facebook.
The key to this solution is capturing, formatting and encoding in such a way that it can be easily wrapped around a sphere. The easiest way to accomplish this is through Equirectangular Projection.
What is Equirectangular Projection?
If you think about the surface of a sphere, a single point is defined as having a latitude and a longitude coordinate. Now think about a standard video frame. A video frame has a width and height, with points defined as X and Y coordinates.
Equirectangular Projection simply unwraps the sphere, mapping the longitude to the X coordinate, and the latitude to the Y.
Here is an example we are all familiar with, the globe laid flat:

Notice that the image widens and it progresses towards the poles. This is because the spatial distance between longitude positions decreases the closer you get to the pole. The smaller circumference of a line of latitude close to a pole is stretched to the same distance as the latitude at the equator.
This distortion makes it difficult to comprehend what an Equirectangular image is composed of. In addition, you’re seeing far more information than you’re typically accustomed to, and its position is not intuitively defined. The object at the far right of the frame is actually behind the camera, and the object to the far left is directly to the right of it.
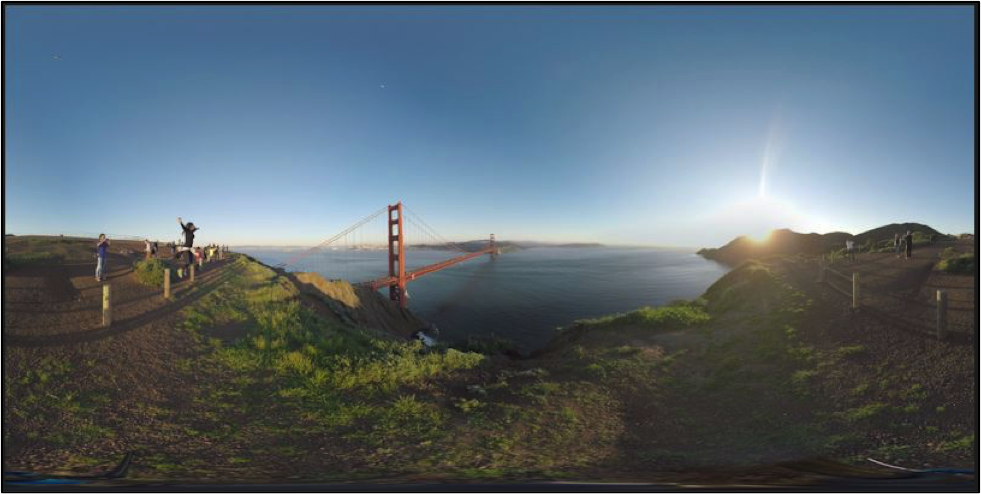
Here’s a real-world example of a video frame with Equirectangular Projection:
https://blog.adobe.com/media_bbdebdd53f3d01cb9504e174c36d7de8c35e3df4.gif
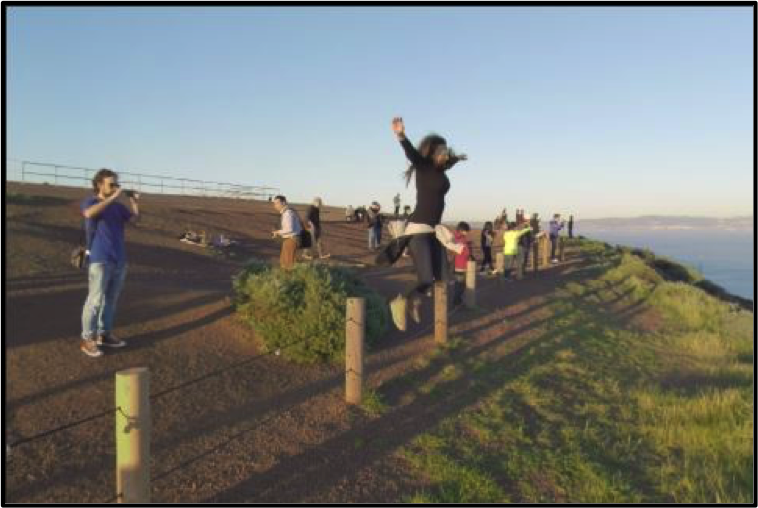
The Golden Gate Bridge catches our eye because it’s towards the center of the frame, but when we shoot immersive video, we want to be aware what’s in the entire scene. Looking at the frame, it might not be apparent that there’s a fence behind us. Or the brave soul leaping from that fence behind our left shoulder!
https://blog.adobe.com/media_a5939ec9236266929f8099c4c29273ba4d232e79.gif
To tell a good story, editorially, you need to be aware of what is going on in the entire frame. This is even more of a challenge with Equirectangular Projection. Adobe Premiere Pro CC 2015.3 provides you with the tools necessary to look around the sphere, simulating the view you might have through a headset or watching on a desktop viewer such as YouTube.
Editing Equirectangular Video Is Not as Hard as You Might Think
Even though working with Equirectangular Projection can be a challenge, it’s not that different from any other video format. Most of your editing skills, tools and tricks are relatable. Trimming, splicing and track manipulation all work the same. Even many of the most commonly used effects work well with Equirectangular Projection.
One feature new in the Premiere Pro 2015.3 release that can be especially helpful with immersive video: Proxy workflows. Some Equirectangular video can be as large as 8,000 pixels wide by 8,000 pixels high – much larger than most other frame sizes. Video of such high resolution is very difficult to decode in real time, even with hardware acceleration. Premiere Pro’s new Proxy workflow allows you to ingest this material, begin editing with it, while lower resolution 2K versions are generated in the background, ready to take their place on the timeline with the click of a button.
Enabling the VR Video Display
By enabling the VR Video Display in either the Program or Source monitor, Premiere Pro allows you to step inside the sphere and view the video from a user’s perspective. Using VR Video Display, you can simulate different viewing experiences with your Equirectangular Video, for example, using a VR headset such as the Oculus Rift or on a desktop through YouTube or Facebook.
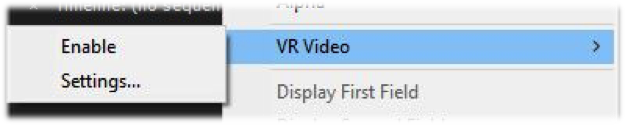
To activate the VR Video Display, simply click on the settings wrench icon in the mid-lower right of the monitor, open up the “VR Video” sub-menu and select “Enable”.
https://blog.adobe.com/media_43fe4041323ae0f21738971b72c5774fb3aed65a.gif
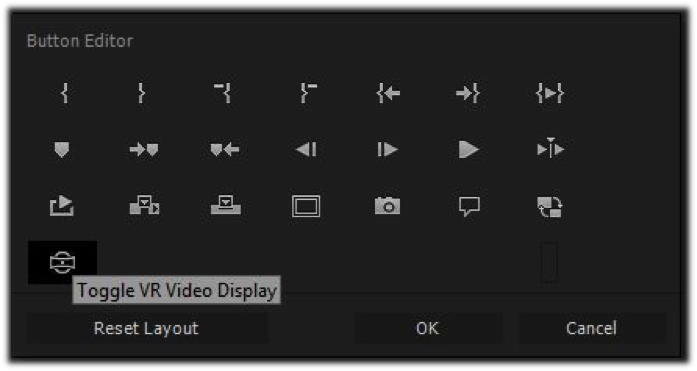
There is also a new monitor button which quickly toggles the VR Video Display that you can easily add to your monitor’s playback controls. To add this button, begin with opening the Button Editor by clicking the “+” icon in the far lower right of the monitor and then drag the button titled “Toggle VR Video Display” to the desired poition under the monitor display.
https://blog.adobe.com/media_c274e1cb7352e89ee8fb4d3278e41c970c87f48a.gif
You can also assign a key of your choice to toggle the VR Video Display from either or both of your monitors using the Keyboard Shortcuts dialog.
Viewing Immersive Video in the VR Video Display
Once you enable the VR Video Display, your view is now from inside the sphere and your monitor will tranform into an experience like this:

http://blogs.adobe.com/creativecloud/files/2016/07/SourceGGB.png
The upper center is your interactive window inside of the sphere. You can immediately change your perspective by simply clicking and dragging on your view inside of the sphere, allowing you to easily pan and tilt. At any time, you can quickly re-center your perspective by double clicking anywhere within the view.
The siders along the right and bottom edges allow you to control the tilt and pan, respectively.
The numeric fields alongside each slider provide you with exact feedback of your viewing position, but also allow you to enter your own values. Positive values will pan to the right and tilt upward, while negative numbers will move your perspective to the left and downward.
At the very bottom of the VR Video Display is a radial knob which provides a more visual feedback as to which direction you’re currently facing, but it also allows you to click and drag within to pan your perspective left and right. The radial knob is unique in that it allows you to spin completely around and keep going past your starting point.
Configuring the VR Video Display
The VR Video Display works with both monoscopic and stereoscopic video. It’s also possible to work with equirectangular footage from a smaller section of a sphere. It can be configured to simulate the view from a headset or desktop, even allowing you to view stereoscopic footage in 3D using a pair of inexpensive red/cyan anaglyph glasses.
To configure the VR Video Display, simply click on the settings wrench icon in the mid-lower right of the monitor, open up the “VR Video” sub-menu and select “Settings…”. This will present the following dialog window:
https://blog.adobe.com/media_89afcbcb5bed0d183b289fc1a4cdd558dba923ec.gif
“Frame Layout” lets you declare if your video is “Monoscopic” or “Stereoscopic”, the latter also allowing you to choose between an “Over/Under” or “Side-by-Side” layout. If you choose one of the stereoscopic layouts, you’re given a choice of a “Stereoscopic View”, either the “Left” or “Right” eye, along with a red/cyan anaglyph composite.
When working with immersive video, you need to think in degrees of view, in addition to pixel dimensions. The “Captured View” describes what part of the sphere is represented by the video frame. Typically, you’ll leave this at the full-sphere defaults of 360 horizontal by 180 vertical degrees.
The ”Monitor View” fields allow you to control what portion of the sphere you view while in the VR Video Display mode. This is where you can simulate different viewing experiences. For example, using a value of of 90 horizontal by 60 vertical degrees will approximate an Occulus Rift headset, while 160 by 90 degrees will simulate viewing within YouTube. One other thing to note is that the aspect ratio of the view window is determined by these settings, as well. For example, 160 by 90 degrees will present a 16:9 view window.
Working with Effects
Three of the most common effects used in Equirectangular Projection are Dissolves, Color (Lumetri) and Speed. These effects do not alter a pixel’s position enough to cause an issue. The basic rule is that if an effect changes a pixel’s vertical position, it’s unlikely to work. You have to consider how a pixel’s vertical position affects its horizontal distortion once perspective is applied. For example, Horizontal Squeeze or Wipe will work, while a simple Picture-in-Picture effect will look distorted, because it scales both the vertical and horizontal dimensions of the image.
The other thing to consider is compositing. You can composite Equirectangular imagery on top of other Equirectangular imagery as long as you do not change its vertical position and scale. It’s possible to shoot an object against a green screen in Equirectangular and Chroma key it on top of a background image. You cannot composite traditional flat video on top of Equirectangular without additional steps, and that brings us to the fourth most common effect: Titles and Graphics. In order to work with flat imagery, such as a title, on top Equirectangular, it has to be projected into the sphere. To composite flat video on top of Equirectangular, we recommend using third party plug-ins, such as Mettle’s SkyBox 360/VR Tools (http://www.mettle.com/product/skybox-360vr-tools/) – specifically the Mettle SkyBox Project 2D effect.
Finally, there is one important built-in effect to be aware of when working with Equirectangular video, and that’s the Offset effect (found within Video Effects/Distort). Unlike shooting with a traditional camera, a VR rig has no single lens to use to focus on the subject. The entirety of the scene is captured at once. When you begin to cut together different shots, you may find that your camera changed orientation, that the subject you care most about is in a different position from the previous shot. You don’t want the user to have to twist their head to bring the subject back into view.
The Offset effect allows you to rotate the entire frame. Apply the Offset effect onto the cut segment in the timeline and drag the first number of the “Shift Center To” parameter pair left or right, depending on how you want to pan the clip. Take care not to shift the second parameter, which would violate the vertical position rule. One final note, this effect is not real-time and will require rendering. Mettle’s Rotate Sphere effect provides real-time support. It also allows you to tilt vertically and even roll. Care should still be taken when tilting and rolling the sphere, as it can degrade the image quality, purely due to the way Equirectangular projection works.
Exporting
Exporting Equirectangular video is much like exporting any other type of video, with a few caveats:
- First and foremost, regardless of the Format and Preset you select, be certain to change the “Source Scaling” option in the upper left of the Export Settings dialog window to “Stretch To Fill”. If you do not do this, you are likely to introduce either letterbox or pillars to the exported video, which breaks the seam of the sphere and distorts it.
- If you export H.264, HEVC or QuickTime, you should enable the “Video is VR” checkbox in the Video settings tab. Next choose the appropriate “Frame Layout” that matches your source video, just as you did in the VR Video Display settings. If you enable this setting, Equirectangular video published to YouTube and Facebook will automatically play in a special VR viewer after it has been processed by the service, which can take up to an hour after upload is complete.
- For very large Equirectangular frames, care must be taken when choosing a container and codec. If exporting on the Mac, you have the option of exporting using QuickTime and one of the ProRes variants.The situation is more complicated with Windows, where H.264 is your best choice. When exporting large frames with H.264 follow these steps:
-
- Choose the “H.264” format with the “Match Source” preset
- Disable the match source check boxes for dimensions, profile and level
- Change the profile to “High” and the level to “5.2”
- Choose “Stretch To Fill” in the “Source Scaling” setting to the far upper left, once again
- Disable the aspect ratio link next to the dimensions and change the dimensions to 4096 by 2304 (or 2160 for 60fps)
- Select a high bitrate such as 100 Mbps.
- Enable “Use Maximum Render Quality” to achieve the best scaling results.
The following is an example of H.264 stereoscopic export settings:

http://blogs.adobe.com/creativecloud/files/2016/07/VRExport4096Updated.png
In Summary
Adobe Premiere Pro has long been the standard tool used by editors working with immersive VR video. With the 2015.03 version, Premiere Pro provides you with the tools to better view, export and share VR video. In addition, the market is quickly growing for everything related to VR video: rigs, cameras, Equirectangular video stitchers, effects, VR headsets and even in-application headset monitoring. Immersive VR video is nascent and exploding. It’s different than stereoscopic 3D in that the technology isn’t being driven by a small handful of large electronics manufacturers. It’s being nutured by hundreds of companies, large and small, many working together, and Adobe will continue to contribute.
Resources
- Adobe’s NAB 2016 Preview of VR Workflows: https://youtu.be/u1eUb0OiBxU
- Wikipedia article on Equirectangular Projection: https://en.wikipedia.org/wiki/Equirectangular_projection
- Third-party plugins:
- Mettle – VR monitoring, effects: http://www.mettle.com/
- Kolor – VR monitoring, stitching: http://www.kolor.com/
- Dashwood – VR monitoring, effects: http://www.dashwood3d.com/