A couple of weeks ago we released version 14.2 of After Effects CC, which added many often-requested features as well as an exciting new workflow for sharing motion graphics.
In this article, we’re sharing more detail about how the new features work, including Lumetri Scopes, effect input layer options, the all-new Camera-Shake Deblur effect, Right-to-Left and Indic text support, and much, much more. Details about the new Essential Graphics panel and Motion Graphics templates can be found in a previous article.
Please, if you want to ask questions about these new and changed features, come on over to the After Effects Forums. That’s the best place for questions. Questions left in comments on a blog post are much harder to work with; the blog comment system just isn’t set up for conversations. If you’d like to submit feature requests or bug reports, you can do so at this page.
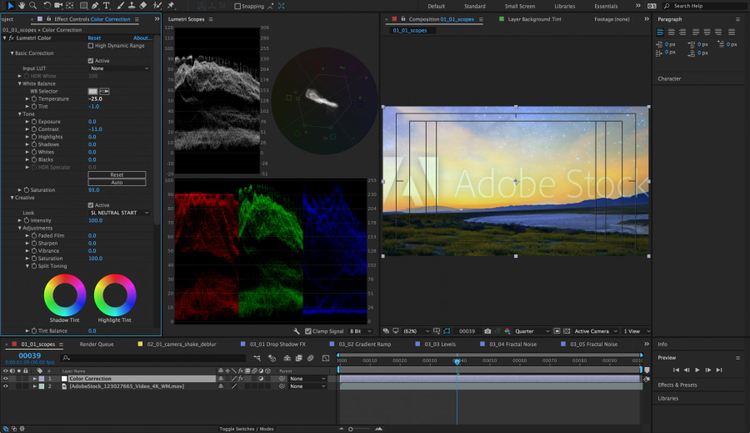
Lumetri Scopes
After Effects now includes vectorscopes, a waveform monitor, and other color measurement tools in the new Lumetri Scopes panel.
To open the panel, choose Window > Lumetri Scopes. A new workspace named Color for working with the scopes and the Lumetri Color effect is available from the Window > Workspace menu.
This is the same Lumetri Scopes panel as in Premiere Pro. For details about the options available in the panel, please read the Premiere Pro help article about Lumetri Scopes.
In After Effects, the Lumetri Scopes panel measures color from the current Composition, Layer, or Footage viewer panel. If the Primary Viewer option is enabled for any viewer panel, Lumetri Scopes will be locked to that viewer.
Lumetri Scopes is designed for broadcast color workflows. It measures colors in the Rec. 601, 709, or 2020 color spaces. If you have set a different color working space for your After Effects project, the scopes represent the appearance of your composition including that working space, but transformed into the color space (601, 709, or 2020) set in the Lumetri Scopes panel.
Effect Input Layer Options
Effects that use layers as an input, such as Set Matte and Displacement Map, can now target the input layer’s masks and effects, instead of only the source of the layer. This means that for many cases you won’t need to pre-compose layers just for the purpose of being referenced by an effect.
Where an effect includes a layer parameter, a new input parameter menu to the right of the layer selector allows you to choose whether to target the input layer from its source, masks, or effects:
- Source: targets only the source of the layer. Masks and effects are ignored.
- Masks: targets the layer after its masks are applied. Effects are ignored.
- Effects & Masks: targets the layer after its masks and effects are applied.
This control is similar to the View menu at the bottom of the Layer viewer panel, which allows you to render the layer from different positions in the rendering order: from its source, from its masks, or from its individual effects.
Layer self-references are not allowed for the Effects & Masks option. This would cause a recursive rendering loop. If the effect’s layer parameter is set to the host layer, the Effects & Masks option will be disabled. If the effect’s layer parameter is set to a different layer and the input parameter is set to Effects & Masks, but you then change the layer parameter to the effect’s host layer, the input parameter will be temporarily switched to Masks.
Known issues with effect input layer options:
- Copy and paste of an effect that uses a layer parameter, or applying an animation preset using an effect that uses a layer parameter, always sets the input layer option to Source regardless of how the input parameter was originally set.
- After Effects will crash after you undo copy and paste of a layer with an effect that uses a layer parameter or of an effect’s individual layer parameter.
Camera-Shake Deblur Effect
A new effect, Camera-Shake Deblur, reduces motion blur artifacts resulting from camera shake. This effect can save shots that might not otherwise be usable due to slight camera bumps or camera motion blur that remains after stabilization.
Camera-Shake Deblur is found in the Blur & Sharpen category of the Effects menu and the Effects & Presets panel.
This effect reduces motion blur by analyzing frames on either side of the blurry frames for apparent sharpness and then uses optical flow technology to blend the non-motion-blurred frames into the blurry frames.
Camera-Shake Deblur has the following parameters to control how the deblur is calculated and applied:
- Blur Duration: Controls how many frames around the blurry frame to compare in order to find a non-motion-blurred frame. Choose the minimum value necessary to produce good results: smaller values for shorter periods of camera shake, larger values for longer periods of camera shake.
- Deblur Method: Chooses the optical flow method, which affects how pixels are mapped from the non-motion-blurred frames to the blurry frame. High Quality is more accurate than Standard, but slower to process.
- Strength: Controls the strength of the de-blurring result. Larger values can produce artifacts if the non-motion-blurred frames within the blur duration are not a close match to the blurry frame.
- Shake Sensitivity: Determines the threshold of whether or not a frame is considered blurry enough to need de-blurring. At zero percent, no frames will be de-blurred; at 100% all frames will be de-blurred.
For best results with the Camera-Shake Deblur effect, apply it after stabilizing footage. For example, apply the Warp Stabilizer effect first, then apply Camera-Shake Deblur.
For shots that are difficult to deblur, applying multiple instances of the Camera-Shake Deblur effect with a lower Strength value may achieve better results than a single instance of the effect with a high Strength value.
High frame rate support
After Effects now supports higher frame rates, including 120fps and 240fps footage from Apple iPhone and GoPro Hero cameras. Frame rate values for compositions, layers, and footage can now be set up to 999fps, compared to a limit of 99fps in previous releases of After Effects.
Additional GPU-Accelerated Effects
The following effects will now render using your computer’s GPU when the Project > Video Rendering and Effects > Use option is set to Mercury GPU Acceleration:
- Drop Shadow
- Fast Box Blur (formerly Box Blur; see explanation below regarding the name change)
- Fractal Noise
- Gradient Ramp
- Levels
- Levels (Individual Controls)
- Offset
The Box Blur effect has been renamed to Fast Box Blur, and the Iterations parameter defaults to 3, instead of 1. This replicates the rendering result of the Fast Blur (Legacy) effect, and is GPU accelerated.
To understand why Box Blur was renamed to Fast Box Blur, it helps to also understand the relationship between this effect and the obsoleted Fast Blur (Legacy) and Gaussian Blur (Legacy) effects.
Under the hood, Fast Blur (Legacy) and Gaussian Blur (Legacy) used the box blur algorithm with the Iterations parameter set to 3, although the Iterations parameter was not visible and could not be controlled. The new Gaussian Blur effect introduced in the June 2016 release After Effects CC (version 13.8) uses a different blur algorithm, not the box blur algorithm. We heard from customers that the Fast Blur effect is still useful, and there was confusion about it being moved to the Obsolete category. Now that the box blur algorithm is GPU accelerated, and because it can replicate the results of both Fast Blur and Gaussian Blur (Legacy), the new name “Fast Box Blur” is intended to help you quickly find this preferred blur algorithm.
For scripting and expressions, the match name of the Fast Box Blur effect is “ADBE Box Blur2”. The older match name “ADBE Box Blur” will continue to work: when used to add the effect, “ADBE Box Blur” will apply the Fast Box Blur effect, but with the older name “Box Blur”; the Iterations parameter will be set to the new default of 3.
Right-to-Left and Indic Text
After Effects now allows you to type and edit text in right-to-left and Indic writing systems.
To enable right-to-left or Indic text, open the new Type preferences panel (Preferences > Type) and change the text engine to South Asian and Middle Eastern.
Then choose:
- Middle Eastern and North African to work with right-to-left languages from that region, such as Arabic and Hebrew.
- Indic to work with languages from the Indian subcontinent, such as Hindi.
In this release of After Effects there are several limitations to right-to-left and Indic text which we intend to address in a future update:
- Controls for editing Middle Eastern text (ligatures, Hindi digits, and paragraph direction) as seen in Premiere Pro are not available.
- Per-character animation works left-to-right and will separate glyphs in ligatures.
- Right-to-left text can not be combined with left-to-right text in the same text layer.
Team Projects (Beta) Improvements
Improvements to Team Projects in After Effects include:
- Dynamic Link is now allowed between Premiere Pro sequences and After Effects compositions in a team project. To prevent resource allocation problems, nesting of sequences and compositions is limited: a sequence may be linked into a composition in After Effects, and the composition can be linked into another sequence in Premiere Pro, but that sequence can not be linked into another composition. (This is the same nesting limitation as when using Dynamic Link with local After Effects and Premiere Pro projects.)
- Scripting for team projects.
- Many bug fixes.
Mask Mode Keyboard Shortcuts
You can now use keyboard shortcuts to change the mode of a closed mask while you are drawing or modifying it:
- N – None
- A – Add
- S – Subtract
- I – Intersect
- L – Lighten
- D – Darken
- F – Difference
When you draw a new mask with the shape tools (Rectangle tool, Ellipse tool, etc.), you can press these keyboard shortcuts at any time while the mouse button is down.
When you draw a new mask with the Pen tool, you can only press these keyboard shortcuts when you close the mask: place the pointer over the closing vertex (usually the first vertex), click and hold the mouse button to close the mask, then press the mask mode keyboard shortcut before releasing the mouse button.
Open masks do not have a mode. These keyboard shortcuts do not work when drawing open masks with the Pen tool.
When you modify a closed mask, you can press these keyboard shortcuts at any time while you hold down the mouse button: when modifying mask points or the mask shape, when in free-transform mode, or when adding or modifying mask feather points.
Markers Can Be Assigned Color Labels
Composition and layer markers can now be assigned color labels.
By default, markers have no color. To change the color label of a marker, double-click on it to open the marker’s settings dialog, then change the new Label property. Color labels are defined in Preferences > Labels.
Also, the icons have changed for marker in and out points (the icons used when a marker has duration).
Snapshot Difference Mode
Snapshots in the Composition, Layer, and Footage panels can now be blended with the base image using the classic difference blending mode by holding the Option (macOS) or Alt (Windows) key when you click on the Show Snapshot button. This can be useful for detecting subtle differences in pixel color or position between the base image and snapshot image. Tip: Exaggerate minor differences between the snapshot and the base image by increasing the viewer panel’s exposure, using the Adjust Exposure control on the right side of the viewer panel’s controls.
Solids Folder Improvements
After Effects now allows you more flexibility in organizing your project, thanks to several improvements to the behavior of which folder new solids, adjustment layers, and nulls are created. You can now:
- Rename the solids folder: After changing the name, new solids will continue to be created in that folder instead of in a new folder named “Solids”.
- Set a default name for the solids folder: In Preferences > New Project, change New Project Solids Folder to change the name for the solids folder in new projects.
- Nest the solids folder in other folders: If you drag the solids folder inside another folder in the project, new solids will continue to be created in that folder instead of a new folder at the top level of the project. Note: Team Projects do not allow solids folders to be nested.
- Set any folder as the solids folder: Right-click on any folder in the Project panel and choose Solids Folder to set it as the solids folder. Only one folder at a time can be set as the solids folder.
Recent Script Files Menu and Keyboard Shortcut
The File > Scripts menu now includes a Recent Script Files sub-menu which lists the 10 most recently run scripts.
The most recently run script can also be re-run by pressing the keyboard shortcut Command+Option+Shift+D (macOS) or Control+Alt+Shift+D (Windows).
Maxon CINEWARE 3.1.22 plug-in
The Maxon CINEWARE plug-in has been updated to version 3.1.22. Changes include:
- Bug fixes for extracting scene data.
- The Maxon CINEWARE plug-in may only render black frames when the Renderer option is set to Software or OpenGL on a Windows computer when the GPU doesn’t meet minimum OpenGL requirements, or if there aren’t sufficient GPU resources available. This occurs because Maxon CineRender’s CPU-based OpenGL fallback renderer has been disabled on Windows for all CPU types, a temporary measure to prevent the CineRender process from hanging while trying to initialize on AMD Ryzen CPU’s. You can work around this limitation by changing the Renderer option in the CINEWARE effect to Standard (Draft) or Standard (Final). Maxon and Adobe will address the problem with AMD Ryzen CPU’s and re-enable the fallback renderer in a future update.
Other Improvements
- Mask expansion and mask feather values can now be scrubbed up to 32,000, and mask expansion values can be scrubbed down to -32,000. Earlier releases of After Effects only allowed scrubbing these values to 1,000. Mask expansion could accept values between -32,000 and 32,000, but not by scrubbing; values beyond -1,000 and 1,000 had to be typed into the field.
- Copying and pasting from a Premiere Pro sequence into an After Effects composition now pastes the layers above the currently selected layer(s). If no layers are selected, the layers are pasted at the top of the layer stack.
- Creating a new light now includes the type of light in the light name. For example, a new spot light will be named “Spot Light 1”. Changing the light type will also change the name to the new light type, but only if the name has not been modified, and only when the light type is changed in the Light Settings dialog (i.e., not in the Timeline panel). For example, changing “Spot Light 1” to a point light will rename it to “Point Light 1”.
- The Tools panel now remembers the last-used 3D axis mode (Local Axis, World Axis, or View Axis) when you quit and restart After Effects.
- Adobe Media Encoder can now embed color profiles in JPEG files rendered from an After Effects composition. To do this, set a color working space for the project, add the composition to the render queue, enable the Embed Profile option in the Color Management tab of the Output Module Settings dialog, then queue the render item in Adobe Media Encoder and set the export format to JPEG. The embedded color profile will be the output profile specified in Output Module Settings > Color Management in After Effects. If the Embed Profile option is not enabled, Adobe Media Encoder will embed the HDTV (Rec. 709) profile.
