June Update of Adobe XD

Header image includes work by Norah Park, created using Adobe XD
Summer is here! While taking time off from work to enjoy the warmer weather is always recommended, we know that good design never takes a vacation. That’s why we’re thrilled to bring you several new ways to speed up your design workflow on both macOS & Windows 10.
New on Mac and Windows
Symbol Overrides and Update All
As a UX designer, you build buttons, navbars, sliders, and many other types of components that are repeated throughout your design. Yet, your designs can change on a dime. Symbols save you time and help you stay nimble. With the June release of XD, you can now customize the text and bitmaps for individual symbol instances – giving you greater design flexibility. If the individual change you made should be applied to all instances of that symbol, you can select “Update All Symbols” from the context menu to make that change. For a quick overview of how Symbols overrides work, check out our tutorials (Go to 01:49 on the Mac tutorial, and 09:37 on the Windows tutorial).
https://blog.adobe.com/media_935b8e3851bf19426af2a26504d2ad48b0c25d61.gif
New on Windows
Symbols (Including Overrides and Update All)
We’re excited to introduce Symbols on Windows 10. Access the Symbols panel by clicking on the icon in the lower left-hand corner of the application window or via shortcut keys (Shift+Ctrl+Y). To create a symbol, select an object on the canvas and click on the “+” in the panel, press Ctrl+K, or select “Make Symbol” from the context menu. The object’s highlight color will switch from blue to green, and the object can now be duplicated on canvas or dragged from the panel to create linked instances. Editing the shape, position, or style/properties of one instance updates all instances immediately. For more information on how Symbols work, go to 09:37 on the Windows tutorial.
https://blog.adobe.com/media_66376ace2941bb572c308374277cdff75e103458.gif
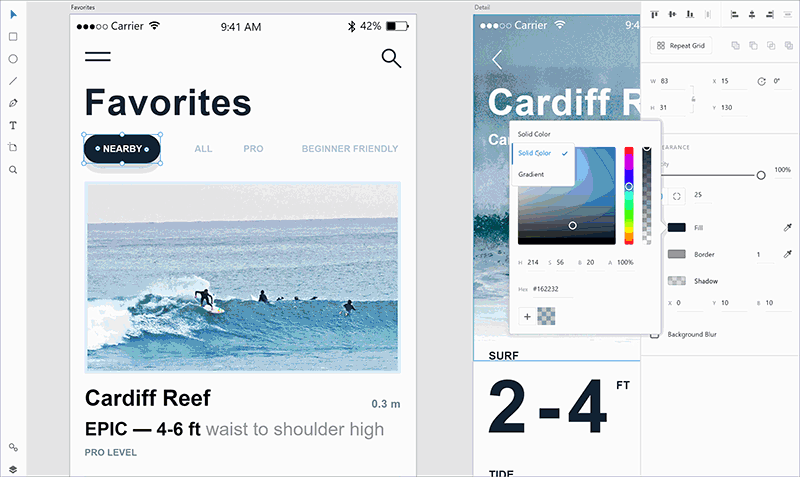
Linear Gradients
With this release, you can now create and edit linear gradients within vector objects in XD. What’s more: you can easily bring in existing gradients from Illustrator with simple copy/paste commands, color stops and all. To create a linear gradient, select the object you want to apply the gradient to, open up the color picker, and select “gradient” as the fill type. A gradient will appear, based on the existing color of the object. You can add, select, move, and delete color stops on the bar at the top of the pop-up to customize your gradient. Modify each stop color and transparency using the familiar color picker and appearance controls.
https://blog.adobe.com/media_50d68392689d4743b24f53c9bf0be2a4e9810eb1.gif
Another way to work with gradients is directly on canvas. When you create a gradient by changing a vector object’s fill from solid to gradient, you’ll notice that a control line appears within the shape itself (on canvas). This control line allows you to position the gradient’s endpoints and angle. You can also add new color stops and reposition them by sliding them along the control line.
Have a great time building beautiful gradients, and share your work with us by tagging it with #MadeWithAdobeXD!
Layers Drag and Drop
We introduced layers on Windows last month, and are excited to introduce a follow-up enhancement that will extend the usefulness of the Layers panel: drag and drop. You can now change the z-order of the objects on an artboard from within the Layer panel. Simply drag and drop layers within the panel, and they will reorder directly on the canvas. The drag and drop feature is also a great way of adding new elements into an existing group (shown at 04:42 in our Windows tutorial). Let us know what you think of layers and what we can do to make them even more useful by visiting UserVoice.
https://blog.adobe.com/media_bb401ac7460dabe18d438d529efc314e5f0ad214.gif
Text Range Styling
With the June release, you can now create different text styles within both area and point text. Simply select the portion of text that you want to style differently and then use the property inspector to customize the typeface, size, character spacing, and color of the selected text.
Copy Bitmap to Clipboard
You can now copy from XD and paste into different applications. Select an artboard, an element, or group and XD will store it in your system clipboard as a bitmap for use in a host of other applications.
Every month means something new on XD, and we’ve got even more great stuff coming. Stay tuned, and keep building XD with us by telling us what you think on UserVoice, Facebook, or Twitter.
UX Community
We’d love to continue the dialogue! You can follow our handle @AdobeXD for updates or reach the team on Twitter using the #AdobeXD. You can also talk to us using Facebook, where we share videos and updates as well as answer questions during live sessions.
Meet some UX designers who have used Adobe XD. Learn how they got started in UX design and their creative process; check out some of their work and listen to their favorite tunes.
#MadeWithAdobeXD
While sharing your prototypes on Behance, don’t forget to tag them with #MadeWithAdobeXD and select Adobe Experience Design under “Tools Used” for the opportunity to be featured in the Adobe XD Newsletter.