Create Gradient-Filled Objects With the Blend Tool in Adobe Illustrator
Knowing how to manipulate gradients is an advantageous skill for any designer. With a few short steps, you can create a dazzling image that looks like it took hours to create.
Evgeniya Righini-Brand spent a month experimenting with gradients for her Skillshare class and vouches for the ease and effectiveness of the Blend tool. “As a graphic designer I always look for the most efficient ways of creating illustrations and love taking something very basic and making something unique,” she says. “That’s why I find the the Blend tool is so important. It allows you to create so many different things with just a few clicks.” Click here to download the source file.

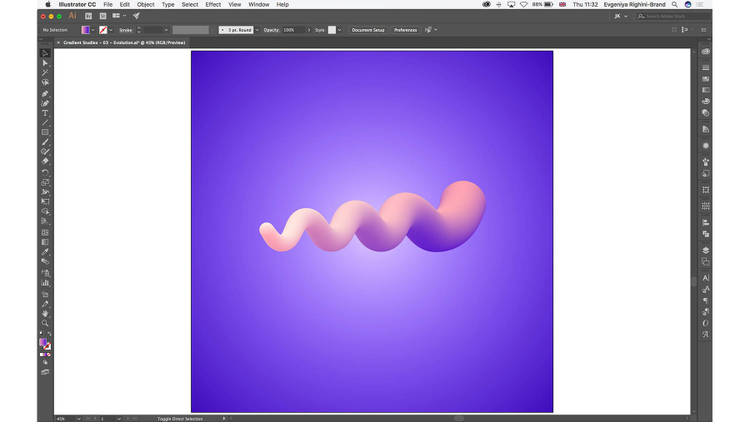
The above image looks like something a digital effects expert would spend hours making, but with Evgeniya’s technique it only takes a few clicks.
To start, create at least two separate shapes, each with a color gradient fill. Two shapes are all that you need to create a linear figure, but once you’ve mastered the blend tool, you can experiment with a wide variety of shapes and structures.
Under the Objects menu, select Blend>Make.

The program will automatically fill the space between the original shapes either with a set of new objects, or with a smooth transition between them.

To create a single smooth transition from the first object to the last, select Option>Blend>Blend Options, which opens a new window.

The step number indicates how many different objects will appear between the two initial images. To create a seamless transition between gradient-filled objects, choose Specified Steps, and choose the maximum number, 1000 steps. You can use less steps if you are working on a shorter blend

You now have a gradient that flows from one end of the shape to the other, but the image lacks depth and complexity. To add movement to the image, create an open path separate from the image. The shape you make with the path will eventually be the shape of your gradient image, and it can be anything, from a wavy line to a spiral to monoline lettering.

Once you have the path drawn, select both the path and the gradient image, and click Object>Blend>Replace Spine.

The image contorts to fit the path.

Add shadows and additional details to create a unique object that appears to leap from the page.

The blend tool makes your images stand out, literally, and it only takes a few minutes to use. Your imagination is the only limit for what your finished object will be.
