As a new designer, you want to try your hand at as many different types of projects as possible — and that includes brand guides. But if you’re new to the design game, chances are you’re probably scratching your head right now, thinking, “OK, sounds great, but what, exactly, is a brand guide? And how do I design one?”
Never fear, we’re here to walk you through a step-by-step process for building the kind of brand guide that will knock the socks off your clients, build your design skills, and add the kind of diversity to your portfolio that will help take your design career to the next level.
What is a brand guide?
So, first things first — what exactly is a brand guide?
A brand guide outlines all the aspects of a brand, from their style guidelines to their brand voice, their brand personality, to their communication dos and don’ts, and just about everything in between. Think of a brand guide as a blueprint — it lays out all the different components of the brand and how they should come together to create a cohesive brand experience.
By the end of this tutorial, you’ll have all the knowledge you need to get out there and design the kind of brand guides that will have brands begging to work with you.
Doing your research
Before you even think about starting your design, it’s important you do your research so the brand guide you design feels true to the brand you’re designing for.
Review as much information as you can about a brand (like looking at their logo, reading their mission statement, and scrolling through their social media accounts). Once everything has had a chance to absorb, sit down with your client and ask the million dollar questions like, “If your brand was a person, who would they be?”
Once you have a list of characteristics of your client’s brand, you can start using those characteristics to look for relevant brand images (if you’re not sure where to look, these free photo sites are a great place to start).
Getting your document set up
It’s time to set up your document so you can start designing.
- Open a new file in Adobe Illustrator and set the parameters for your page size and orientation (we’ll be using 1280x720px, landscape mode in this tutorial).
- Set the rest of the necessary parameters: bleed to 12px (or whatever your printer specifies), Raster Effects to 300 ppi, and Color Mode to CMYK.
- Set the number of artboards, name your document, and click “Create.”
Once you’ve created your document, you’ll need to set the layout grid using guides.
- Place a rectangle-sized 20x20mm at the page’s edge on the upper-left corner of the document.
- Make the rulers visible by hitting Ctrl+R, then click and drag to create your guide.
- Place the newly formed guides at the inner sides of your rectangle.
- Move the rectangle to the lower left corner and repeat the process.
- Unlock your guides by clicking View > Guides > Unlock Guides. Then, select and copy the guides (that way, you can easily paste them on your other artboards).
- Click on the next artboard and paste the guides (you can do this by hitting Shift+Ctrl+V).
- Rinse and repeat with all the artboards in your document.
- Rename this layer “Guides,” then drag the rectangle outside of your artboard and lock the layer (just don’t delete the rectangle — you might need to use it later to measure).
As we move forward through the tutorial, remember to click on the next artboard and create a new layer for each step. This will make staying organized much, much easier.
Cover
Remember how you found all those awesome photos during your research? Well, now’s the time to use them for the cover of your brand guide.
- Choose the most visually impactful photo that best represents the brand you’re designing for, and open it in Photoshop.
- Convert the photo to CMYK color mode and save (you’ll want to save as a .psd file).
- Go back to Illustrator and create a new layer. To keep it simple, name the layer “Cover.”
- Select the first artboard, and use the Shift+Ctrl+P shortcut (or File > Place) to insert the .psd image into the artboard.
- Resize the image as necessary and position it on the page, making sure the image fills in the bleed area. Use the Clipping Masks if necessary (not sure how to use Clipping Masks? Check out this Clipping Masks tutorial to get started).
Once you have the .psd image in the artboard, think about what other elements you want to incorporate into your cover, like the brand’s logo design and the title of your brand guide. Add those elements to the document and play around with them until you’re happy with the way they look.
Then, voila! Your cover is done.
All Radpaw designs and images by 99designs designer Mky.
Table of contents
In terms of difficulty level, the table of contents will definitely be the least challenging part of designing your brand guide. All you need to do is create rows for each chapter title and leave a space for their corresponding page numbers.
When all is said and done, your table of contents should look a little something like this:
About page
Now that the cover and table of contents are squared away, it’s time to tackle the “About” page.
Start by copying the header from the contents layer, pasting it to a new layer and title it “About Page,” and adding a page number. Then, add any of the relevant info from your client (this includes any information about who they are, what they’re about, and why they’re creating the brand guide).
Jazz up your client’s copy with images and graphics (you can use the photos you pulled during your research phase). Just don’t forget to convert any images to CMYK color mode before you add them.
Once you’ve got everything where you want it, add the page number and rearrange them on the artboard.
Brand logos
Time to move on to one of the most important parts of the brand guide — logos.
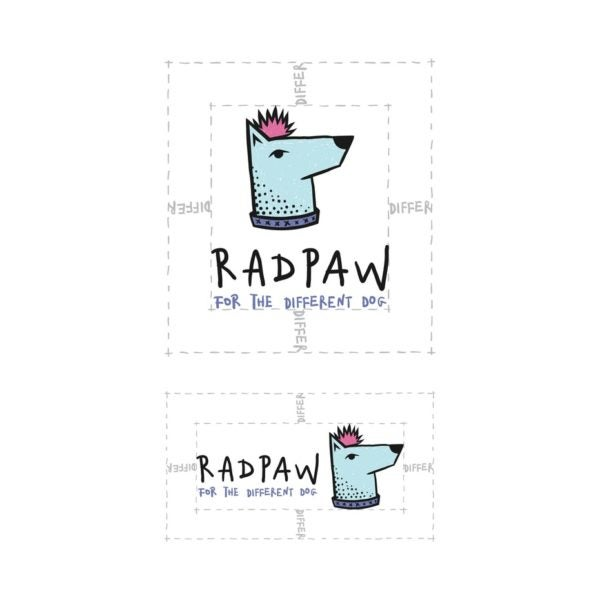
A brand’s master logo is the one they’re going to use most of the time. So, for example, Pepsi’s master logo is the logo that has both the globe and the brand name underneath.
Paste the header onto a new layer, add the page number, and paste the brand’s master logo in the center of the page (for the sake of not sounding like a broken record, just remember to do this with each new step of the process). Then, write down the main characteristics of the master logo.
All Radpaw designs and images by 99designs designer Mky.
Once you’ve got the master logo page done, you’ll want to build an additional page for the brand’s secondary logo (Pepsi’s secondary logo is the logo that just has the globe and skips the text). Repeat the exact same process as above (if the brand doesn’t have a secondary logo, skip this step).
Most brands have different variations of their logo — and you’ll want to include all of them in the brand guide. Arrange all the variations on the page (including the master and secondary logos, so every variation is represented).
All Radpaw designs and images by 99designs designer Mky.
Now that you’ve outlined all the different brand logos, it’s time to outline how to use them. Add a page specifying the minimum and maximum sizes that will work for each logo.
In order to figure out what the proper sizes are, think about where you’re going to be using your logo. Is your logo going to be splashed across a billboard? Then you’d obviously need a higher maximum size. On the flip side, if your logo is going to be used on branded merch, like a pen, you’d want to take that into consideration when choosing your minimum.
All Radpaw designs and images by 99designs designer Mky.
In addition to defining the minimum and maximum sizes for the logo, you’ll need to define the minimum space a logo needs around it (that way, it doesn’t get crowded by other elements on the page).
All Radpaw designs and images by 99designs designer Mky.
Font and typography
This next page will outline all the brand fonts. Make sure to outline what fonts are appropriate and when (so, for example, which font to use for titles and which to use for longer paragraphs of text). Most of the time, these fonts will come from the brand, but if your client tasks you with choosing fonts, there are a few things you’ll want to keep in mind:
- Choose fonts that align with your overall branding. If you’re designing for a children’s clothing company, choosing a traditional font is going to feel off brand; a whimsical cursive font would be a much better fit. On the flip side, using that same cursive font for a more serious or corporate business, like an insurance company, would feel completely unaligned — in that case, the more traditional font would be much more appropriate.
- Choose fonts that complement each other. Since you’re going to be choosing different fonts for different things, you want to make sure they all work together to create a look that feels cohesive and well designed.
- Don’t choose fonts that everyone else is using. You want the brand you’re designing for to stand out — and that’s not going to happen if you choose the same fonts everyone else in their industry is using. Make sure to choose fonts that feel fresh and original.
For more on choosing fonts, check out this article — and for tips for finding free (and legal!) fonts to use in your designs, check out this resource guide.
Once you’ve chosen your fonts, you’re going to want to include a visual of the entire alphabet of each font, as well as a few sentences or a paragraph to show what said fonts will look like in action.
All Radpaw designs and images by 99designs designer Mky.
Brand color palette
Next up, color palette. This is the section of the brand guide where you outline the primary colors for the brand. Typically, this will be the colors used in the brand’s logo, plus blacks and whites and any accent colors.
Typically, this information will come from the brand, but if they give you creative license to choose your own colors, make sure you choose colors that accurately represent the brand you’re working with (if you need help choosing colors, this article on color psychology should be pretty helpful — or, feel free to check out Adobe’s Color Tool, which can help you create synergistic color palettes based on the central color of your design).
Once you’ve got your colors in place, outline them on the page — either in neatly arranged columns, splashes of color, or whatever other visually appealing way you feel like presenting them — and add the necessary color codes (RGB, HEX, and CMYK).
All Radpaw designs and images by 99designs designer Mky.
Brand application
If the brand you’re working with has any stationery documents (like business cards or packaging) or materials for social media, this is where you’d want to pop them in. You can either include images of the documents or actual templates for the client to later modify (as well as any guidelines about how and when to use them). If there are no relevant documents, feel free to skip this step.
All Radpaw designs and images by 99designs designer Mky.
All Radpaw designs and images by 99designs designer Mky.
Credit your work
You designed this brand guide, so of course you deserve your own page. This is where you’ll want to put your contact info — that way, if the client has any questions (or wants to hire you for another project), they know where to find you. If you’re a freelancer, adding your contact info is a great way of keeping your name top of mind for your client.
All Radpaw designs and images by 99designs designer Mky.
Saving your brand guide
You’re done — huzzah! Time to save your work.
Save your work as a single-file PDF. If your client wants to use the brand guide digitally, there are a few adjustments you’ll need to make.
- Remove the bleed by going to File > Document Setup and typing “0” into the bleed section.
- You’ll also need to change the image colors from CMYK to RGB. Go to File > Document Color Mode, and click RGB.
Once you’ve selected RGB color mode, you’ll need to change all the CMYK images to RGB images. Go to Window > Links and relink any images that are currently using CMYK image mode.
Wrapping things up
As you put your final touches on the brand guide, ask yourself: are there any opportunities to add color, to incorporate more visual imagery, or to infuse more of the brand’s personality in the design? If so, knock yourself out. This is your creation, after all.
All Radpaw designs and images by 99designs designer Mky.
Now that you have everything you need to get out there and create some awesome brand guides for your clients, get out there and start designing.
Brea is community marketing manager at 99designs, the world’s largest graphic design marketplace. 99designs helps connect a global community of freelance designers with businesses of all sizes to complete their design needs. Fire up your freelance career and sign up today.