Premiere Pro 13.0 Released Today
Faster performance and smarter tools for professional video editing.
The latest update for Adobe Premiere Pro CC is available today. Premiere Pro 13.0 offers improved performance, awesome new selective color grading, polished motion graphics workflows, intelligent audio cleanup, end-to-end support for VR 180, and more. The new features are listed below. You can read a full overview, including video demos, in our Premiere Pro post for IBC 2018.
And that’s not all. All-new Premiere Rush CC was also released today — an all-in-one, cross-device video app that extends your editing platform wherever you go. Capture, edit, and share online videos from your mobile device or desktop. Open native Rush projects in Premiere Pro for additional editing power.
Premiere Rush CC is available for download now at both Adobe.com_ and via the iOS app store (Google Play Store availability coming in 2019), and is offered across a series of plans including the Premiere Pro single-app plan. Learn more_ here.
Update: 13.0.1 released on November 1, 2018. See What’s New page for details.
Updating to Premiere Pro 13.0
The Premiere Pro update is available online or directly from your Creative Cloud application.
Auto updates: Creative Cloud now supports auto updates for the Creative Cloud apps. For the video and audio apps, we do not recommend enabling this feature.
**Before you update: **check your system specifications. Software is always evolving, and system requirements change with them. Premiere Pro 13.0 requires Windows 10 v. 1703 (or higher) or macOS 10.12 or higher (10.13 recommended for Apple Metal graphics acceleration).
- Learn more about updated operating system requirements.
- Important: updated graphics requirements for Apple Metal, CUDA, and NVIDIA GPUs.
- Visit the Premiere Pro system requirements page for more information.
Best practices for updating
As with all software, we recommend saving and backing up current projects before updating.
You can create a parallel installation of Premiere Pro 13.0 alongside existing installations.
Locate Premiere Pro under Apps in the Creative Cloud desktop application and click on Update. Click on “Advanced Options” in the popup dialog. Ensure that “Remove old versions” is deselected.
Note: projects created or saved in Premiere Pro 13.0 aren’t backwards-compatible with previous Premiere Pro versions (e.g., version 12 releases). If you work with other editors or teams, confirm they are on version 13.0 before starting projects in Premiere Pro 13.0.
New features in Premiere Pro 13.0
- Selective color grading
- Display color management
- Add, rename, and edit Lumetri instances
- Open Premiere Rush projects in Premiere Pro
- Intelligent audio cleanup
- Edit and transform vector graphics
- Essential Graphics and Motion Graphics template enhancements
- Support for data-driven infographics
- Improved search for Motion Graphics templates in Adobe Stock
- VR enhancements
- End-to-end workflow for 180 VR
- Spatial markers for immersive media
- New Theater mode in Adobe Immersive Environment
- Collaboration enhancements
- Group invites for Team Projects
- Creative Cloud Libraries enhancements
- Performance enhancement and file format support
- New file format support
- Support for Australian closed-captioning standard
- Performance improvements
- New home screen
- Auto-save improvements
- Quick timecode entry,
- And more.
Feature notes
Updates to Motion Graphics workflows
Motion Graphics templates are, by their nature, flexible, and can include as many or as few parameters as needed. That’s why new features, such as font controls, data-driven infographics, and organized customization parameters require Motion Graphics templates (.MOGRTs) authored in After Effects which include these functions. Existing MOGRTs can be updated and re-saved in After Effects to add them.
Along with these specific features, the overall workflow for Motion Graphics has been refined and performance is noticeable faster in most cases.
NEW Display Color Management
With new Display Color Management turned on, you can leave your OS color settings set to the system default and your colors will be presented correctly on-screen while working in Premiere Pro. Color information of your source files is not modified and will export correctly.
Display Color Management works for any internal monitor and for any secondary computer monitor used as part of the OS desktop, including HDMI, Display Port, DVI, and Thunderbolt connected displays.
Display Color Management does not support external monitors connected through video I/O cards using Mercury Transmit. These need to be configured outside of Premiere Pro.
Enable Display Color Management by opening Preferences > General > and check “Enable Display Color Management.” The preference is off by default since not all systems have sufficient GPU horsepower to use the feature.
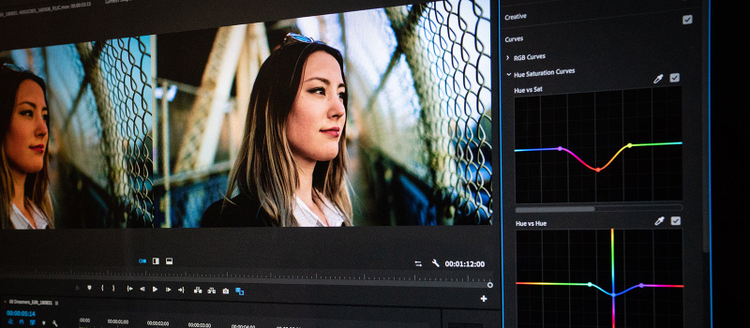
NEW Selective Color Grading
Selective Color Grading provides five new curve adjustment tools. The first one, Hue vs Saturation, replaces the radial “donut” and presents the same controls as a horizontal curve line.
Use the eyedropper to select a color range in your image, or manually add adjustment points as needed to manipulate the curve. A scroll bar at the bottom of the window makes it easy to work on any part of the line (essentially, dialing around the color wheel).
Hue vs. saturation
Select a hue range and adjust the saturation level. As you drag your selection up or down, a vertical line appears and displays the saturation levels available, giving you visual guidance as you adjust.
Hue vs. hue
Select a hue range and change it to another hue — modifying a specific color range, for example, to match it or distinguish it from other colors in the image. Again, the vertical adjustment line provides a visual guide as you make the adjustment.
Hue vs. luma
Select a hue (color) range and adjust the luma (light). You could use this, for example to darken a pale blue sky and add more contrast or drama to a shot.
Luma vs. saturation
Select a luma range and adjust the saturation, for example to roll off the saturation in the highlight of a sunset and minimize clipping in the center of the sun which is overexposed.
Saturation vs. saturation
This allows you to selectively adjust saturation for a specified saturation range. Use this for fine adjustments to your image or to ensure broadcast-legal saturation levels.
Bug fixes in Premiere Pro 13.0
Performance
- Improved Mercury Playback Engine performance on Metal.
- Improved Reverse Playback performance of HEVC file.
- Improved Metal renderer performance at full-res playback.
- Lumetri: Performance drop/dropped frames with interlaced media (GPU).
- 8K R3D playback performance issues at full and half resolution (macOS).
Stability
- Intel Coffee Lake CPU: crash when importing or opening an existing project while NVIDIA driver is enabled.
- Crash can occur when going backwards in Learn panel.
- Crash when switching to thumbnail view with PNG files.
- Recovery clips are created when working with multiple open projects.
- Import reference file for some audio (e.g., AIFF, MOV) results in low-level exception in Importer MPEG.
- Slow import of multiple AVCHD files on macOS.
- Crash when switching between workspaces viewing Waveform Luma & RGB Alignment in Lumetri Scope.
- Stability issues with laptops with discrete GPU running Windows 10.
- Crash when quitting if “Manage My Account” link is open in that session.
- Several redrawing errors, crash and blank screen while changing workspaces using Workspace tabs.
- Crash when importing XDCAM files from Nexio/Harris Velocity.
- Crash when using “Reveal Project in Project Panel” with some projects.
- Reverse nested sequence causes program monitor to display black.
- Files generated by YI camera result in low-level exceptions or application stops responding.
- Duplicating sequences loses effect data.
- After adding a motion effect to clip on timeline, playback will freeze.
- Crash occurs when match framing or slip/slide of clips in multicam sequence.
- Placing growing MXF file from Abekas into sequence causes Premiere Pro to crash.
- Hang when rendering some timelines.
- MP4 material can cause video playback to freeze and the application to stop responding.
- Application hangs when importing 100 or more files, requiring force quit.
- Importing FCP xml into large project results in a freeze.
- Hang while importing some types of GoPro files.
Formats
- Some ARRI Alexa Mini files appear incorrectly vertically instead of horizontally.
- HEVC mov files with Codec ID hev1 import as audio only.
- Playback does not work when importing ALEXA_LF 3840 x 2160 files.
- R3D file plays back distorted in 1/4 resolution or lower playback setting.
- When importing ProRes 422HQ codec mov files on Mac, a slight color shift can occur.
- QuickTime files that are out of gamut are shown as being in gamut on Windows.
- Open GOP files have artifacts with HW decode.
- Some H.264 files with frame rate and original frame rate values have switch to software decode.
- Imported H.264 10-bit files have shift in color values.
- Premiere can’t import 4448×1856 ARRI RAW files and eventually hangs the app.
- Importing some QT files cause the app to hang or crash.
- Subsequent imports of XDCAM HD 422 MOV file will only import audio.
- Some audio/video files import as video only.
- Filmic Pro files import as video only.
- 4K raw files from Sony FS7 import as white screen.
Workspaces and panels
- Issues with Workspaces when opening legacy projects.
- Workspaces don’t save with the project.
- Display Timecode is inconsistent when multiple timeline panels are visible.
- Opening a second project opens two project tabs in project panel.
- Switch to another workspace results in missing some or all of the project tabs.
Editing
- Adding marker to multicam clip causes waveform to disappear.
- Clip name in timeline not legible.
- File selection is not carried over when switching between Icon and List views in project panel.
- Marker workflow between timeline, source monitor, and program monitor panels is broken.
- Video and audio usage drop-down list doesn’t work if any clip is selected in the project panel.
- Digital distortion in silent areas between clips if used as a track-based compressor.
- Drag clips from one project to another project’s sequence loses clip label color.
- Moving clip between projects via source monitor loses label color.
- Reveal in Project, with bin set to open in place results in bin tab not being selected.
- Merged clips are deleted from a timeline, without a warning, if a smart bin filtering merged clips is deleted.
- Clip marker comments are lost when quitting.
- When AJA Capture Settings dialog is set to control panel, changes are unsaved.
- Background color of drop zone barely visible when dragging media from finder onto project folder.
- Saving multiple open projects that originally had different saved renderers all get saved with current renderer.
- Motion Graphic template does not always relink or indicates that After Effects is required to be installed.
- Can’t change camera views of a multicam project item in a locked project.
- When AJA io4k is configured to transmit Rec 2020 over HDMI, picture outcome is corrupted.
- With Sonnet eGPU device attached to iMac Pro, new timeline creation leads to crash.
- Incorrect XMP data leads to missing frames in Source Monitor playback.
Captions
- Intermittently lose decoding of CC 608 or 708 in timeline when adding more than one blank caption with ctrl-click add caption to timeline.
- Unexpected behaviors when making two blank captions.
- Issues with authoring captions on V3 when another captions track is on V2.
- Setting I/O point and exporting project with embedded captions strips captions from track (Windows only).
- When importing dfxp TTML open caption file and placing it on the timeline, characters appear to overlap on the program monitor.
Audio
- Media pending error displays when audio input set to non-working device.
- Mix down clips to stereo setting deletes track routing when dragging a sequence to the source monitor with multichannel master tracks.
- Specific AAF files that are exported fail to import on Windows.
- Silent audio export from audio clip at 9,000 percent speed.
- Solo in clip mixer with a clip loaded into the source monitor does not properly reflect the solo state in the mini meters.
- Waveforms constantly refresh with large projects when BlackMagic transmit is enabled.
- Switching cameras on multicam clip in the source monitor does not switch audio unless a third-party transmit is enabled.
- Embed audio for AAF creation strips out the audio file metadata.
- There is intermittent left/right channel bleed and waveforms only display problem areas at certain zoom levels.
- Some TS-mixed 5.1ch files are imported as stereo.
- Incomplete audio when recording on two tracks.
- Audio distortion when using an ASIO sound card, Decklink device, and switching rapidly between multicam view may lead to hang.
- Flattening a multicam audio item will clear any volume adjustment.
Export and render
- Green/pink patches along with horizontal lines are observed while playback of HEVC/H.264 files with Intel Graphics 620.
- Error compiling movie “software render error” for some third-party plug-ins.
- Warp Stabilizer gives a bad result with interlaced footage.
- Certain settings for MPEG2 export result in pixelation.
- Red frames when exporting specific projects.
- Export of HEVC 4K clip using HW encoding on i9 MacBookPro results in ExporterMPEG_VideoToolbox error.
- Analyzing in background banner appears erroneously when playing a morph cut.
- Export Range is full instead of limited when exporting HDR content for H.264 and HEVC.
- Export failures caused by Lumetri render error.
