How to Vectorize an Image

There are a few ways to vectorize an image. In this tutorial we will use Adobe Illustrator, and specifically the “Pen Tool” (P), which is the most common method.
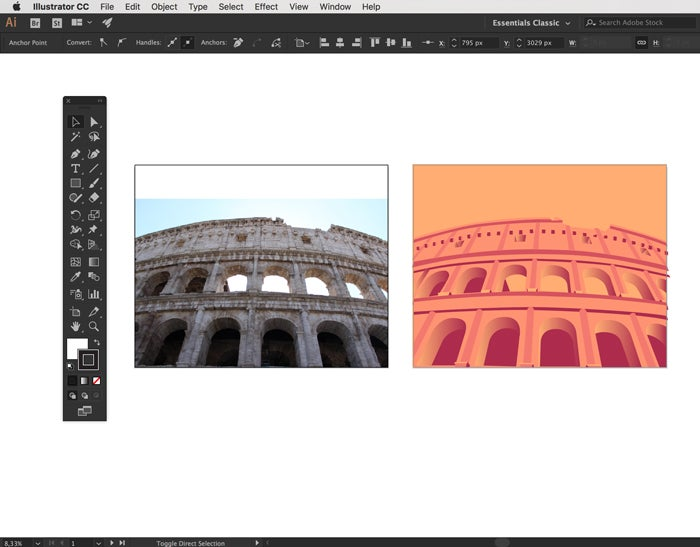
- First off, we need to select our base image or photo. In this case, I will use a photograph of the Coliseum in Rome that I took a few years ago (available through Adobe Stock).

- When you have your image ready to go, open Adobe Illustrator CC and create a new document.

For this tutorial, we will create a 5000 x 4000 px art board with an RGB color profile.
- Place your image in the middle/bottom of the document, and block it on the layer panel, clicking on the “lock” icon. Or select the image and press “CMD+2” (shortcut to block elements). This will help you to keep from moving the image during the trace process.

- To start the trace process, go to the tool panel and select the “Pen tool” (shortcut: “P”).

Now, we need to clear the fill color, leaving only the line color.
Pick a bright color that’s different from the photo color scheme. This will help ensure you can see the lines during the next few steps. The color doesn’t matter at this point, we will change it later on.

- We will start the tracing process (vectorize) from the most distinctive shapes in the image, and end with the smaller details. Also, for this exercise, we will “keep it simple” in terms of shapes and details, which will generate a particular “illustration” style of the Coliseum.
Now, with the “Pen Tool”, we need to add a single point where we want to start the path. In this case, on the top left of the Coliseum.

After the first point, move to the right to set the second anchor point of your path.
Move the cursor until the first crack on the top.
Hold your mouse / pen after adding the second point, and move it to the sides to arrange the curve of your path, placing it in the same position as the vertex in the top.

Follow the entire silhouette of the building, adding more points and curves with the “Pen Tool” (P). Close the path in the same place that we started.
For more information about how to use the anchor points, check out our Helpx page: https://helpx.adobe.com/illustrator/using/editing-paths.html
- With the outline of the Coliseum complete, we can start creating the inside arches – again using the same “Pen tool” (P).

- At this point, your image should look like the following in the “normal view”:

In the “outline” preview (shortcut “CMD+Y”), it should look like this:

- After finishing all the arches (the second most distinctive shapes of the image), we can move to the horizontal lines, and then jump to the pillars of the building. Remember that we will simplify the details, so don’t spend too much time on them, just follow the main shapes.
In this stage of our tracing process, complete all the shapes that we want to have in our composition. Below is how it will look.
(You can hide the image of the background just clicking on the “eye” icon from the layer panel – or select the image and press “CMD+3”.)

- Now we can choose the color we want to use for our final illustrated vector. In this case, let’s start with a warm color palette, using 5 tones and one gradient – darker to the lighter colors.

- Now, add a rectangle as background using the “Rectangle Tool” (M). Fill out the entire artboard, and pick the lighter color from our palette.
Make sure that this layer is at the back of all the other layers. (Do this by selecting the rectangle and clicking the right button of the mouse, “Arrange” and then “Send to back”.)

Then we can select the outline of the Coliseum and pick the second color (looking at the color scheme from left to right).

For the inside area of the arches, we will use the gradient to fill them. Select them all and pick the gradient with the “Eyedropper Tool” (I).

Now we can move to fill the pillars with color, as well as the rest of the details. Keep in mind the shadows and lights of the original image as a reference.
With all the paths filled, our vectorized illustration should look like this:
Now, your vector illustration is ready for any design project, or to upload to Adobe Stock.
In this case, let’s use a free Template from Adobe Stock to create a poster about Rome.


That’s it! You’ve created an animated vector from a photograph!
