Capture Your Look
Create powerful LUTs from light and color around you to color grade your photos and videos in Photoshop, Premiere Pro, and After Effects.

Image source: Hep Svadja.
It’s no surprise that an image can instantly transport us back to a moment in time, reigniting memories and recreating entire moments in our minds. But the images that spark this sense of nostalgia are more than just the place where they were taken — it’s also about the time of day when they were taken, the divine light along that beautiful ocean sunset on the horizon, or perhaps the dark and ominous clouds on an overcast day in a bustling city. The emotional connection we feel toward images is equally derived from both the place where they were taken as well as the color and light when they were taken.
So what if we were able to recapture that feeling from a single image (or even live, where we stand) and apply that same look to a video that we’re editing? Say hello to the Looks module, reimagined and released today as an update to Adobe Capture.
With Looks, you can use an image you’ve already taken or simply shoot on the go in your environment, capturing the color and light as you see it. Select a primary hue for creating your look, give it a name, and it syncs to your CC libraries. Once synchronized, this LUT can be easily applied to your own footage inside of Adobe Premiere Pro or After Effects.
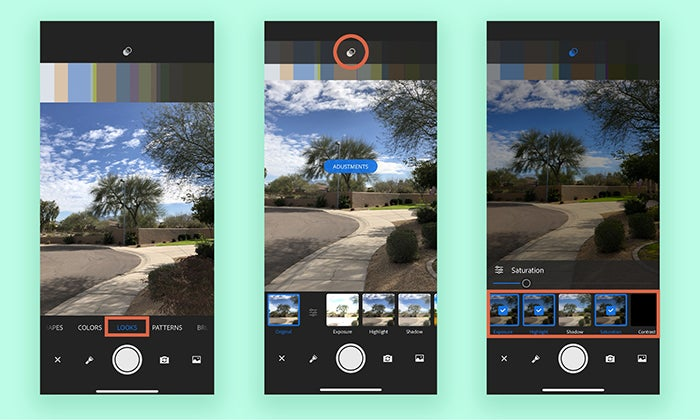
Step 1: Open Capture in the Looks module. You have the option to choose an image from your photo library or use the camera in the app. You can also import images from your Creative Cloud Libraries, Adobe Stock, or your Lightroom catalog. At the top of the screen, you will see a button that will allow you to make adjustments. Tap it and you’ll immediately have access to a series of controls to further refine multiple elements of the image/camera exposure, saturation, contrast, hue, and more. Just below the adjustment button, if you’re using the live camera you’ll see the primary hues adjust in real time. When you’re ready, tap to take your snapshot.
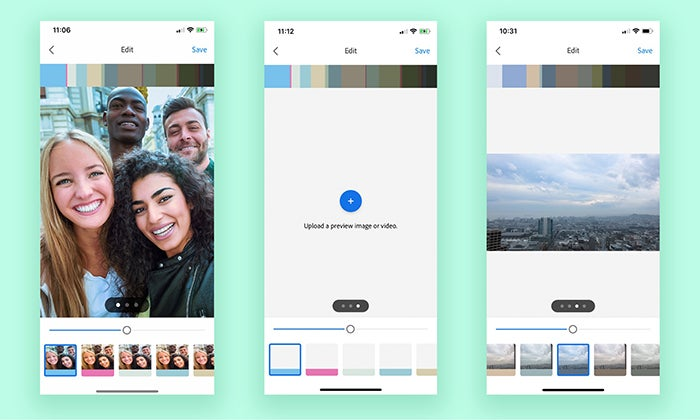
**Step 2: **Once your image is captured, you can preview what the result will look like on a series of reference images/videos provided within the app, or you can import your own reference image/video and test it out there. At the bottom of the screen, you have a slider to adjust the intensity of the look applied, as well as the ability to select the primary hue of your look. Tap and hold to see a before and after of your look applied.
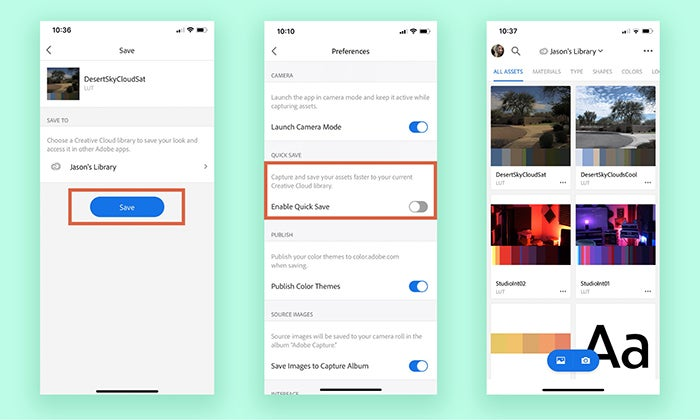
**Step 3: **If you’re happy with the result, you can simply tap Save and your look will automatically be added to your last used Creative Cloud Library. You can change this “Quick Save” option, however, in the app preferences. By disabling Quick Save this will not only allow you to choose whatever CC Library you’d like to save into (even allowing you to create a new one), but it will also give you the ability to give your look/LUT a specific name.
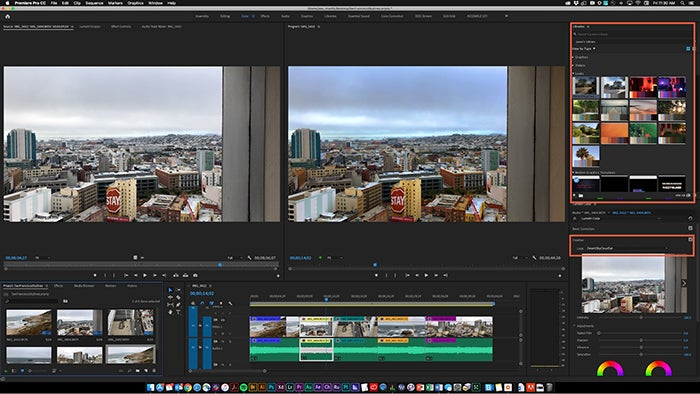
**Step 4: **Once your look is saved, open the Libraries panel in Premiere Pro or After Effects CC and simply drag and drop your newly created look onto your footage. The look will be applied as a LUT in the Creative tab of the Lumetri color panel.
Creating looks for your footage has never been easier, and you can truly recapture the look and feel (and that emotional connection) of your favorite memories with the simple but powerful LUT creation process in Adobe Capture.