Creating VR-360 Content with Animate 2019

After my last blog post, Exporting glTF from Animate, I wanted to write about adding interactivity to glTF animations from Animate. In that post I briefly mentioned the JavaScript APIs to add interactivity. But instead of explaining how to use those APIs in plain 2D animation, I wanted to explain them in the context of another glTF related feature, specifically using the creation of 360 degree virtual reality (VR) content as an example. Animate 2019 added features to create 360-degree and panoramic contents. The format used for publishing these contents is glTF. And because the glTF export feature is in beta, features to create 360 and panoramic contents are also in beta.
Since there is a lot to cover on this topic, I am going to split the content into two parts:
- In the first part, which is this article, you can learn how to create plain 360-degree VR content.
- In the next article, you can learn how to add interactivity.
Description of demo application
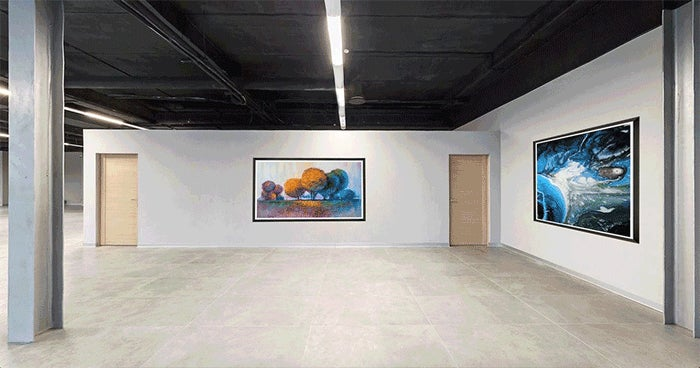
Let us create a simple application to navigate a museum. It has two sections, one for paintings and the other for 3D arts. To create a VR-360 view of the museum, we will use flattened 360-degree image. The paintings and 3D art on display in the museum are also images. Users can navigate the virtual museum using a mouse. Two sections of the museum are created as separate scenes in Adobe Animate and a user can switch between the sections by clicking directional signs.
Click here to see how the finished application looks (hold the mouse button and move to navigate the scene). You can also download the FLA file to try out.
Here are a couple of screenshots of the application.
The creation of this application can be broken down into the following simple steps:
Step 1: Create 360-degree view
Follow these steps to create a new VR 360 document
1. Select VR 360 (Beta) document type either from the launch screen or using File > New. The option is available in the “Advanced” tab.

Depending on your recently created documents, the placement of VR 360 (Beta) might be different.
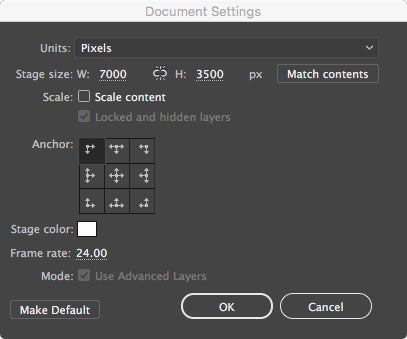
2. Create a layer in the document with a background image. You can drag and drop the image from the disk on the stage, or use the File > Import option. Make sure the stage size is modified to the size of the background image. To do this, select Modify > Document from the menu. In the Document Settings dialog box, click the Match Content button.
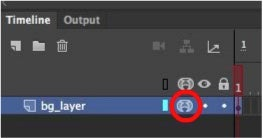
Then change the layer name to something meaningful, for example, ‘bg_layer’.
3. Create texture wrapping for the background layer. To do this, simply click the first dot after the layer name in the timeline. You should see a texture-wrapping icon replace the dot on that layer.
At this point, you should be able to navigate the scene in the browser by pressing CTRL/Command and Enter, or from the menu option Control > Test Movie > In Browser. For more information on how to create a VR-360 degree document in Animate, see “Virtual Reality authoring and publishing.”
In our museum app, we will create two scenes and create two texture-wrapped layers. Click here to see how the application looks at the end of this step. Hold the left mouse button and move to navigate the scene in the application. You can download the FLA file to try out.
Step 2: Add objects to the view
The next step is to add the following objects to the scene:
- Paintings on the wall
- Pop-up banners for the paintings to display information when a user clicks on a painting
- Directional sign (Clicking on this navigates to the other scene)
- Images for 3D arts
- Pop-up banners for 3D art
We will also add movie clip animation for one 3D art. Adding animation in a 360-view is similar to adding one in flat animation. After this step, all animations (for pop-up images and directional signs) start together, on the loading of the scene. We will fix this in the next step using scripts.
Click here to see how the application looks at the end of this step. You can download the FLA file to try out.
Step 3: Add interactivity
In Part 2 of this article, you can learn how to add interactivity.
All demos in this article are created by my colleague on the Animate Team, Arvind B.V. Assets for the demo are licensed from Adobe Stock.