Quickly Brand Your Instagram Photos with Adobe Photoshop Actions

Image source: Codify Design Studio.
Ever feel like it’s Groundhog Day when you’re using Adobe Photoshop — you’re adding the same logo to every graphic or applying the same effect to every photo? It’s time to eliminate the tedium and save tons of time by using Actions. Photoshop Actions are sequences of editing steps that you can save and use over and over, and they’re perfect for quickly adding company branding to your Instagram photos.
Create an Action that matches your branding style
To begin creating your branding action, open one of the images you’d like to post to Instagram. Open the Actions panel, click the New Actions icon, and name it “Instagram post.”
Let’s say you’d like to add a black rectangle behind your logo. With the Record button activated, start by creating a vector rectangle at the bottom of the image that’s 120 pixels high by the full width of 800 pixels.
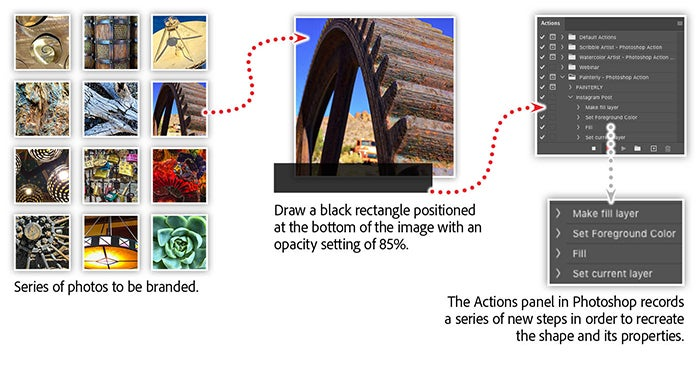
Create your own reusable Actions by recording your steps in Photoshop. As you work, watch as the steps appear in the Actions panel.
Next, set the foreground color to black and fill the vector layer with black. And finally, set the layer opacity to 85% and click Stop in the Actions panel.
You’ll now see a series of steps that Photoshop recorded as you drew and styled the rectangle. These steps include Make fill layer, Set Foreground Color, Fill, and Set current layer. If you were to delete the rectangle in your image and run the Action, Photoshop would recreate the rectangle again, with all the same properties.
Import your logo
With the vector shape background in place, you can now add your company logo to the action. Choose Place Linked from the File menu, and choose an Adobe Illustrator logo file. The Place Linked option creates a new Smart Object layer that maintains a link back to the original graphic file — just like you’d expect in apps like Illustrator and Adobe InDesign.
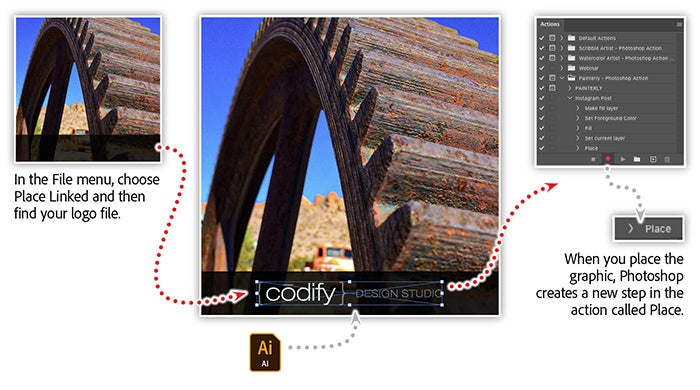
To bring your logo graphic into the Action, simply select the Place Linked command from the File menu, and then locate your logo graphic.
In the Actions panel, you’ll see that a new Place step has been added to your Action. Now your Action will import the same logo file you specified as a Smart Object, and it will perform the same transformations and use the same positioning attributes as when you first placed the graphic.
Run your Action as a batch process
Once you like the look of your Action, it’s time to run it on a whole series of images using an automated feature called batch processing. To begin a batch process, choose Batch from the File > Automate menu. Select your Action in the Action dropdown menu on the left side of the Batch dialog box, and then choose the Source folder that contains all the images you want to modify.
On the right side, choose a Destination folder and set any naming preference you have for your final files. If your Action has a Save step, check the option Override Action Save As Commands so the batch process can perform the process without asking for user input.
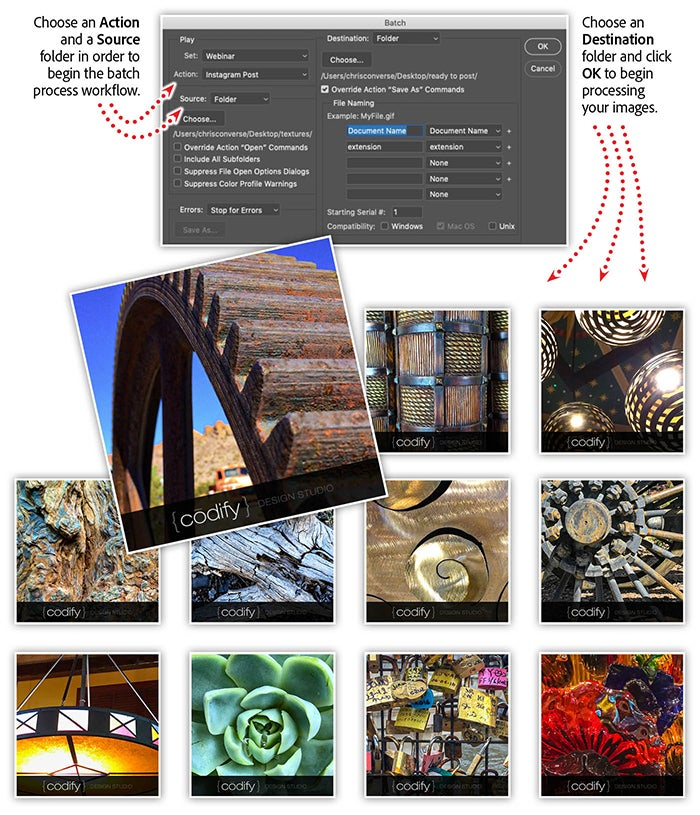
Save production time by using batch processing to apply your logo and design elements to a whole series of images automatically.
With your Action selected and both the Source and Destination folders defined, click OK to begin the batch process. Photoshop will open each image in the Source folder, perform the Action, and then save a new file in the destination folder. The result is a series of branded images that are ready to post to Instagram.
Learn even more about using Actions in Photoshop
Join our webinar to discover how to take Photoshop by the reins with Actions. You’ll learn how to create Actions that save tons of time by doing the work for you.
The webinar includes an additional 15-minute, hands-on workshop to help you create your first Photoshop Action. And join us afterward as we create an Action that automatically prepares graphics for a social media post, complete with branding and color adjustments that match our corporate look and feel.
Join Take the Reins in Photoshop with Actions and learn to:
- Recognize the types of tasks that should be automated
- Record Actions as you work
- Add user-defined options to your Actions
- Share Actions with your team or the world
Adobe Creative Cloud e-learning series: Take the Reins in Photoshop with Actions