Anyone Can Be Creative with Adobe Creative Cloud

Image source: Adobe Stock / Fizkes.
Add a little Adobe Photoshop to your creative skill set. Follow these steps to see how to bring out the best in any photograph using the Camera Raw Filter.
Step 1. Download assets from Adobe Stock
If you’d like to follow along with this tutorial, download the following preview (watermarked) image from Adobe Stock. You can also watch this tutorial as part of the Anyone Can Be Creative with Creative Cloud webinar.

Image souce: Family in living room — by Fizkes.
Step 2. Open the image in Photoshop

Locate the Layers panel. If you don’t see it onscreen, choose Layers from the Windows menu. Select the Background layer in the Layers panel and choose Convert for Smart Filters from the Filter menu. This will convert the layer into a Smart Object, which will allow you to apply nondestructive edits to the image.
Step 3. Apply the Camera Raw Filter
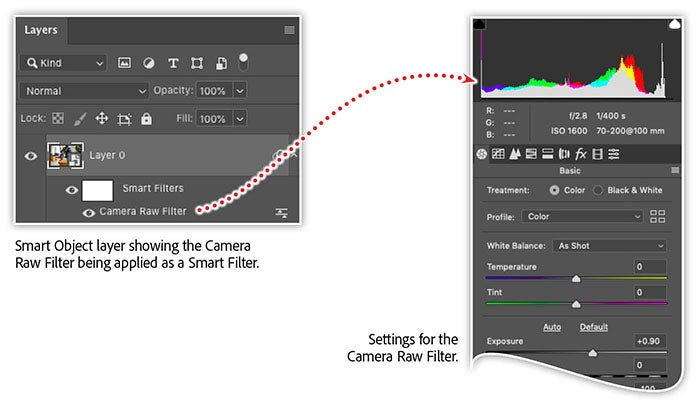
With the new Smart Object layer selected in the Layers panel, choose Camera Raw Filter from the Filter menu and set the following values:
- Exposure: 0.9
- Highlights: -100.0
- Shadows: 60
- Whites: -100.0
- Clarity: 27.0
- Vibrance: 15.0

The Camera Raw Filter gives you the power to reveal lost details in the darkest areas of your photos while simultaneously allowing you to adjust exposure, remove atmospheric haze, and apply vibrancy to the colors. Use this technique to bring out the best in any photo!
Learn more about boosting your creativity with Creative Cloud
Creative Cloud isn’t just for designers. Join us in this unique webinar, Anyone can be Creative with Creative Cloud, to explore Creative Cloud tools that anyone can use to enhance photos, create graphics and web pages, or prepare a newsletter for commercial printing. You’ll also learn how Adobe Stock templates can help you jump-start creative projects and marketing materials for web, print, photography, and beyond.
Adobe Creative Cloud e-learning series: Anyone can be Creative with Creative Cloud