Better Together: Photoshop on the iPad and Adobe Fresco Premium
Introducing the ultimate bundle for drawing and painting.
An image of a colorful bird enhanced with tools and techniques from Photoshop and Fresco.
Like peanut butter and jelly, cookies and milk, or sand and surf, some things are just better together. Today we’re proud to announce you can get Adobe Photoshop on the iPad and Adobe Fresco premium — two great apps that work even better together – at one great price. The offer is available to customers who buy Photoshop on iPad or upgrade to Adobe Fresco premium through the App Store, as well as to Creative Cloud customers who buy the Photoshop Single App or All Apps plan on Adobe.com. Early adopters who already have a Creative Cloud membership are eligible too. Sweet deal.
Image made in both Photoshop and Fresco on iPad.
With Photoshop on the iPad, you can harness the power of Photoshop to create anything you can imagine, wherever inspiration strikes. The app delivers core compositing and retouching tools reimagined for Apple Pencil and touch. Photoshop on the iPad introduces new features every month, including Adobe Fonts auto-activation, which automatically finds and updates missing Adobe Fonts in your PSD files.
With Adobe Fresco premium, you get access to more than a thousand additional brushes, plus you can import your own brushes. Be sure to download both apps to get the most creative mileage out of your iPad.

Two great apps, one great price.
How can you use these two apps together? We’ve got a few ideas to jumpstart your creativity. Keep reading to learn some suggested workflows.
Photoshop and Adobe Fresco inspiration
To get started, first make sure you’re connected to the internet. We recommend you connect to follow these tutorials for two reasons:
- Your work is automatically saved to the cloud when you’re online. A cloud backup keeps your files up to date in case you lose battery power or your device. No more lost files — and you can always revert to an earlier saved version.
- Currently, it takes multiple steps to transfer your work from one app to the other offline. You’ll need to export a PSD from Photoshop or Adobe Fresco, save it on your iPad, and then import that PSD back into the other app. We’re continuously working to improve our customer experience, so stay tuned for workflow improvements in future releases.
Transform your photo into a painting
Beginner skills required
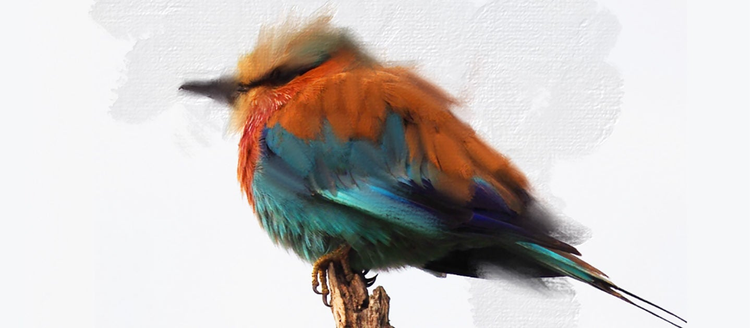
You can make any photo look like an oil painting with live brushes in Adobe Fresco.
Start with a photograph or design — or any project from Photoshop on the iPad that you want to make into a painting. Your projects show up automatically in the Cloud documents tab of Adobe Fresco and Photoshop (if you don’t see the image, you might have to scroll down through your cloud documents).
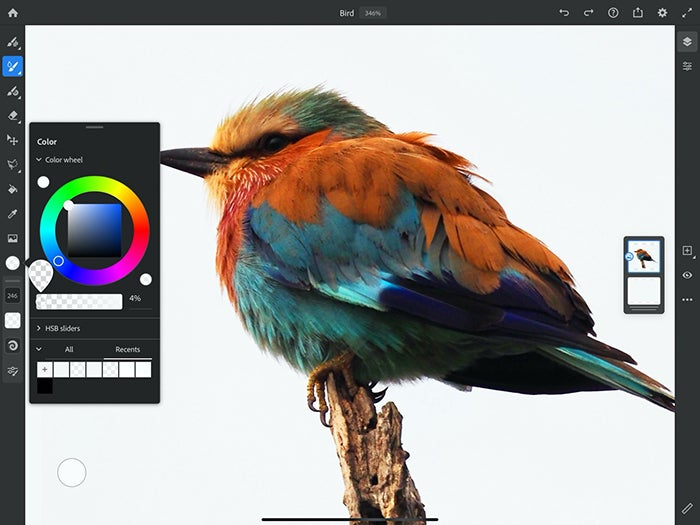
You can also start with a photo from your camera roll and edit it first in Photoshop on the iPad. Here we have an image of a bird where we used Select Subject in Photoshop on the iPad to remove the sky.
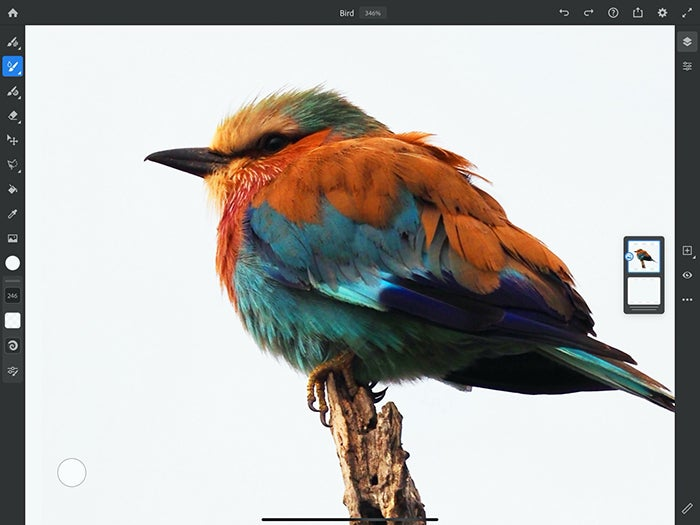
Start with a photograph you want to paint.
In order to achieve a painted effect, start with the live brushes in Adobe Fresco. We chose the filbert oil brush, which is included in the free version of Adobe Fresco.
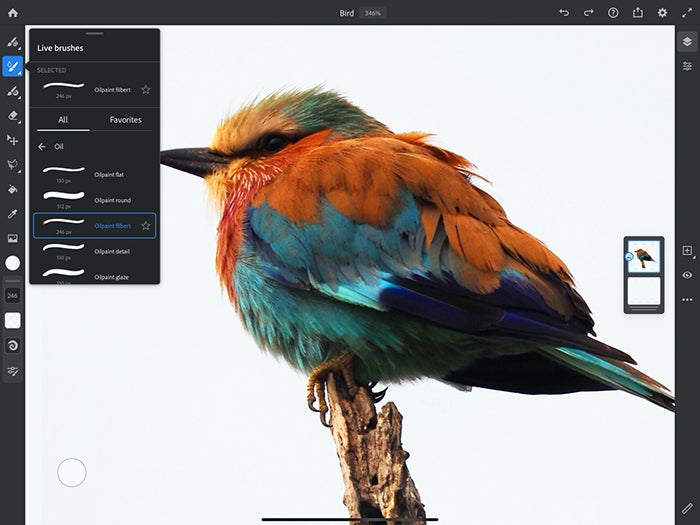
Select Oil under the Live brush menu.
Open the Color panel and turn the opacity to zero. This lets you paint “transparently,” using the colors of the photo with the texture of the oil brush without having to color pick directly from the image.
Make your color “transparent” using this slider in the color module.
Change the size of the brush to get larger or smaller strokes, which increases or decreases the level of detail of the painting. You can also use the color mix slider to blend colors with your brush. Another tip is to turn reload color off and on in the brush options, which lets you choose to continue using one color from the painting in another area. Then play around to get that perfectly painted look.
If you’re feeling really creative, you can also add a new layer or add your own detail to the painting, such as highlights or splashes of color outside of what’s present in the photo.
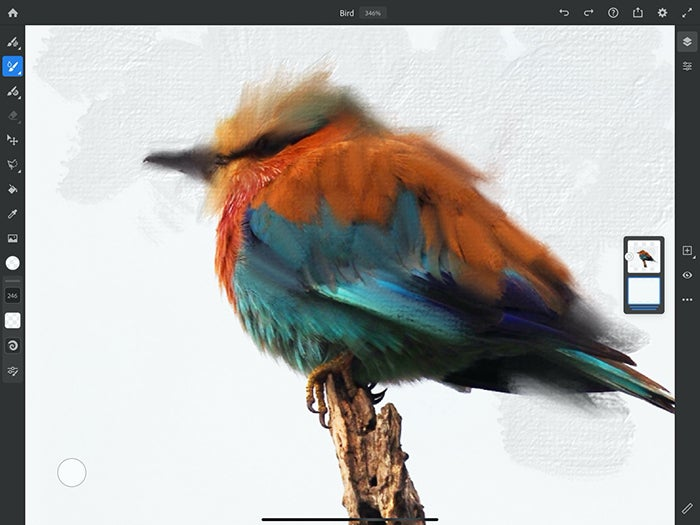
Experiment to find the look you desire.
Add watercolor splashes to a design
Some design skills needed
Watercolor splashes are a hot trend. You’ll find places all over the web where you can buy them as assets to put in your designs. But with Adobe Fresco, you can make your own watercolor splashes and customize them exactly how you want. Here’s how to add a watercolor splash to anything you create in Photoshop on the iPad:
Start with a design, like this flyer for a Jazz Collective.
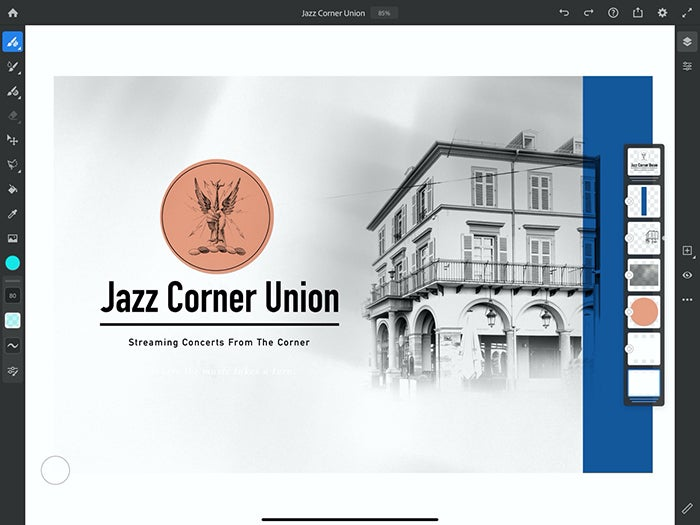
A design started in Photoshop on iPad.
Since it was made with Photoshop on the iPad, it automatically shows up in Adobe Fresco cloud documents. Again, you might have to scroll to find it if you have a lot of documents.
To create some watercolor splashes behind the text, first make a new layer under the text. Next, open up the live brushes and select watercolor.
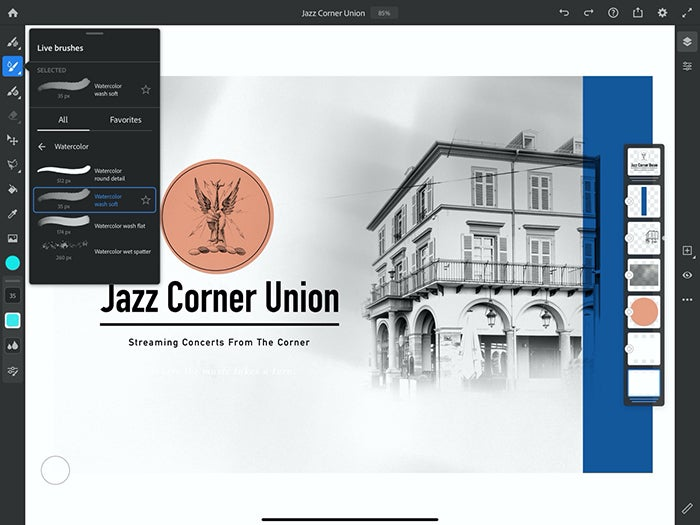
Use the Watercolor brushes under the Live brush menu.
Play around with the different brushes and colors, varying from the flat wash to the spatter brush. For example, you can start out with the flat wash in a variety of complementary colors to create a watercolor base, and then use the spatter brush to create some texture.
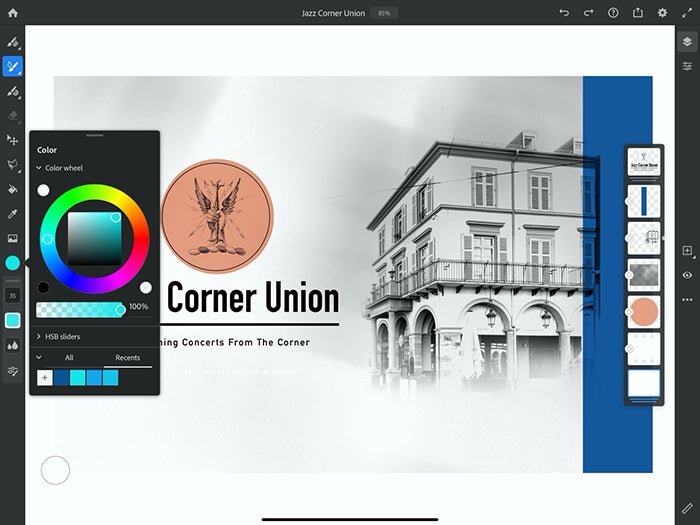
Choose colors under the color menu. Adobe Fresco saves your colors under the ‘Recents’ tab.
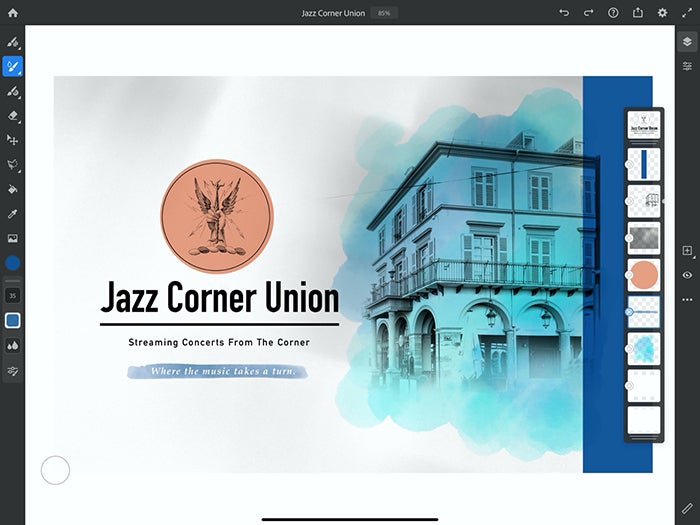
If you want to dry the painting, tap the layer once and choose “dry layer.” Just like in a real painting, the watercolor will dry so you can build up color (but unlike a real painting, you won’t have to wait).
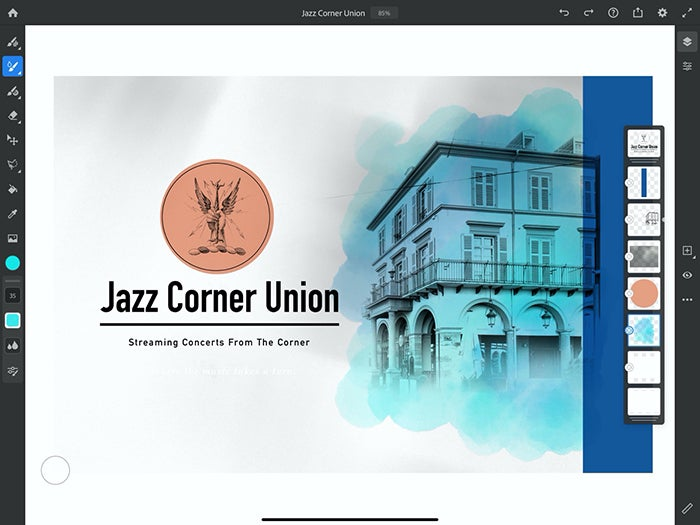
Let the watercolor splashes blend your colors naturally.
Play around with it until you have the perfect watercolor splash. Reuse your new watercolor splash in other artwork or create exciting new splashes.
Watercolors can be used for graphic design, accenting your text.
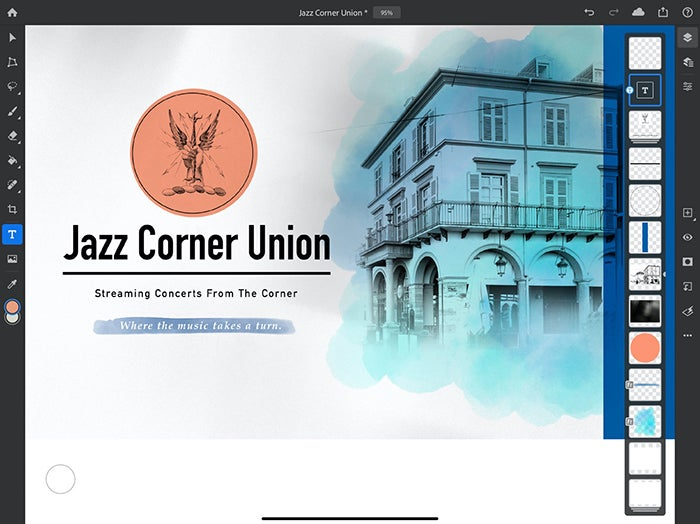
Add type in Photoshop to an illustration or design
Design skills required
Take your artwork from Adobe Fresco to the next level by adding type in Photoshop on the iPad. These two apps give you the freedom to create anything together —whether you’re working on a comic strip, a poster, or a card design like our example.
Starting from an Adobe Fresco project, find your artwork in the Cloud documents tab of Photoshop and open it. All your layers, including any artwork, watercolors, or oils, will show up exactly how you arranged them in Adobe Fresco. To add type, select the Type tool in the toolbar on the right.
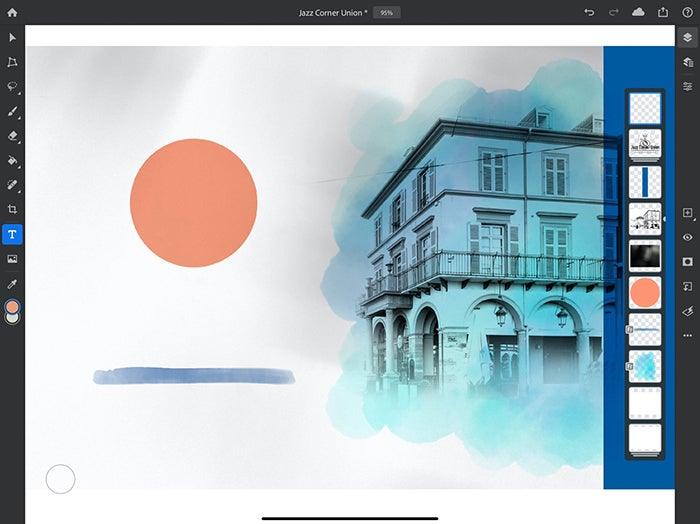
Add type by selecting the the text tool on the right – it’s highlighted in blue.
Your text appears on a new layer. Notice your type layer has special options under the Layer Properties menu to the right. This is where you can customize size, font, scale, and other text properties.
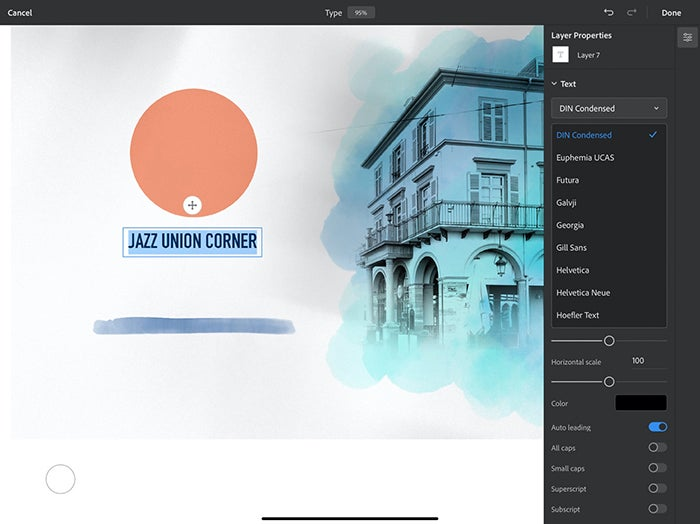
Use the Layer Properties panel on your text layer to customize font, size, and more.
If you don’t see your favorite font on your iPad, you can download thousands from Adobe Fonts to use in your design with the Adobe Creative Cloud app. If you open a project created on a different device with fonts you haven’t added to your iPad yet, don’t worry. Photoshop on the iPad has a brand-new feature that auto-activates and downloads any missing fonts for you and anyone else who opens your document. No more missing font errors! Learn more about Adobe Fonts auto-activation here.
Better together: Photoshop & Fresco make your iPad a powerful creation tool.
https://apps.apple.com/us/app/adobe-photoshop/id1457771281

https://apps.apple.com/us/app/adobe-photoshop/id1457771281
Tag us online on Instagram, Twitter, or Facebook at @Photoshop and @Adobedrawing. We can’t wait to see what you create.