Using Color, Space, and Environment to Create Fantasy in Fashion Photography
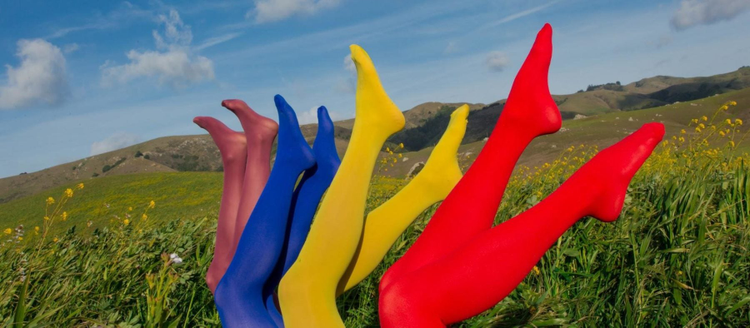
My favorite photos are the ones that transport you to another place or time. Whether you journey to a distant land or build a world of your own in a studio, powerful photographs have the ability to not just send you somewhere far away, visually, but also transmit the sounds, the smells, and the feel of somewhere new. A successful image allows the viewer to touch the intangible, which is what I strive to do in my fashion photography with colorful spaces, wild outfits, and beautiful environments.
In this article we’ll explore some great tips to editing fashion photography in Photoshop as well as best practices for creating successful fashion photography shoots both as a team and when you’re shooting solo. We’ll focus on things like talent direction, location selection and outfit styling, all to craft imagery that relays the powerful feeling you’re striving for.
Photoshop tips to take fashion photography to the next level
Crafting a great photo takes a lot of work but making the right edits in post-production is what truly sets an image apart. I love using Photoshop because it’s an effective, seamless tool to push your fashion photography to the next level. While it’s super important to make sure all elements are spot on while you’re shooting, we inevitably run into imperfections or aspects of the shot that need tweaking—and Photoshop is my go-to.
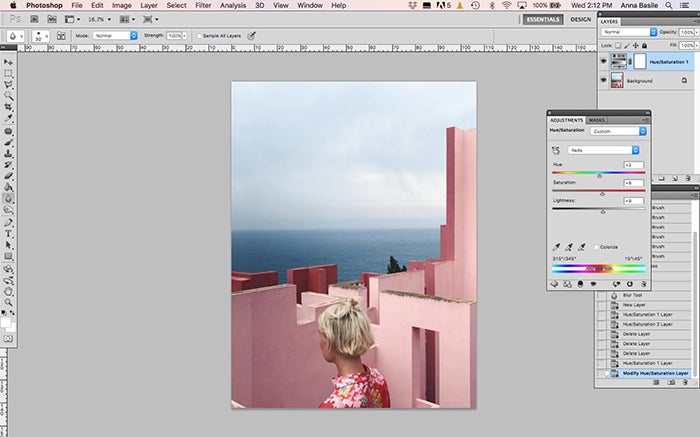
Using HSL in Photoshop. Image credit Anna-Alexia Basile.
Here are my favorite Photoshop tricks to editing my fashion photos:
- My go-to tool in Photoshop is Hue, Saturation, and Lightness. HSL is one of my favorite custom adjustment tools as it allows you to perfect each color in your image. Once you add your Hue/Saturation Layer, select exactly which color you’d like to tweak. From there, of course, you can change its hue, saturation, or lightness.
- Hue has to do with what kind of color you change it to. For red, will it be a warmer, more orange-red (if dragged to the right) or a cooler, more pink-red if dragged to the left?
- Saturation has to do with how much of that color is present within your images. Do you want a lot of red within the image (dragged to the right) or do you want the red to be more subtle (dragged to the left)?
- Lightness is exactly what it sounds like — it has to do with how bright that specific color appears within the image. If you drag it to the right the red will appear lighter, whereas if you drag it to the left the red will darken.
- HSL is one of the most important aspects of my editing process because my work is so heavily rooted in color triggering our emotions. By having total control over the hue, saturation, and lightness of each color in my image, I’m better able to control the final result.
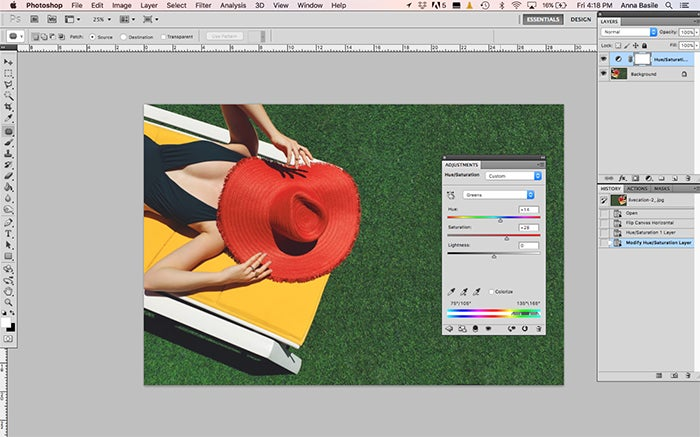
- Another great tool I love using is the Gradient Map. You can use the Gradient Map for various stylistic purposes but I love using it to even out skin tone and get rid of any funky discoloration. Once I select the gradient map from within my new adjustment layer I’ll play around with making a custom gradient that results in a brighter and more even skin tone (I tend to go with warmer nude colors to enhance the skin glow).
- Once I’ve selected my gradient I’ll head over to the layers tab and change the drop down menu from Normal to Color, which will tint the entire photo. Next I’ll need to mask out the model’s face so I select the inverse of the image and then paint her face using white to bring back the gradient and add a warm and even glow to skin tone.
- Once the face and other areas of exposed skin have been masked I’ll bring the opacity down and play with it until the gradient map is showing through the perfect amount, revealing a warm and even skin tone.
- My final favorite Photoshop hack is the Content Aware tool. Sometimes I’ll nail the perfect shot but there will be one aspect of the photo that contains something it shouldn’t. This could be an electrical pole, a fence, or even a person that accidentally walked into the shot. Rather than Clone Stamping for days, I like to see if I can get lucky using Content Aware to remove the unwanted element from the shot.
- First, I select the aspect of the image I want to remove either with the Marquee or Patch tool. Next I select Edit, then Fill, and make sure the Contents Use is set to Content Aware and that the Blending Mode is set to Normal with the Opacity at 100%. From there I click OK, and 90 percent of the time, Photoshop does all the work for me and seamlessly removes the unwanted element from the image, saving me a ton of time and energy.
Using HSL in Photoshop. Image credit Anna-Alexia Basile.
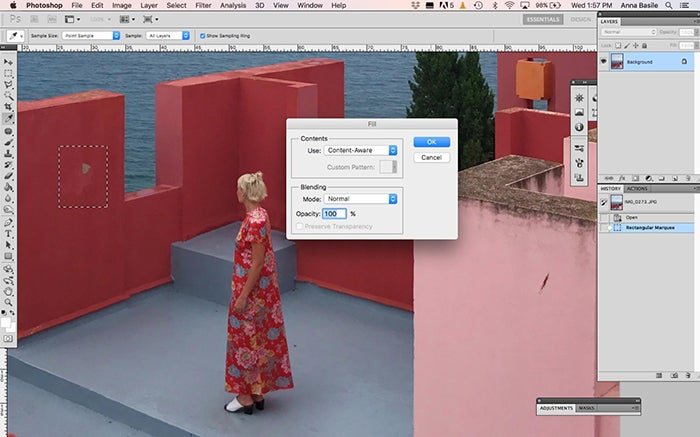
Anna-Alexia Basile exclusively uses Adobe Photoshop for retouching. Here, she uses Content-Aware Fill for quick corrections.
Working with the right team
Step 1: Assemble the right unit
A crucial element to every fashion photography shoot is the team itself. Ensuring that you’re working with talented, diverse, inspired, and collaborative individuals will go a long way and yield incredible end results. Each team member is equally important and should always be fully recognized for their skill sets and contributions both in how they’re treated on set and how they are compensated monetarily.
DO NOT skimp on any of the team members! Each person is essential to the success of your shoot. Making sure that you assemble a hard working, knowledgeable, diverse and visionary team will make all the difference. It’s important to recognize that each individual pours their own focus and creativity into their specific task in a way that smaller teams can never replicate. What we can accomplish alone is good, but what we can accomplish as a team is much greater!
Here are some tips to assembling the perfect team:
- Do some visual research. Check out other creatives’ Instagrams and websites to take note of who is making work you admire and feel inspired by. Reach out to them and connect over your love for image making.
- Ask other creatives who they love working with. Word of mouth is a great way to locate excellent talent and get first-hand information on what it’s like to work with potential partners on set. Some of the most talented people I’ve worked with on set were recommended through friends!
- Pay creatives their full value and never ask anyone to work for free. This might sound obvious, but paying people their full rates makes them feel valued and motivates them to create a far better end product and to be fully invested in your collaboration.
Step 2: Giving direction to the model
Effective and inspiring direction is a huge aspect of creating successful fashion photography. While it can be pure magic when you get the privilege of working with a fantastic model who dances through their wheel of interesting poses, sometimes we work with talent and subjects that aren’t as confident in their moves. It’s in this space that photographers must step up their game and jumpstart the flow by talking subjects through various movements and poses that best accentuate the shape and mood of the clothes.
The advantage to being behind the camera is that you can see everything unfolding in real time — from the way the wind blows the long scarf aside to the way the large balloon sleeves billow when the models arms are extended outward. Our responsibility as the photographer is to walk models through micro-movements that yield a wide variety of shapes, expressions, and feelings to review and pull from when making selects after a shoot.
Here are my favorite tips on giving great direction:
- Stand or sit where the model is about to pose and move through the series of poses you envision them taking yourself. This helps visually articulate the vision in your head and gives the model a great starting point for their creative process.
- Be descriptive in your direction! Don’t just say “lift up your arm” — say “lift up your left arm so that I see the detailing on the sleeve, and slowly move your head to cover your left eye and then tilt your head back.” The more specific you are in your direction the more it pulls the subject out of their own heads and encourages them to focus on the movements, shapes, and vibe they’re embodying.
- Applaud the model when they’re doing something you really like. Verbal communication is super important on set and is the most direct way of encouraging them to continue doing what they’re doing right! Positive affirmation goes a long way, creating a great sense of community and leading to a better end product.
- Know how to recognize when a shot isn’t working. If you notice the team/model is really struggling with a particular shot, be aware enough to signal to the team that you’re moving on to something different. It’s better to focus on a new angle/location and successfully achieve it than frustrate yourself or the team on a shot you’re never going to get.
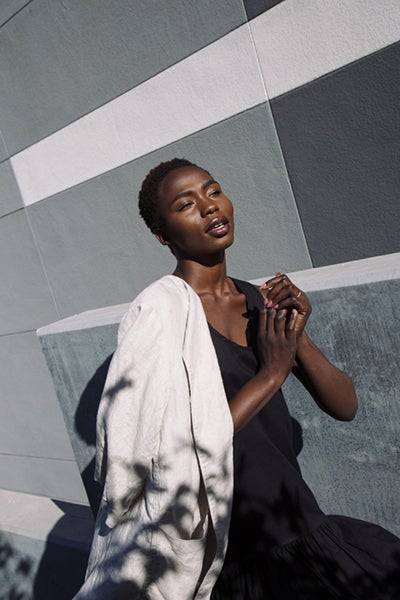
Effective direction can make or break the shot. Image credit Anna-Alexia Basile.
Step 3: Information vs. feeling
When a lot of us think about fashion photography we visually jump to the clothes. But fashion photography is about so much more than the fashion itself — it’s also tied to the environment in which the clothes are photographed and the feeling that is born from that union. To illustrate this point, let’s look at the difference between product photos and lookbook photos taken of the same items for the same brand. Product photos are all about conveying information about the items you’re shooting (interesting seams, details, etc). While lookbook photos are all about conveying a feeling with the end goal of establishing an emotional connection between the product and the consumer. That feeling is what translates into sales for the brand.
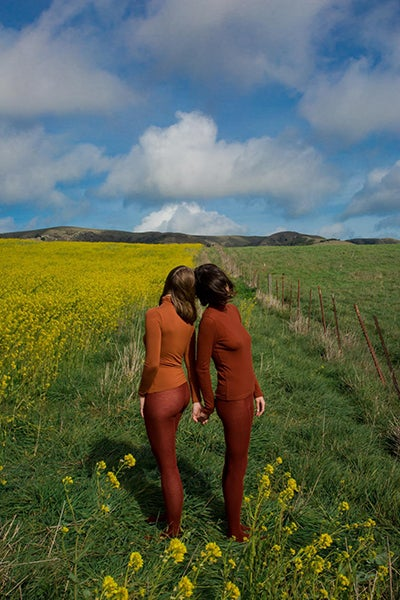
Taking viewers on a journey through location, color and emotion. Image credit Anna-Alexia Basile.
Here are some of my favorite elements for creating emotionally captivating imagery:
- Know your consumer. Who is it that you’re selling to? What do they like? What inspires them? What kind of person are they now and what kind of person do they want to be? Keep all of these things in mind when concepting and bringing your vision to life.
- Maintain elements of aspiration in your photos. Take the viewer on a visual journey somewhere new and make them feel like they are actually there with the product. You can achieve this by shooting from angles the natural eye would see.
- Don’t be so literal. In order to convey the concept of “summer” when shooting swimwear you don’t have to shoot a model in a beach scene with cold drinks and sunscreen. Instead, you could photograph a woman’s shadow with the bathing suit laying on the shadow where it would lay on the body (giving the illusion that the shadow is wearing the bathing suit). Conceptual photos are not only more interesting but will elevate the brand you’re photographing and set it apart from its competitors.
Self portraits and working solo
If you enjoyed this trailer and would like to learn more about Anna-Alexia’s process for shooting self-portraits and to access the full video, email her at https://www.annaalexiabasile.com/about-contact. Video credit Anna-Alexia Basile and Sofala Mai.
How to pick a location
A big focus within my work is self-portraits. I love photographing the human form but am not always around other people when the perfect moment arises (especially during the COVID-19 quarantine). Because of this, I often turn the camera on myself. Self-portraits are a fantastic form of self-expression and a direct way of realizing your artistic vision from both ends of the camera.
I am often asked what I choose first between the outfit and the location. While the answer differs depending on the project, more often than not I choose the outfit based on the location. This means the location is the first piece of the self-portrait puzzle within my process. The type of location you’re attracted to will vary greatly depending on your style. For me, the modus operandi is that it needs to be colorful. Color is indispensable within my work because it transmits emotion so effectively. But color can sometimes be lacking in our day-to-day lives. Because of this, when we run into a world of color, it feels really special. This “special” and “not-day-to-day” feeling is what I try to articulate within my work — and it starts with a stellar location.
My tips for landing the perfect location:
- Always keep your eyes open. You never know when you may stumble across the perfect shoot location! I like to mark these spots on my Google Maps app on my phone so I remember exactly where they are and can see if they’re close to any other cool spots I’ve bookmarked as well.
- If you’re traveling to a new destination, I love using the geo-tags on Instagram to see what cool spots people have stumbled upon other countries. If it looks like someone hit the jackpot with a great location but I’m unsure exactly where it is, I’ll reach out to ask them about it. Most people love sharing about their adventures and I’ve come across some of the best secret tips through these other travelers!
- If you can’t find the perfect backdrop in the outside world, create one within your inside world! I love sourcing funky objects and cool pieces of fabric from flea markets and scrap yards and then using them to build interesting sets. But even without an excess of props, chances are you probably have some cool backdrops within your home that can be accentuated with simple objects like plants, fruit, or colorful items. Take a day to be a kid again and build a mini set in a corner of your house to bring your vision to life.
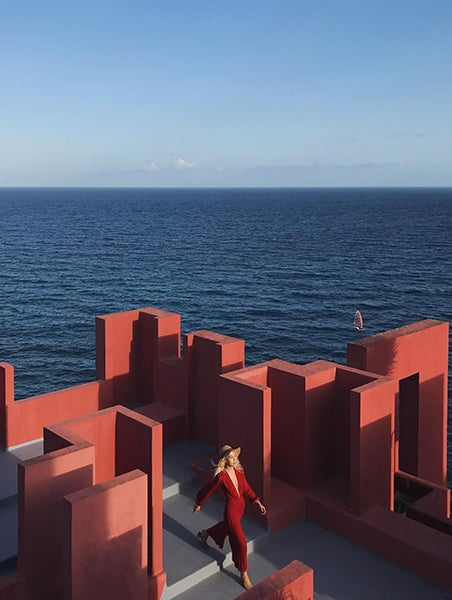
A solo shoot. Image credit Anna-Alexia Basile.
Picking the right outfits
Once you’ve tracked down the perfect location, selecting the right outfit is the next puzzle piece to complete. When styling the look, think about how the clothing and location will interact and choose an outfit that sustains a visual conversation with the environment. Think about including contrasting colors to help the image pop, or continuing a color theme to create a dramatic monochromatic image. Remember that the clothing is always telling a story.
Here are some of the things I always think about when selecting an outfit:
- Does the garment fit? If it doesn’t, make sure you bring tools with you to make each piece look just right. These can be clips for an extra large garment (or embrace the volume!), a belt to accentuate the waist line, or a shoe to add height so the skirt doesn’t drag.
- Do you feel good in the outfit? You always want to wear a look that allows you to feel fully self-expressed and great about yourself. Chances are if you’re wearing something that’s uncomfortable or that doesn’t feel true to your style that that discomfort might translate visually. Always pick an outfit you love and feel confident in!
- Does the garment match the vibe of the environment? I encourage you to always maintain a visual dialogue between the clothes and the set because it’ll help you create a stronger visual voice and better transmit your creative message.
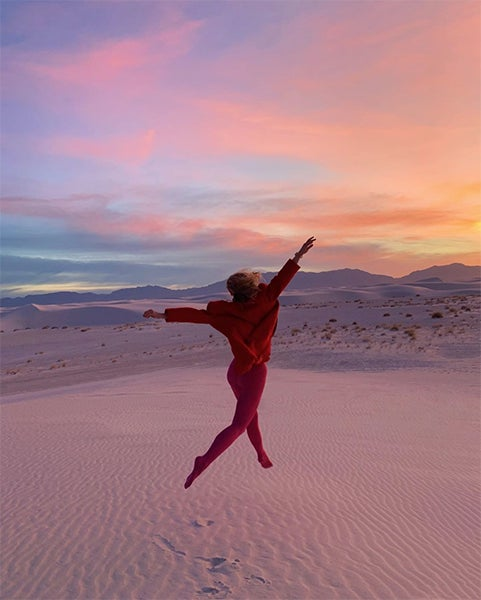
Continuing a color theme to create a dramatic monochromatic image. Image credit Anna-Alexia Basile.
Posing
Knowing how to pose is essential because the pose creates movement and lines that strengthen the image. Sometimes it can be hard to see exactly where you land within the frame when you’re both shooting and modeling, but it’s important to really get this right. Framing yourself properly and figuring out the perfect pose for a location or for an outfit will transform the image.
Here are my go-to tips for posing within a self-portrait:
- It may sound silly, but after I’ve put on the look I’m about to shoot I’ll spend a minute or two taking in its special details. Then I’ll hop in front of the mirror and move my body in ways that make the special elements of the clothes stand out. That little bit of practice in front of the mirror and really seeing how the garment moves and takes shape on the body can make all the difference.
- Check the framing after the first shot. You want to make sure you’re occupying the right space within the photograph. With no one else behind the lens, you might not realize parts of your body are out of frame.
- Move around a lot! Just like you’d direct a model to dance through different micro-movements to reveal a wide variety of poses, you should do the same within a self-portrait. Try not to get stuck on your go-to pose because then all of your images will look the same. Instead, try a variation on that pose and I guarantee it’ll lead you so something new and successful.
- Integrate yourself into the environment or set. Rather than just plopping down into the middle of the scene, find ways to interact with your surroundings in a way that makes it appear as though you visually belong.
By focusing on unique and vivid moments, color, and location, any fashion photographer can bring an outfit’s true essence to life. Successful photography can transport the viewer and communicate feelings beyond the visual. I hope these tips will help you down the path to creating more powerful and provocative imagery.
For more of Anna-Alexia’s adventures and classes you can find her at @annaalexia on Instagram. DM her with photo questions or to get more info on her upcoming classes!
At Adobe, we believe that everyone deserves respect and equal treatment, and we also stand with the Black community against hate, intolerance and racism. We will continue to support, elevate, and amplify diverse voices through our community of employees, creatives, customers and partners. We believe Adobe has a responsibility to drive change and ensure that every individual feels a sense of belonging and inclusion. We must stand up and speak out against racial inequality and injustice. Read more about the actions we’re taking to make lasting change inside and outside of our company.
We also know many people are still impacted by the current COVID-19 crisis and our thoughts are with you. The entire Adobe team wants to thank you, our customers, and all creators around the world for the work you do to keep us inspired during this difficult time.