InDesign editorial + production magic with WordsFlow

If you’re a designer using InDesign, you have most likely collaborated on a project with a writer/editor who is submitting copy in Microsoft Word. Usually the process begins with you receiving an email with Word (or Excel) files, either attached or as a link to a shared folder. You ask with a hopeful tone: “Has this been proofread and approved by all parties?” The answer is always yes, but you’ve been down this road before — it’s probably not final, the boss hasn’t even seen the copy, and it will require many rounds of editing. Sigh.
Typically, you place photos, logos, and the text from Word into InDesign. You format the text carefully with paragraph and character styles, fix typos, and remove extra tabs, spaces and double returns. Once finished, you send the client a PDF proof. In a perfect scenario, editors will correctly use Acrobat’s PDF commenting to make changes to the now beautifully designed article they originally sent, the one that was supposed to be final … remember that conversation?
PDF commenting, how it should work
If used correctly, PDF comments in Acrobat can be loaded back into the PDF Commenting Panel in newer versions of InDesign. You as the designer still must find where in the InDesign document the change is to be made, decipher what the comment means, then either accept a comment, or manually make the correction. One of the drawbacks to PDF comments in InDesign is that if major changes are made to the InDesign file, either structurally or to the text, comments may not correlate exactly to the specific location in the InDesign document anymore — so it’s best to wait patiently for the client to send back the corrections before making any major changes. This method also requires another round of proofing to make sure that comments were interpreted exactly how the client wanted to make changes. You sigh and remove your “designer hat” and put on the “editor/proofreader hat” for the next few hours. This seems to be a never-ending cycle.
My “a-ha!” moment
At an InDesign event a few years ago, one of the sponsors was Em Software. After chatting with founder Chris Ryland and watching his impressive demo of WordsFlow — a plugin for InDesign — I knew this was the answer to the back-and-forth dance between my clients’ Word files and my InDesign documents. I had to give it a whirl. After only a few minor modifications to my workflow, I was making my clients and InDesign work for me, instead of me doing all the work. It worked like a charm! I’m continually amazed at the time saved and the drastic reduction of the editing dance to which I had become accustomed.
Getting started with WordsFlow
The WordsFlow software is super simple to install and use — visit http://emsoftware.com and navigate to Products > WordsFlow. On the right sidebar, under the header Downloads for InDesign, choose your version and operating system, click to download, and double-click to start the installer and follow it through to success. Restart InDesign, and WordsFlow is up and running!
I would recommend taking advantage of the 15-day free trial to make sure the process will be a fit for your workflow. You can activate anytime during the trial without downloading anything new — just enter your license after purchase.
WordsFlow is very flexible and can be introduced or used at any point of the workflow. You can begin an InDesign project by placing a Word file using WordsFlow right out of the gate — this connects the Word and InDesign files from the beginning — or you can use WordsFlow to export any story already placed in InDesign and send the generated Word file to the client for editing. If you’re already deep in production before you found WordsFlow, and if you have the original Word/Excel file, you can use WordsFlow’s Link to Original Document and continue working as if you had started with WordsFlow.
How does WordsFlow simplify my workflow?
To place a story and begin to use WordsFlow right away, choose File> WordsFlow > Place with WordsFlow (a new menu command added by the plugin).
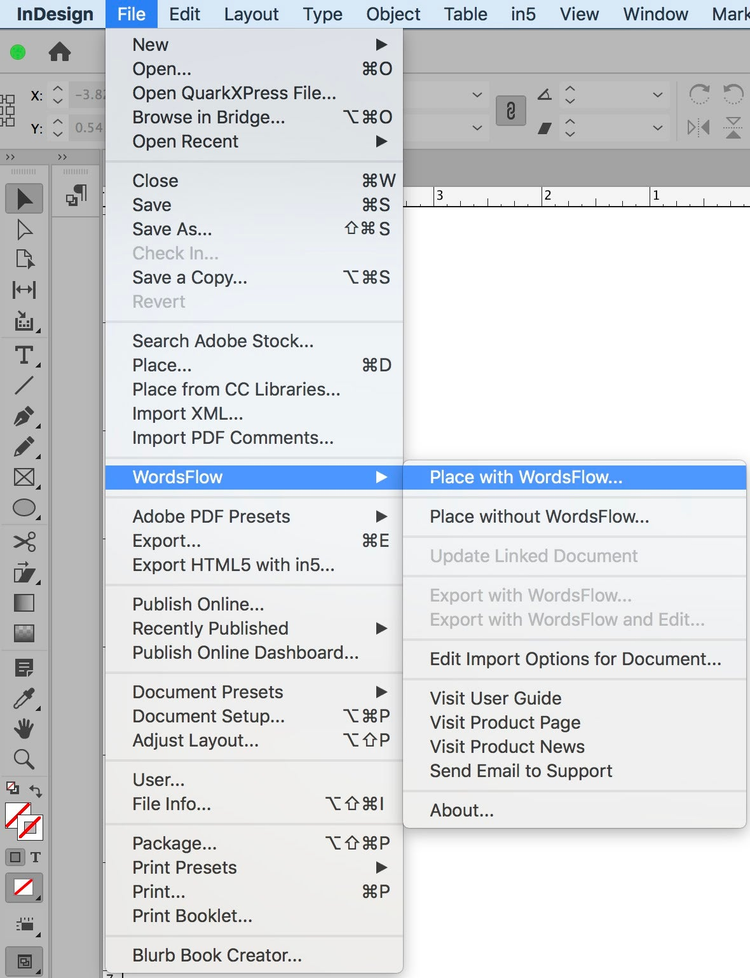
New WordsFlow menu added to the File menu in InDesign.
Then click to place the file normally, in one text frame, or threaded across multiple frames and pages, just like you would normally do in InDesign. A live link will be created in the InDesign Links panel, connecting the newly placed text in InDesign to the original Word file.
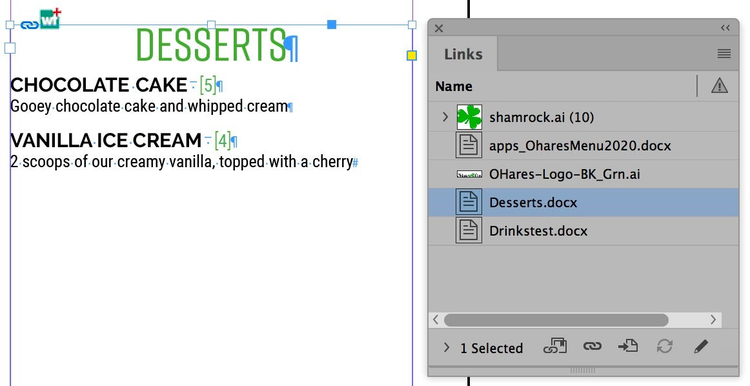
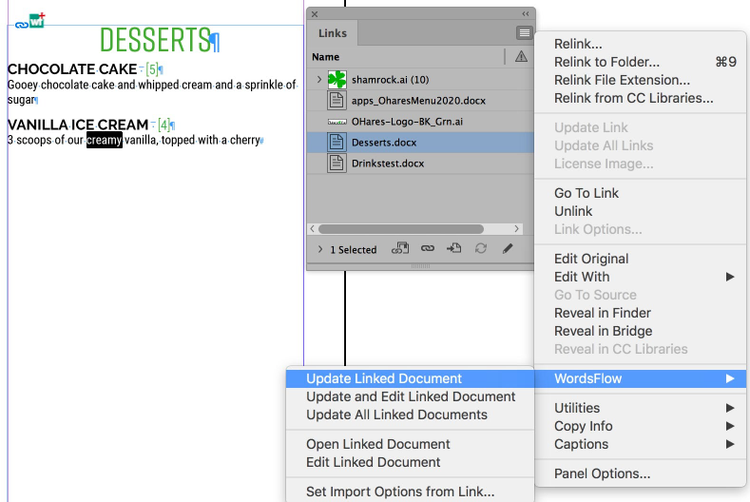
Notice the [wf] icon at the top left of the text frame and the link to the file Desserts.docx in the Links Panel.
Now, style the text in InDesign with Paragraph and Character Styles, and local formatting. You can also freely edit the text for typos, extra spaces, etc.
When the InDesign document is complete and ready for proofing, you can send out PDF proofs to your client. If they need to make any changes, they can simply edit the original, linked Word document (in a shared folder or on a shared server), and the link in the Links panel will show it has been modified.
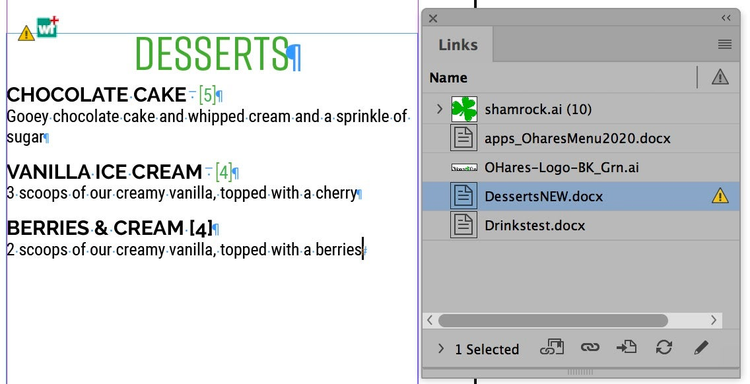
When the word file is edited, a changed/warning icon shows up both in the Links panel and at the top of the text frame.
Double-click on the warning/changed icon in the Links panel to “magic-merge” all the Word edits into the linked InDesign story, without losing any of your work or theirs. It’s that simple.
Or, if you prefer a different workflow where your client can see the changes you made before starting their edits, choose from the Links panel menu Wordsflow > Update Linked Document. The original Word file on the shared drive is updated to include all changes and formatting done in InDesign. The client can then edit this file in any way, and, again, when they make changes, you can magic-merge in those changes with a double-click on the changed/warning icon.
After changes are made in InDesign, update the Word file.
If the original file was emailed to me, or I’ve typed in the text into InDesign, I can easily create a linked Word file from any InDesign story, something I can’t do with InDesign out of the box. Place the cursor in a story and choose File > WordsFlow > Export with WordsFlow. A new Word file will be created in the folder you choose, and it will be linked to the InDesign story, the same way a photo would be linked. This Word file can either be accessed on a shared drive or emailed to the client for editing.
No matter how hard I try to tell the client to just make changes and save right over the top of the original document in Dropbox or our shared folder, I always get the client who will “save as” and rename the file to their own desktop and then email it back to me later. With WordsFlow I don’t have to worry about the client creating a second document. All I need to do is to choose Relink… from the Links panel menu for the link in question and select the new Word file the client sent back to me. InDesign will relink to the new Word file, with WordsFlow doing its magic-merge, keeping all the styling intact and incorporating all the client’s changes from the new Word file back to my InDesign story, just as if they had modified the original document and I had updated the link normally.
What should I send my client to proof?
I usually send a PDF and a few Word files, one for each major story to be edited. I can either send these to my client via email or point to a shared folder. I use WordsFlow to export the story from InDesign, which will create a link to the Word file (if I didn’t use WordsFlow initially). This allows my client to see the final designed layout on the PDF and gives them the ability to make changes to the longer stories, directly in Word, where they are comfortable. They do not need a license for WordsFlow, only Word. I’ll ask them to send me back the PDF with comments, which I’ll import into InDesign and the Word files, which I’ll relink using WordsFlow.
Can we both edit at the same time?
Now, let’s say my client makes changes in Word at the same time as I’m working on the InDesign file. They might add and remove words and sentences and even add in new paragraphs. WordsFlow remembers each and every change made in both Word and InDesign. When my client saves the Word file in our shared folder, I will see a changed/warning icon in my InDesign Links panel indicating the Link to the Word file has been modified. When I double-click on the warning icon, the changes that I made in InDesign will remain, and any changes my client made in the Word file will magically appear in my InDesign story. The best part is this: All of my styling will remain in InDesign.
Wait a minute … can’t I already link a text or spreadsheet file in InDesign?
Yes, this is an option, but there are a few big issues with this built in InDesign “feature” that WordsFlow improves greatly. Personally, I find this InDesign feature unusable. If you place a Word or Excel file with the Create Links checkmark “on” and apply formatting to the text in InDesign, all seems to be fine and dandy. Here is the problem:
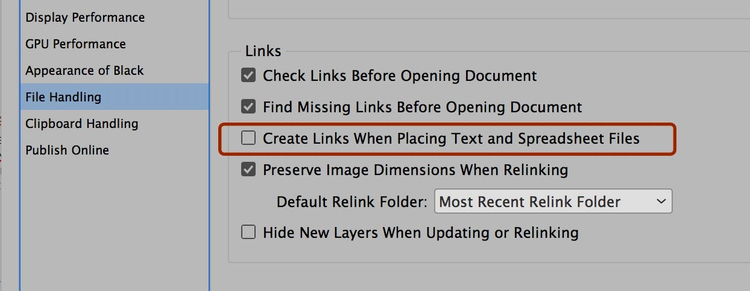
Preferences > File Handling | Create Links When Placing Text and Spread
When the original Word or Excel file is modified and saved in its original Microsoft Office program, there will be a yellow “Update link” icon in the InDesign Links panel. If you choose to Update the Link, the Word file will be placed again into InDesign and all the formatting and modifications completed in InDesign will be wiped out — and completely replaced by the new Word or Excel file. To me, this completely defeats the purpose. I’d need to start over with the formatting. This outdated InDesign “feature” is not a two-way street — only the changes in Word or Excel will be brought over to InDesign; any modifications made in InDesign will be lost.
In contrast, WordsFlow “magic-merges” in the Word/Excel file changes, notifies of any conflicts, and keeps all paragraph styles, character styles, and local formatting intact.
How do I know what my client changed?
Another InDesign feature that I use in my WordsFlow workflow is the Story Editor. After I’ve placed a file with WordsFlow, my client has made changes in Word, and I’ve updated the link, I’m able to choose Edit > Edit in Story Editor to view the changes my client has made, along with any changes I’ve made since the story was placed. Colorful highlights are visible on added, deleted, or modified words and phrases.
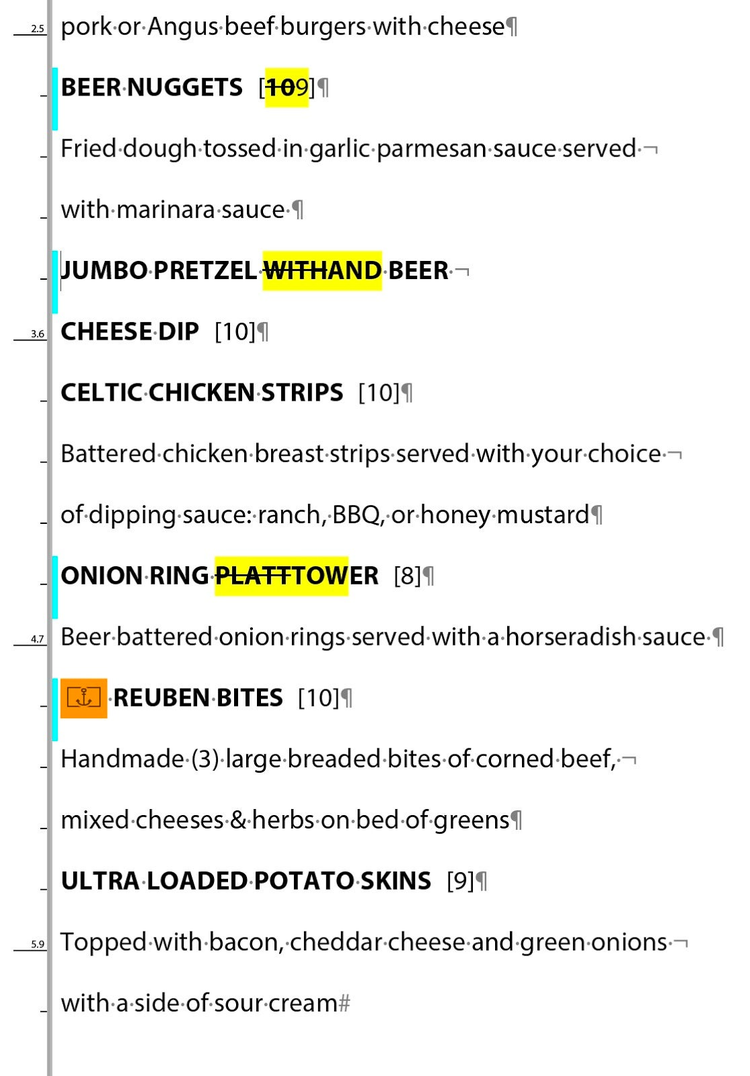
Story Editor highlights changes (in yellow) that were made in Word, and changes (orange) made in InDesign since the story was originally placed.
What if we change the same content?
Sometimes I run across a double edit where both the client and I have changed the exact same word or phrase. Now what? WordsFlow is so stinking smart, it will automatically place a note (with an inline icon) indicating that there is a conflict. I simply open up the Notes panel, (Window > Editorial > Notes), review both edits, and make an executive decision to choose one or the other and remove the note.

Notice the conflict for the Onion Rings - InDesign (left) was changed to the word TOWER and Word (right) now has the word PLATTER

When a conflict is found, WordsFlow will use InDesign’s Notes Panel to indicate a conflict alert. Notice the red note icon between the two conflicting words.
WordsFlow for the win!
So there you have it. WordsFlow and DocsFlow (for Google Docs) allows my client to retain content control throughout the production process. They can use the program they feel comfortable in to make edits, and best of all, I “allow” them to do much of the tedious editing. I simply update or relink the Word file using WordsFlow, and instantly, those client changes are incorporated into my InDesign document. WordsFlow has greatly simplified my workflow and allowed me to keep my designer hat on, the one I love to wear!
(Find full information at http://emsoftware.com/wordsflow and http://emsoftware.com/docsflow, where you can download and install the free, 15-day, full-featured trial plugins.)
