The beginner's guide to mastering photo sharpness

Image credit Kenneth Hines Jr.
As a career photographer of 20+ years, I’ve never specialized in one specific genre of photography. I prefer, and am likely most known for, my cityscape, landscape and street photography, but really, I believe it’s the vibrant colors and certainly the sharpness of my photographs that has helped me stand out across different genres.
When the topic of this tutorital was presented to me, I thought, ‘Wow this is right up my alley.’ The truth is, photographing with a lens that outputs sharp images, means bringing your image into post processing — whether it’s Adobe Photoshop or Adobe Lightroom — with the highest quality data as possible — which is the key to creating consistent images.
In this article
- Shooting sharp photos
- Post-processing sharp photography
- Sharpness in smartphone photography
- Putting it to use
What I’ve learned, and what I share with others, is that regardless of the aesthetic you’re going for in the end, photograph with high quality optics and aim for consistency. These key things allow for a smooth and enjoyable editing process and having sharp images is important for telling a clear story. I’ll get into that, and lots more below. Here are a few tips for creating super sharp, impactful images.
Shooting sharp photos
Sharper images not only give viewers a clearer view to the story being told, but it also gives a richer quality to your images. But before we dive in, let’s understand the difference between sharpness and depth of field.
- Sharpness is when fine details are clear and distinct (think of a close-up shot of fine watch or crisp landscape). Lens quality, shutter speed, camera stability, and focus are critical to capturing sharp images.
- Depth of field is determined by the lens aperture and focal length (how wide or long the lens is), with wider lenses having a greater depth of field at the same f-stop as longer lenses. I’ll address aperture more in a bit.

Image credit Kenneth Hines Jr. New York City, New York — Notice how sharp and in-focus the model is, with the out of focus subway car adding atmosphere to the scene. Photographing at 1.8 gives a significant amount of subject separation. — EXIF: 85mm, ƒ/1.8, 1/160th sec, ISO 1000.
Shutter speed & tripod
A slow shutter speed can cause camera shake, which will blur fine details. How slow you can hand-hold a camera depends on your experience and the lens focal length, with wider lenses such as a 24 or 35mm lens being easier to handhold than longer lenses over 100mm. When in doubt, use a tripod to stabilize your camera. Another tip is to use a remote shutter release or the camera self-timer to take a picture without touching the camera.
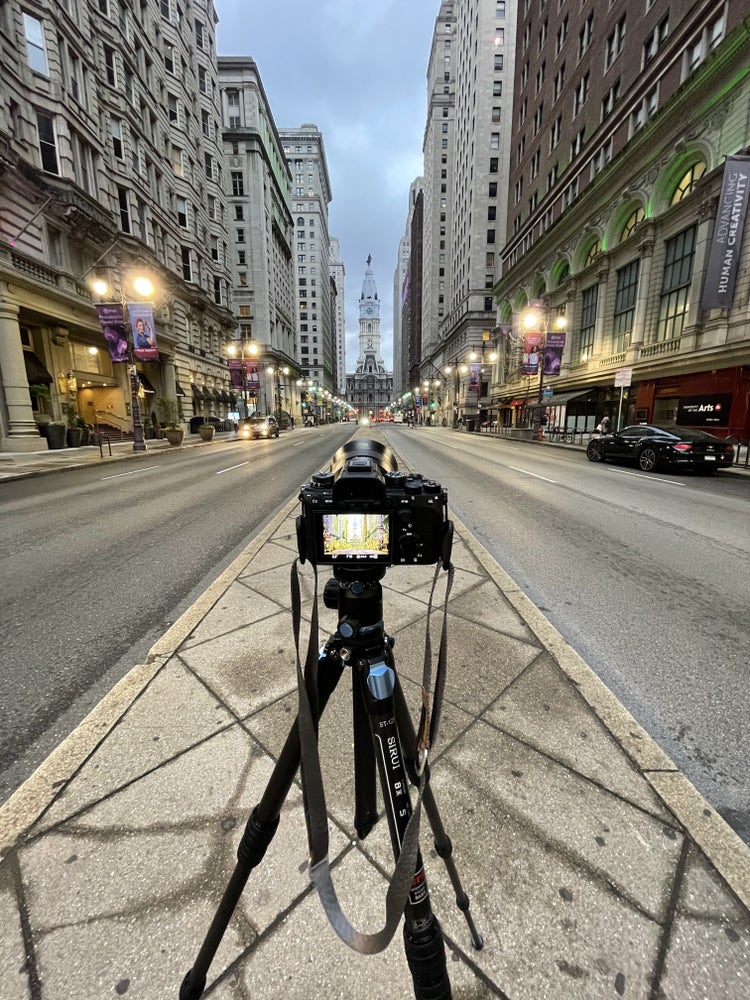
Image credit Kenneth Hines Jr. Philadelphia, Pennsylvania — Here’s a look at my camera setup with a tripod. Using a tripod will eliminate camera shake from my body movement hand-holding the camera, for the long exposure image I’m going for. I’m utilizing a manual lens and will set the focus exactly where I want the image to be the sharpest.
Manual-focus lenses
I am a huge advocate for using manual focus lenses to capture sharp images. With a manual lens, you can fine tune your focus directly onto what you want to be the sharpest point of your image. This isn’t to say you can’t obtain the same thing from autofocusing lenses, but there are times where automatic lenses can miss the point you’d want to have in focus if you aren’t careful. Manual allows you to slow down and concentrate on the composition and make sure your focus is spot on with where you want it to be.
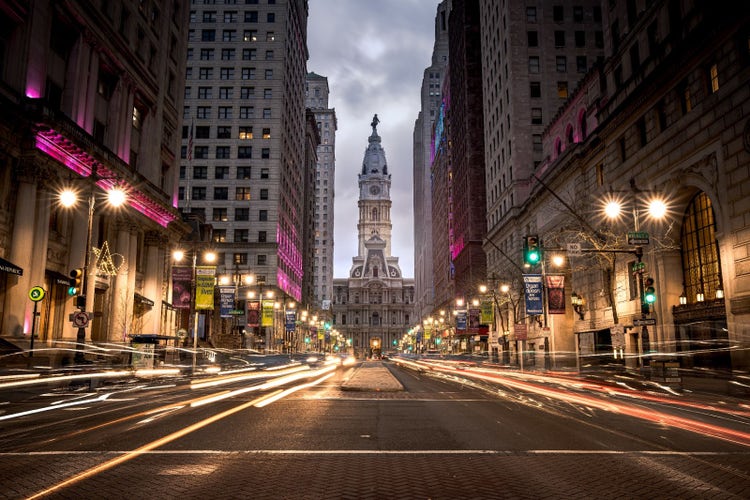
Image credit Kenneth Hines Jr. Philadelphia, Pennsylvania — Final image of the above setup image. EXIF: 28mm, ƒ/9, 2 secs, ISO 50.

Image credit Kenneth Hines Jr. Philadelphia, Pennsylvania — This is a cropped version, to show some of the details up close.
Setting your focus
Of course, in photography, sharpness depends on the subject matter. Cityscapes and landscapes for example will require a different setup from say portraiture. For cityscapes you’ll probably utilize an aperture of f/8 or smaller and for portraits f/2.8 or wider.
Whatever you happen to be photographing, decide ahead of time what your subject is, what you want the photograph to show or tell people, what the composition will be, and then sharpen your focus on that.
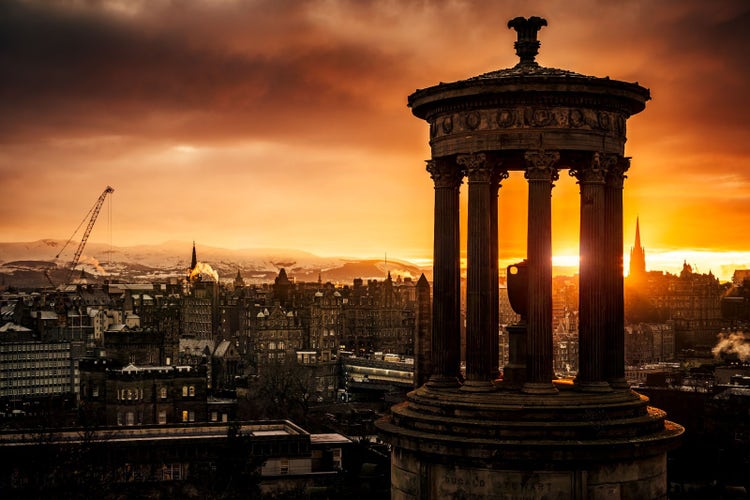
Image credit Kenneth Hines Jr. Dugald Stewart Monument — Edinburgh, Scotland — For this cityscape I wanted everything to be crisp and sharp, from the monument in the foreground to the buildings in the background. I chose an aperture of ƒ/10, to have everything in frame be sharp. My distance to the foreground monument was quite a long distance for this 51mm frame. By being far from it the depth of field between the monument and skyline is wider, allowing for everything to remain in focus, whether I chose to focus on the monument or skyline (in this frame I chose to focus on the skyline, even though the monument is in the foreground). EXIF: 51mm, ƒ/10, 1/20th sec, ISO 125.
Thoughts on aperture
Many discuss stopping down their apertures or setting their lenses to the aperture sweet, for optical image quality. What works even greater is utilizing a high-quality lens, as there are many lenses on the market that work just as well wide open as they do stopped down. Not to mention, they’ll allow you to obtain exceptional sharpness from right in the camera.
If you don’t have the budget to do so, then here’s a few tips to help in obtaining sharper images with what you have:
- Utilize RAW on whatever photographic device you choose to utilize. This will allow more data to be captured in your file. If your device doesn’t allow this then aim to use the highest possible JPEG output.
- Lower the aperture (stop down) between roughly f/7.1 and f/13. This is usually where most lenses will give their highest possible quality on output.
These adjustments will give you a higher quality file to import into Photoshop with and give you a greater starting point for increasing the sharpness of your image.
Always shoot sharp, even when it’s not the look you’re going for. Sharp images are an aesthetic, and different styles of photography call for different levels of sharpness. The truth is, even if you’re trying for a really soft image, shooting sharp to begin with is only going to help you create the look you want in post-processing.
You can always make a sharp image look soft (or alter it for whatever creative style you may want to obtain), but it’s a lot harder to go in the opposite direction.
Post-processing sharp photography
What you have in the camera is one thing, but when you bring an image into Lightroom or Photoshop, it’s a whole other ball game. There are a few easy tips for editing an image to look its sharpest. Please note: I shoot into the camera raw format, which maintains all the data and allows me to be in control of every detail in the image.
Dialing up the sharpness (obviously)
People tend to talk about my images having an almost ‘wet’ or 3D look to them. Part of that is because of the sharpness of the original image, but it’s also attributed to what I produce in post-processing for an image. I’m a bit of a sharpness addict, so even when my original file is incredibly sharp and clear, I tend to increase it quite a bit in Lightroom. Sometimes I even increase it above the one hundred mark because I simply enjoy the extra crispness. I can see the frowns reading this, but it’s true and many may see this from the various tutorials and live demonstrations I teach. There’s never a right or wrong way to do something and it’s about what you feel and works for you. If 110 on sharpness is what you feel, then by all means, crank the sharpness up a notch.
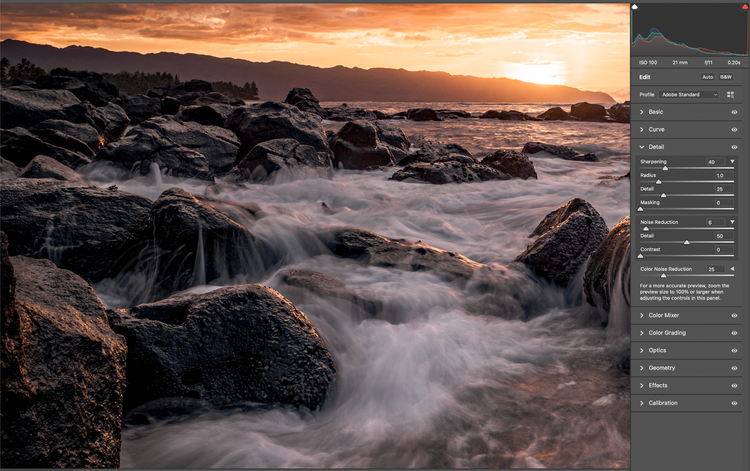
Image credit Kenneth Hines Jr. Honolulu, Hawaii — Here’s a look at the “Detail” panel in Adobe Camera Raw, with the default sharpening settings.
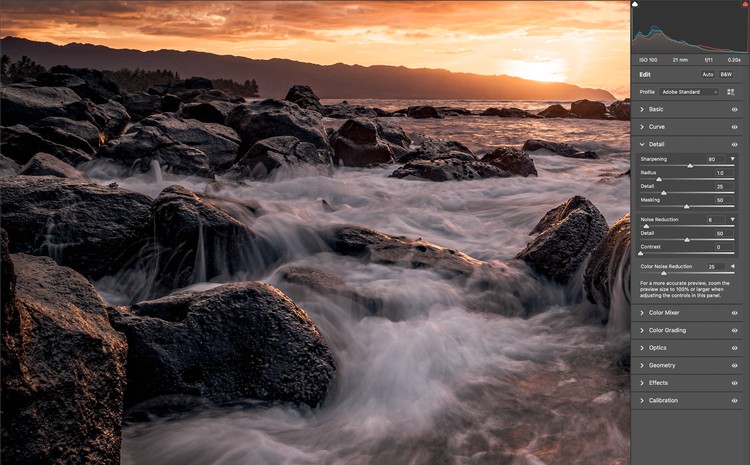
Image credit Kenneth Hines Jr. Honolulu, Hawaii — In this screen capture you can see that I’ve increased the sharpness and adjusted the masking. I wanted to increase the sharpness of the rocks here mainly. I adjusted the masking to a value of 50, which will minimize the sharpness from being applied to areas in the image that are not in focus. In this case there’s a mountain range in the background and that wouldn’t need to have increased sharpness.
Texture and clarity
Texture and clarity are going to help you emphasize the sharpness and bring some life and pop to your image.
Dialing up these two features will emphasize the edges and give your image a lot of strength. This works really well for cityscapes, architecture and landscapes.
For a portrait, however, you’ll want to dial the texture down a little to avoid making the person look too grungy. For most portraits, you want your subject’s skin to look softer. Bringing the texture down and countering that with an increase in clarity allows you to increase the sharpness without emphasizing textural features on people’s faces.
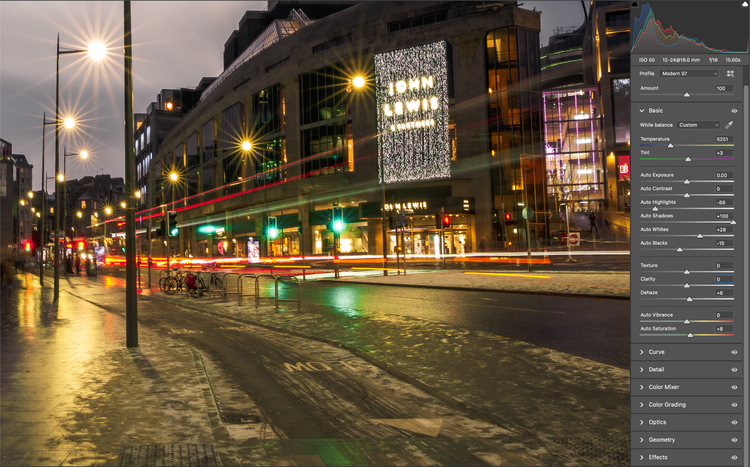
Image credit Kenneth Hines Jr. Edinburgh, Scotland — Let’s take a look at this image, where I’ve already applied all of the adjustments I wanted in Adobe Camera Raw, with the exception of Texture and Clarity adjustments.
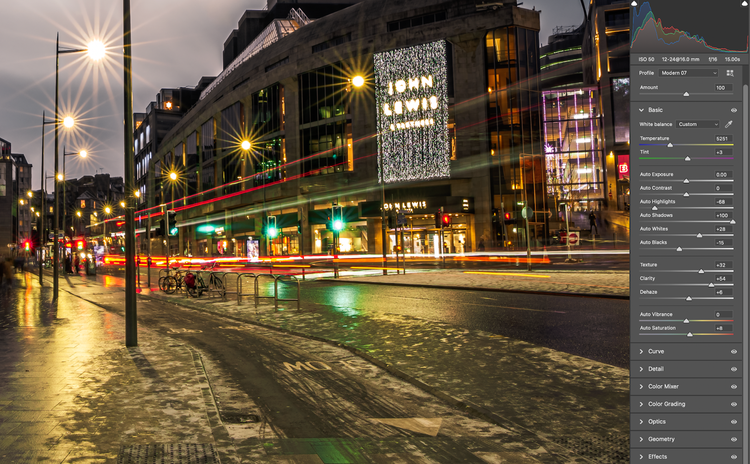
Image credit Kenneth Hines Jr. Edinburgh, Scotland — Here I’ve applied Texture, to enhance the appearance of textures and Clarity, to give more contrast along the edges of objects and you can see the drastic change in appearance to some of our detailed areas. Notice how the sidewalk, ice, building windows and doors have more definition in the details.
Sharpness in smartphone photography
Smartphones capture amazing images and, in some ways, getting sharp images is easier with a phone than it is with a bigger, heavier camera. First of all, phones are easier to hand hold, which will help reduce camera shake. Here are a few tips to get sharp smartphone images.
- Clean the lens. Use a soft lens cloth (not your shirt!) to wipe away the grime that we all have on our phones.
- Hold the camera with both hands and lock your elbows into your body to create a stable, tripod-like position to photograph from.
- Get close — no, I mean closer! Fill the frame with the subject, to take advantage of every pixel your phone can capture.
Phones typically have image sensors that are an inch or smaller in size (significantly smaller in comparison to an APS-C or full frame sensor), but are still capable of capturing beautiful images.
Images taken on a mobile phone may not have as much detail as larger sensors like a full frame, but I still love processing my phone images with Lightroom. Masking features allow me to edit for sharpness without breaking up the image’s overall look. I’ll also include additional vignetting to darken the perimeter of a composition, as in the case of the below image it allows the detail in the darker areas not to stand out as much as the center portion with the train and the lights.
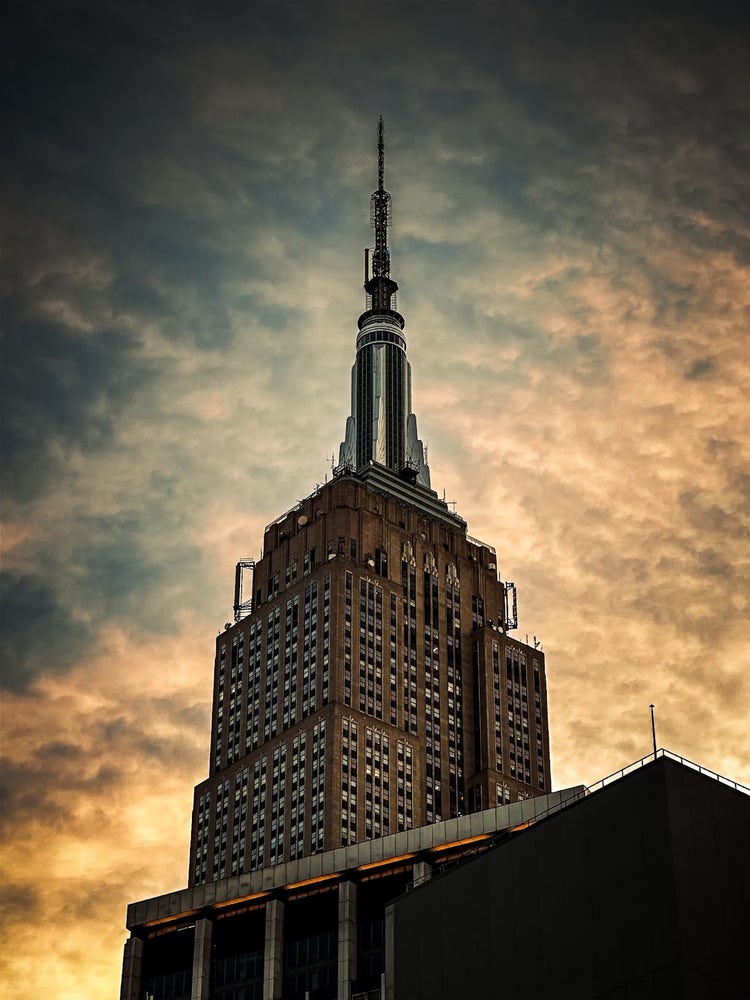
Image credit Kenneth Hines Jr. Empire State Building, New York City — This is a mobile phone captured image. Here at sunset there was still some good lighting here, to allow for a well captured and sharp image from the phone. Upon going into editing there was a lot of detail here, to bring even more life to this image with the sharpness. EXIF: 24mm, ƒ/2, 1/50th sec, ISO 200.
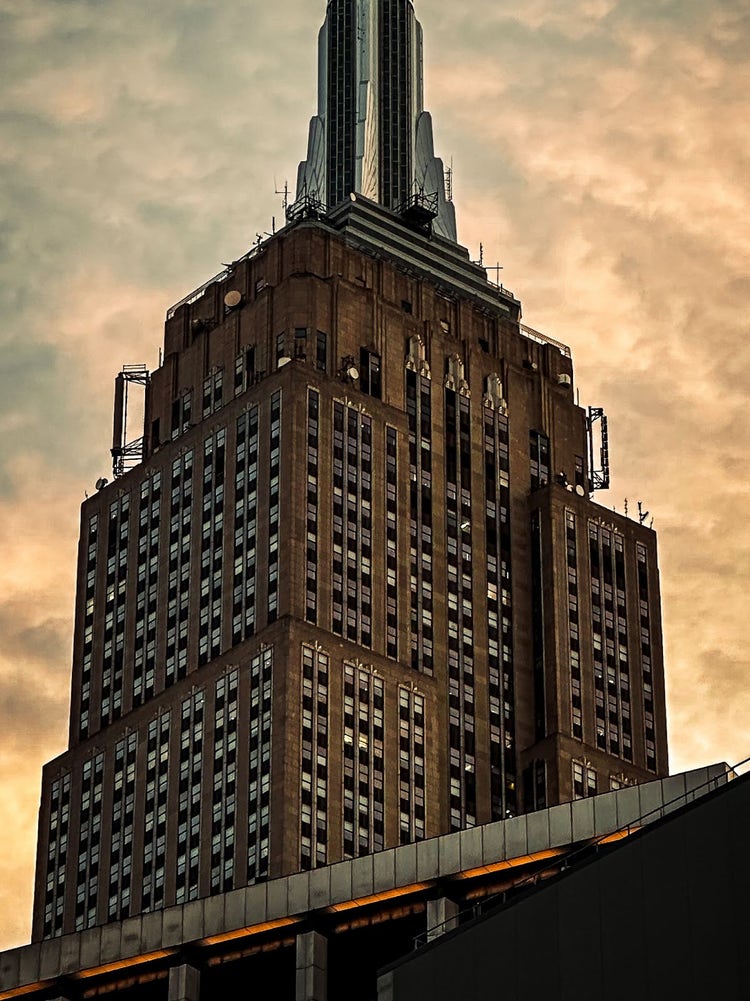
Image credit Kenneth Hines Jr. Empire State Building, New York City — This is a cropped version, to show the details up close of the building.
Putting it to use
In the end, photographing with good gear will always make post-processing that much easier and more fun because there’s just so much more you can do when there’s more data in the image.
No matter what you want your end result to look like, having a sharp image to work with gives you room to play and get creative. So get out there, try out some gear, get creative in Lightroom and Photoshop, try out my top tips, and see what you can create.