Adobe XDをもっと使いこなすヒント! 第59回 新しくなったアセットパネル
Adobe XDをもっと使いこなすヒント!
この連載では、Adobe XDを便利に使うための様々なテクニックを、Adobe XDチームのツイートからピックアップしてご紹介します。今回は、少し使い方が変更されたアセットパネルに関連する8つのツイートを紹介します。
Tip 1. ドキュメントアセットを表示する
#AdobeXD #ProTip Launch the new Assets panel by clicking the icon in the lower left of the screen or with the keyboard shortcut Shift+Cmd+Y (Mac) or Shift+Ctrl+Y (Win). Your Creative Cloud Libraries are now included in the Assets panel. @AdobeXD pic.twitter.com/bJqPSj3amS
— Elaine Chao on vacation until 11/30 (@elainecchao) October 27, 2020
新しいアセットパネルは名称がライブラリパネルに変更されました。開き方は従来と同じで、Shift+Cmd+Y (Mac) / Shift+Ctrl+Y (Win) キーを使うか、画面左下のアイコンをクリックします。
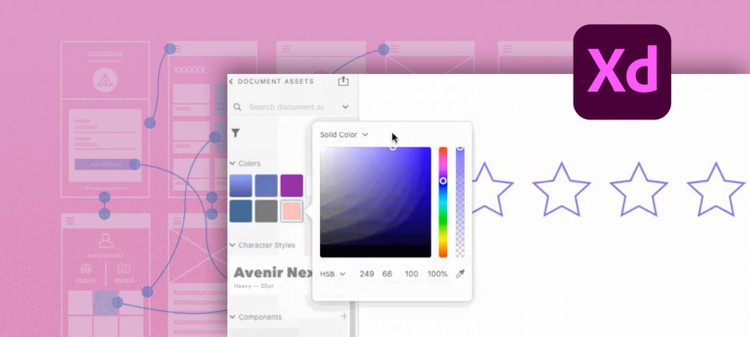
#AdobeXD #ProTip Global assets that are associated with your document are available in “Document Assets,” which is at the top of your libraries list. @AdobeXD pic.twitter.com/w9XlwtJIrK
— Elaine Chao on vacation until 11/30 (@elainecchao) October 28, 2020
パネルを開くと最上部に「ドキュメントアセット」と表示されます。ドキュメントアセットは、ローカルドキュメントで使用している登録済みのアセット一覧です。従来のアセットパネルに相当します。
Tip 2. CCライブラリを表示する
#AdobeXD #ProTip Click on the breadcrumb at the top of the Libraries panel to go back to a list of all of your available libraries. @AdobeXD pic.twitter.com/IiYMko620x
— Elaine Chao on vacation until 11/30 (@elainecchao) October 29, 2020
以前は別ウインドウに表示されていたCCライブラリが統合されているのが変更点です。パネル上部のライブラリ名はパンくずリストになっていて、その左側の < アイコンをクリックすると、利用可能なすべてのライブラリが表示されます。
ドキュメントアセットはリストの一番上に表示されます。クリックすると再びローカルアセットの一覧に戻れます。
Tip 3. アセットの表示形式を切り替える
#AdobeXD #ProTip You can view the colors, character styles, and components in your libraries in either grid or list view. List view enables you to name your styles or components. @AdobeXD pic.twitter.com/hedsADQjQq
— Elaine Chao on vacation until 11/30 (@elainecchao) November 5, 2020
アセットの表示はグリッドとリストから選択できます。リスト表示ではアセットのトークンの確認や変更が可能です。
Tip 4. アセットに登録されているカラーを適用
#AdobeXD #ProTip From any library, including your local document assets, select the color to set the color of your object. @AdobeXD pic.twitter.com/MJuNbDfkap
— Elaine Chao on vacation until 11/30 (@elainecchao) November 3, 2020
ライブラリパネルに登録されているアセットの利用方法は従来と変わりません。アートボード上のシェイプを選択し、パネル内のカラーをクリックするか、右クリックして「カラー(塗り)を適用」を選択するとシェイプの背景色が変わります。
#AdobeXD #ProTip Set your object’s border to your global color by right clicking the color and selecting “Apply border color.” @AdobeXD pic.twitter.com/cArU9m8bdw
— Elaine Chao on vacation until 11/30 (@elainecchao) November 3, 2020
同様に、シェイプを選択してからパネルのカラーを右クリックして「線の色を適用」を選択するとシェイプの線の色が変わります。
Tip 5. アセットに登録されているカラーを編集
#AdobeXD #ProTip Once your object’s fill or border is set to a global color from your document assets, editing from that surface will apply to it (and to any object’s fill or border associated with the global color). @AdobeXD pic.twitter.com/2jtm0FMRD0
— Elaine Chao on vacation until 11/30 (@elainecchao) November 4, 2020
登録されているカラーは、右クリックして「編集」を選択すると自由に変更できます。登録されているカラーを変更すると、キャンバス上の該当するカラーすべてに変更が適用されます。
Tip 6. 登録されているカラーが使用されたオブジェクトを検索
#AdobeXD #ProTip Highlight every object that uses the global color by right clicking it and selecting “Highlight on canvas.” If the color isn’t used on canvas, the option will not be available for that color. @AdobeXD pic.twitter.com/EDTF6F9b0H
— Elaine Chao on vacation until 11/30 (@elainecchao) November 6, 2020
登録されているカラーがどこで使用されているかを確認したいときは、パネル内のカラーを右クリックして「キャンバスのハイライト」を選択します。すると、キャンバス上の該当するオブジェクトが青い線で強調表示されます。
いかがでしたか?
これは便利そうだ!という使い方はあったでしょうか?
次回をお楽しみに!