3D design tutorial: Geometric reflections in Adobe Dimension with Victoria Siemer

Photographer, Photoshop aficionado, and Instagram influencer Victoria Siemer, also known as Witchoria, has been creating work centered around ethereal geometric reflections (from scratch!) for more than 7 years. This style has become one of her signatures, leading to contracts with the likes of Gucci and Samsung, and has landed her a privileged spot as a member of Sony’s Alpha Imaging Collective. (Read more about her journey here).
We asked Victoria to create original scenes using Adobe Dimension (no photoshoot needed), and it’s safe to say the results will blow you away. The end 3D scenes look like stunning art department mockups for a scene in a science fiction movie.


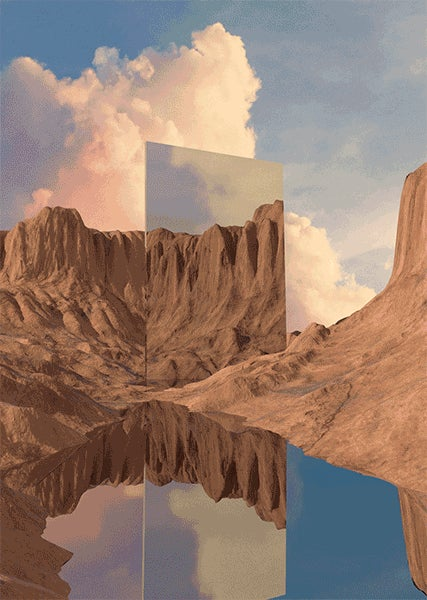
Variations on Victoria Siemer’s first geometric reflection piece created with Dimension CC.
Lucky for us, Victoria agreed to share her process in a highly watchable tutorial video. You can either download the same assets she used and re-create the images exactly (producing an end result like the GIF below), or you use her instructions as a guideline to generate your own Witchoria-inspired sci-fi landscape (below or on her website). When you’re finished, check out Victoria’s other tutorials using Adobe Dimension. You won’t be disappointed!
Download before starting: Victoria’s assets
To get started, download the assets Victoria used below:
- Terrain 3D Model: https://www.badking.com.au/site/shop/environment/lonely-pass-terrain/
- Material: https://stock.adobe.com/3d-assets/porous-desert-rock/176877740
- Cloud background: https://stock.adobe.com/images/sunny-sky-background-in-vintage-retro-style/102709642
You will need to license the Adobe Stock materials and image if you’d like to recreate Victoria’s 3D scene. If you don’t want to license the Adobe Stock assets she used, you can follow along with this tutorial using your own images and the default materials available in Dimension.
Scroll down to see all the steps at a glance, or watch the whole video here:
1. Set up your shot
Victoria begins the video by explaining what to do before you start working with your chosen materials.
Use the properties panel to adjust the canvas size
Victoria set hers at 2,400px x 3000px. Resize the view to fit the canvas (or type in 50.07%).
Learn more about setting the canvas size here and document settings here.
Import your terrain model and place it in the frame
Click: File > Import > 3D Model
When this type of object imports, it’s white, and on a white background. Some people find that difficult to see clearly. One option to increase visibility is to throw a matte material on it temporarily (you can find this at the top of the Materials tab in the Starter Assets panel on the left) or even better, double click on the object, which opens its material properties and change its color to a darker value.
Learn more about customizing material properties objects here and in this Getting Started video.

Learn more about importing assets in this Getting Started Dimension video.
This object also imports teeny tiny and sideways, so we need to make some property adjustments. You can do this in the properties panel on the right.
The properties that were set for Victoria’s image are as such:
**Position **X: 1.1 cm, Y: 5.9 cm, Z: 0.9cm
Rotation X: 90, Y:-180, Z: 96
Size X: 50 cm, Y: 50 cm, Z: 11.9 cm
An alternative option is to eyeball it with the transform tools on the left.
Learn more about transforming and arranging objects in this Getting Started video.
Next:
Find and save the camera angle you want
Use Dimension’s camera tools to get the perspective set up the way it needs to be for the final shot.
Be sure to add a camera bookmark so you can always get back to this camera set up!
Learn more about changing the camera view and adding bookmarks in this Getting Started video.

2. Bring your colors, textures, and lighting in to play
In the video, you’ll see how to bring your environment to life.
Import your sky
Click on “environment” in the scene panel and add the cloud image to the background.
Then add that same image to environment light (we want the lighting to match the background image).
Add materials to the terrain
Click: File > Import > Place Material on Selection
Add your downloaded porous rock material. Adjust the properties so that the material repeats twice.

Let the sun shine in
Toggle on Sunlight and play with the settings – height, intensity, rotation, cloudiness, etc.
Dimension allows you to imagine exactly what kind of weather and what time of day it is in your piece.
Create water with model and material assets
Click on the 3D model panel. Select the plane. Then make the size 200 x 200 cm (or whatever works for you) and use the move tool to bring the plane into view. Helpful tip: use the green arrow to move along the y-axis.
Add a ‘metal’ material to the plane, to give it a reflective quality and the appearance of water.
Create a mirror with model & material assets
Click on the 3D model panel in Dimension and select the cube. Then use the transform tools to resize the cube into a thin rectangular cuboid, then move it into place.
Just like with the water, you can use the metal material to create a clean reflective surface.

Keep adjusting the mirror to find a seamless reflection. Small adjustments to the angle will completely change the reflection.
Sometimes it’s preferable to keep the little render preview open during this part of the process, to keep an eye on how the lighting and shadows are hitting the reflection.
Learn more about editing the look of objects with materials in this Getting Started video.
Learn more about setting environment color, light, and reflections in this Getting Started video.
3. Render
When you feel it’s time, click on the Render tab and pick your export settings. Victoria’s piece is high quality, but this does take a bit longer to render. If you want to just see a quick preview, you can choose low or medium. Or, try the Cloud Rendering (Beta) option: cloud rendering allows you to upload your Dimension scene to the cloud and do the rendering on a server. You can then download the final result, freeing your computer resources and completing renders significantly faster.

Learn more about rendering and exporting images in this Getting Started video.
Create more whimsical worlds with Victoria Siemer: Additional Dimension tutorials
Victoria has done more amazing work with Dimension, and has created additional tutorials to help you do the same. Head over to her site, using the links below, to learn how to create your own whimsical worlds using her style.
- Making portals in Adobe Dimension (Part 1: Nighttime) – Victoria shows you how design an otherworldly nighttime landscape.
- Making portals in Adobe Dimension (Part 2: Daytime) – Victoria shows you how to design a similar daytime scene.
- Glow up with Adobe Dimension – Victoria shows you how turn a realistic, real-world scene into something full of glowing discovery.
Keep experimenting with your sci-fi landscape
Mix up the materials, lighting, and backgrounds to make new geometric reflection landscapes with the same models! To learn more about her and see more of her work, check out our full profile of Victoria Siemer.
We love seeing and sharing your incredible 3D designs. When you’re sharing your designs on Instagram or Behance, don’t forget to tag them with #AdobeDimension, and on Behance be sure to select Adobe Dimension under “Tools Used.”
