A semi-surreal 3D tutorial: Leaves on Water with Mue Studio
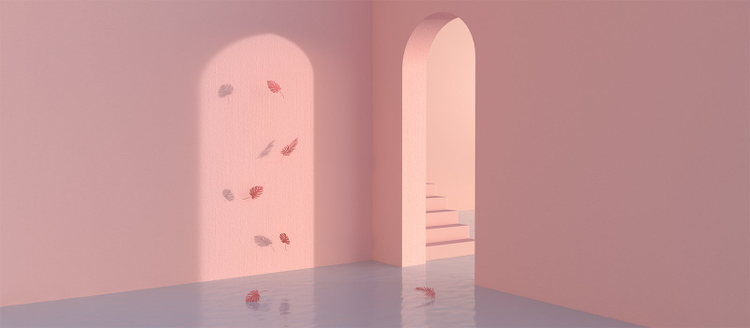
Leaves on Water by Mue Studio.
When Adobe Stock announced its Design Trends for 2020, the world was a different place. In some ways, we knew what we would wake up to each day and our sense of calm and peace were defined by a different cultural context. Today, the world is different. We are different. But that need – the need to find peace, calm and courage while weathering a multitude of storms is more of a necessity now than ever.
One of the trends for 2020 is that of Semi-Surreal – a movement guided by a dream-like, fantastical look at the world. Colorful, engaging and tactile in nature, semi-surreal provides people with a temporary place to escape from reality and the ability to see the things in a different light. At a time when we, as a culture, are struggling to make sense of the world and our place in it, there is a critical need for people to experience something magical, something beautiful and to try to find a serene moment away from the hardships of our current reality.
With this in mind, the Adobe Stock 3D and Dimension teams have partnered with Minjin Kang and Mijoo Kim of Mue Studio to create a set of tutorials and creative works centered around this trend. In this first installment, using free assets from the Adobe Stock Semi-Surreal collection, Mue Studio will take you through a multi-part Dimension tutorial, resulting in a set of three in-progress scenes that leverage soft color palettes, a minimalist design aesthetic, and a final work that encapsulates the serenity of the semi-surreal trend. Join us on this creative exploration and see what is possible.
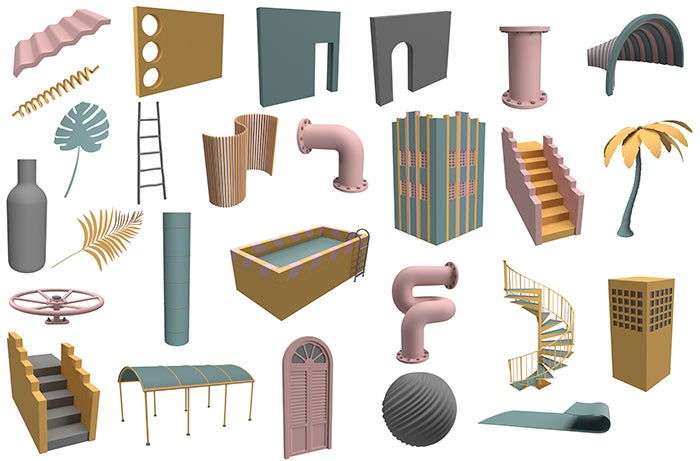
Free Semi-Surreal 3D collection on Adobe Stock.
Leaves on Water Tutorial: Placement and Composition (Part 1)
Step 1: Position the main walls
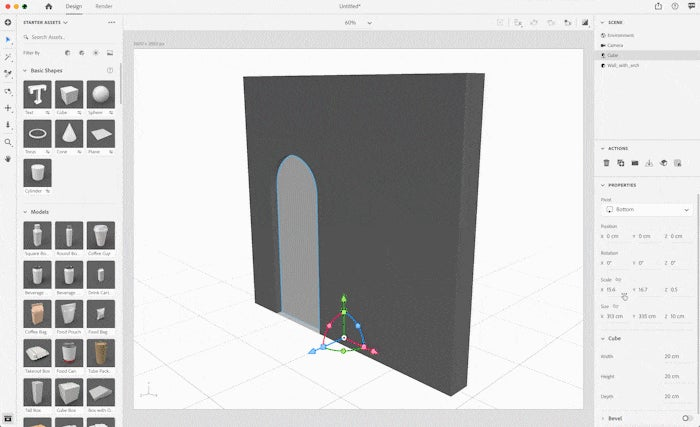
- Start by making your canvas 3,600px x 2,880px. Select Fit Canvas to view your entire working space in Dimension.
- From the Dimension Starter Assets Panel, under Basic Shapes, drag and drop the Cube. Change the size to 313, 335, 0 cm (x, y, z) and rotate y to –90 degrees. In the Scene Panel, rename Cube to Left Wall.
- Press “F” to reposition your scene.
- Add the Arched Wall from Adobe Stock (ID 348972037). Change the size to 365, 335, 30.48 cm.
- Select both assets from the Scene Panel, and under the Action Panel, choose Align and Distribute. Then click Align Min Z and Align Min X from the canvas controls.
- Change the position of Left Wall to -179.6, -0.3, 172.8 cm and Arched Wall to 0, -0.3, 1.9 cm. You now have the main walls lined up for the start of your semi-surreal scene.
Step 2: Add the staircase, floor and back wall
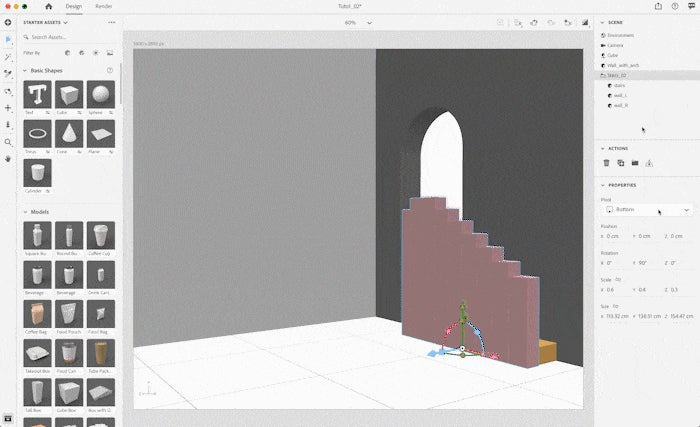
- You now need to position your scene. Select Camera from the Scene Panel and change the Field of View to 45 degrees and the Camera Position to 349.8, 117.3, 410.1 cm. Be sure the Rotation is -1, 55, 0 cm.
- Add the Stairs from Adobe Stock (ID 348972381). Be sure Size is unlocked and scale the asset to 113.32, 138.51, 154.47 cm. Rotate y to 90 degrees.
- Select the Stairs from the Scene Panel and open the folder. Select and delete wall_L and wall_R.
- Position the Stairs to -214, -0.3, -57 cm to nestle these behind the Arched Wall.
- From the Assets Panel, add the Plane from Basic Shapes. Change the Size to 2,400, 0, 2,400 cm and Position at -124.5, 0, 260.5 cm. Rename Plane to Floor in the Scene Panel.
- With Floor selected, press Duplicate from the Action Panel to create Floor 2.
- For the second floor, change Rotation z to 90 cm and Position to -479.1, 250, -555.3 cm. Rename Floor 2 to Back Wall. You now have the entire interior space of your scene.
Step 3: Bring in the leaves
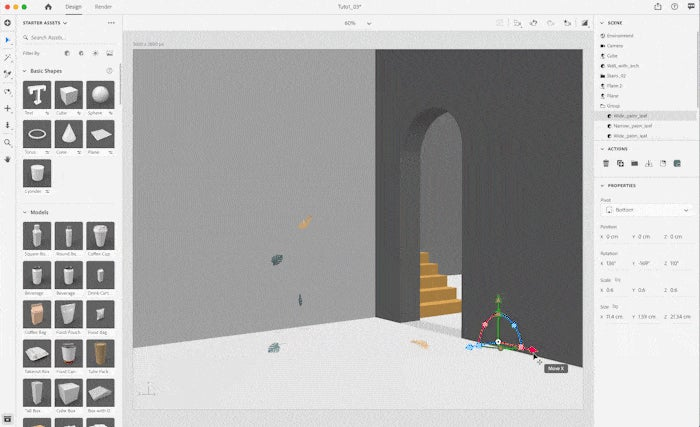
- Add the Narrow Palm Leaf (ID 348974187) and Wide Palm Leaf (ID 348973236) from Adobe Stock. If you would like to create your own version of this scene, be sure the Size is unlocked on both these assets, and then scale, position, duplicate and move the leaves around the scene until to your liking.
- If you would like to follow the same design as Mue Studio, duplicate the Narrow Palm Leaf two times and the Wide Palm Leaf three times. You can then use the chart below to position and scale each asset accordingly.
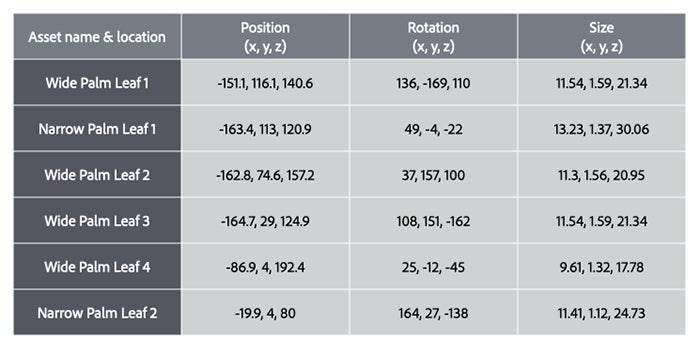
Step 4: Render the Leaves on Water scene (scene 1)
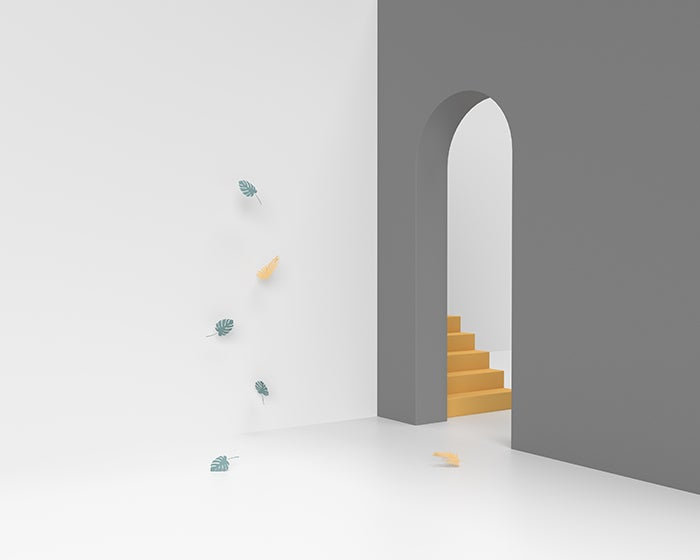
- You have now completed the first part of the Semi-Surreal tutorial for Leaves on Water. In order to see your final work, select Render from the Task Bar, select the quality and file type, and then click Render.
- You can choose to move onto the next part of the tutorial now or come back later and discover how to use 3D lighting techniques to enhance your scene.
Leaves on Water Tutorial: Camera and Lighting (Part 2)
Step 1: Use a camera bookmark
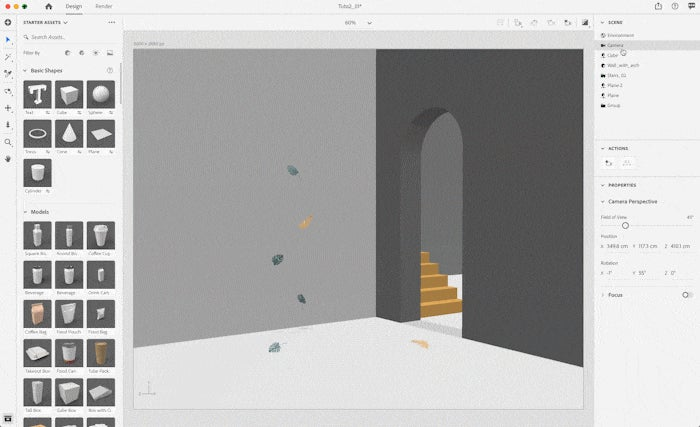
- It is now time to add a Camera Bookmark. Select Camera from the Scene Panel. Be sure Field of View is 45 degrees and Camera Position is 349.8, 117.3, 410.1 cm. Also check that the Rotation is still at -1, 55, 0 cm.
- Select the Camera icon, add a bookmark, and add a name for the view.
Step 2: Add natural lighting
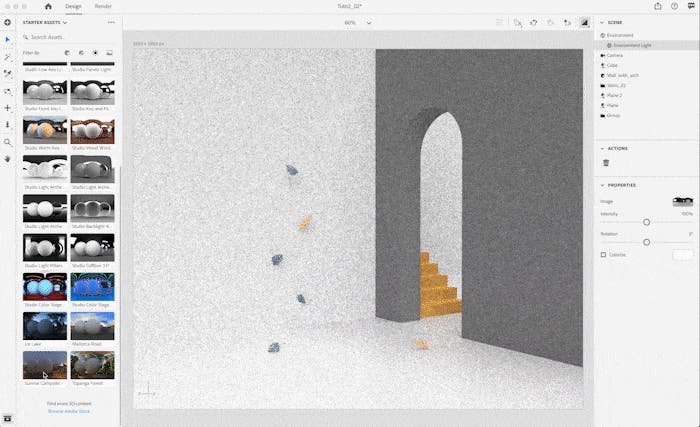
- It is often best to work with lighting in Preview Render mode to better visualize the changes. In order to do so, select Show Render Preview.
- To achieve the beautiful effect of light streaming through the open doorway, select Sunrise Campsite from Environment Lights in the Assets Panel.
- Set the Intensity to 103% and the Rotation to 9 degrees.
- Next, to intensify the light, select Environment from the Scene Panel and set the Global Intensity at 200% with Rotation at 7 degrees.
Step 3: Enhance the lighting
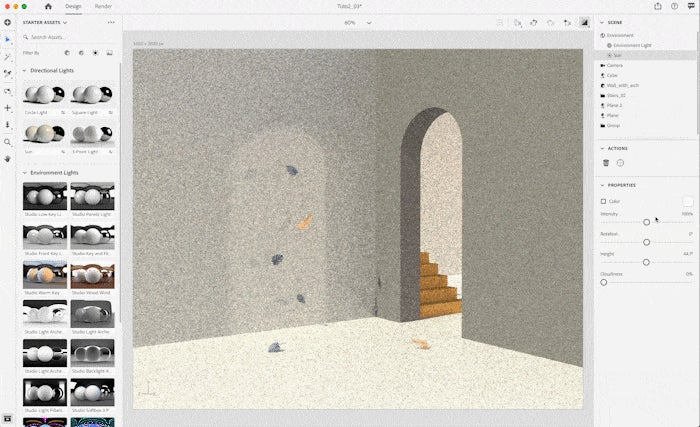
- As a last step, to create an overall warm, welcoming light, add Sun from the Directional Lights in the Assets Panel.
- Set the Intensity at 16%, the Rotation at 0 degrees, the Height at 7 degrees and the Cloudiness at 52%.
Step 4: Render the Leaves on Water scene (scene 2)
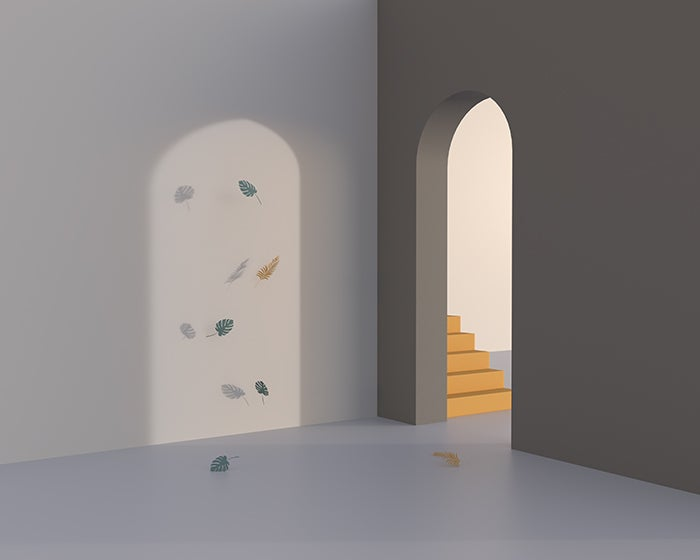
- You have now completed the second part of the Semi-Surreal tutorial for Leaves on Water. In order to see your work, you can create an in-progress render at this time.
- You can choose to move on to the final part of the tutorial now or come back later and discover how to add and enhance both materials and colors.
Leaves on Water Tutorial: Materials and Colors (Part 3)
Step 1: Enhance the interior elements
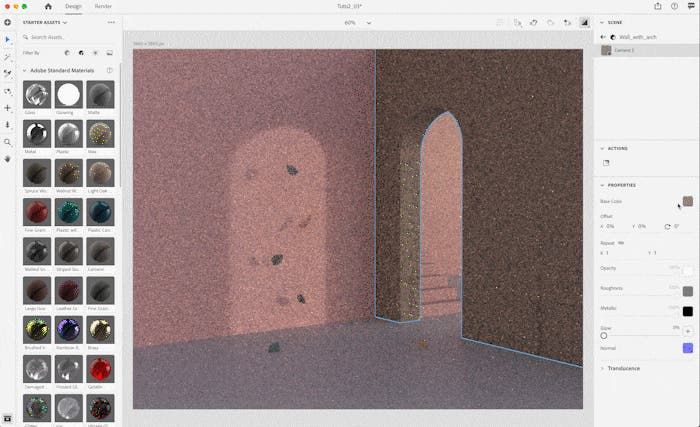
- Add the Cement Material from the Adobe Standard Materials section of the Assets Panel to the Left Wall and the Arched Wall. This can be done by dragging/dropping the material onto the asset or by selecting the asset from the Scene Panel and clicking on the material itself.
- Navigate to the material for the Left Wall in the Scene Panel, and under Properties, change the color to RGB 255, 204, 204. Change Repeat for x and y to 10, 10. Complete the same step for the Arched Wall but change Repeat to 5, 5.
- For the Stairs, change the material Base Color to RGB 217, 182, 182.
- Finally, for the Back Wall, change the Base Color to RGB 209, 167, 167. You now have your soft, pastel environment in place.
Step 2: Add a water effect
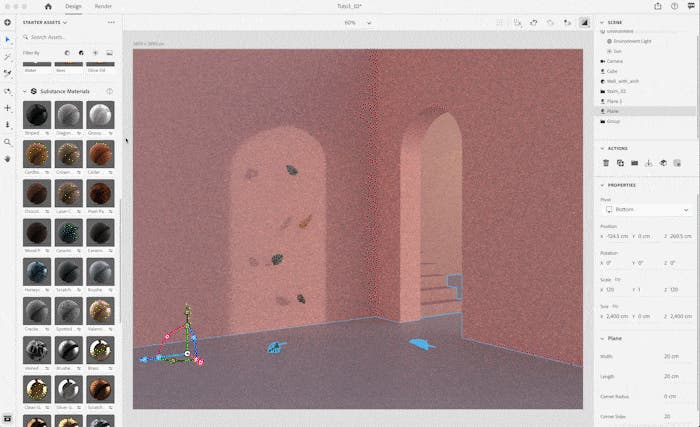
- To give a rippled water effect, add Glossy Paper from the Substance Materials section of the Assets Panel. Under the Material Properties, change the Color to RGB 197, 210, 214.
Step 3: Adjust the leaves
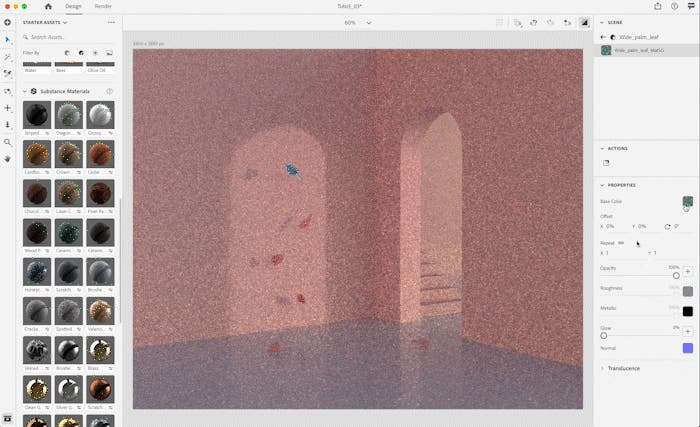
- Finally, update the Material Properties for each of the leaves to give them a rich, pastel tone. Change the Base Color on each leaf to RGB 237, 142, 142.
Step 4: Render Leaves on Water scene (final scene)
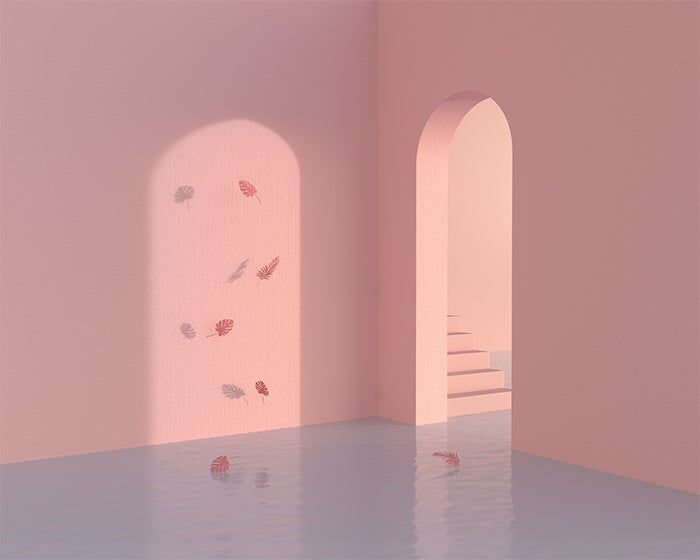
- You have now completed the third part of the Semi-Surreal Leaves on Water tutorial. To see the results, you can now make this final render.
- As a finishing touch, you can take your layered PSD file from Dimension into Photoshop and add a little post-processing polish.
Mue Studio will be joining us again soon to give more insights into their creative history and to take us all through another amazing Semi-Surreal 3D tutorial. Until then, don’t hesitate to take this work in a new direction and find your own sense of peace through the creative exploration.